Chapter 7
5 Ways to Make Eye Contact With an Invisible Virtual Audience
Is there even anyone on the other side of the screen?
That’s a very fair question, and a feeling we all have when starting a virtual presentation. Sure, you can look at the participant count to feel better about it, or to feel terrible that there are only 23 people watching—8 of whom will be doing other things while you yammer away.
Optics of attendance aside, there are still real people expecting you to put on a show, and put on a show you need to do. You should pretend there are 10,000 people watching (unless that image scares the crap out of you), and aim to deliver the performance of a lifetime, every time you step on the virtual stage.
We owe our audiences maximum energy and maximum effort for giving us the privilege of their time and attention.
Here are five ways to better connect with your audience via your magic video-transmitting webcam.
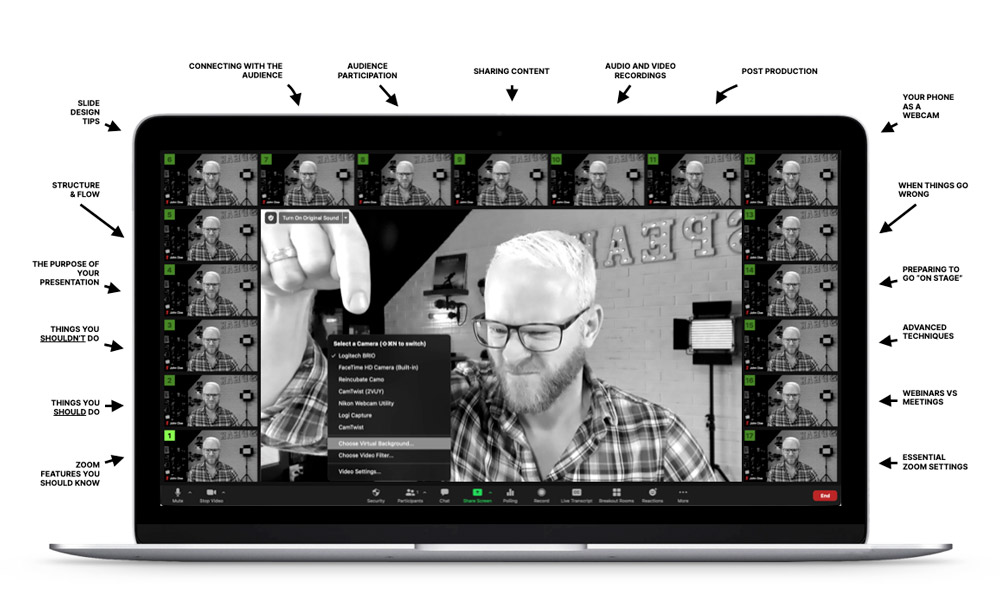
#1 Know your material inside out so you can stare at your slides less
In an ideal world, your peripheral vision is all you need in order to know what slide you are on, freeing you to look directly at the camera, perhaps with a slight glance down once in a while. The more you practice, the closer you get to this ideal.
You can make your downward glances appear more natural if you gesture as if you are thinking when you do it. We often divert our gaze when trying to recall something so it’s a perfectly natural sight. Practice this technique so you know how it feels to do it.
More practice = more time spent making direct eye contact.
#2 Use a rear-position second monitor
A common office setup is to have an external monitor connected to your laptop, with the webcam mounted to the monitor. And you can leverage this setup for better eye contact.
Simply move your monitor and webcam to a table 4-6 feet away from you (longer cables needed). Now when you look at your slides on the monitor, the angle of view difference between your slides and the webcam is flattened greatly giving the illusion of more direct eye contact.
If you don’t have an external monitor, you can still do it with your laptop as long as you have a bluetooth keyboard and mouse, or a remote clicker. For a clicker I highly recommend the Logitech R800 which you can by on Amazon here (affiliate link). It has a timer on it, and buzzes when you are five and two minutes from your allotted time.
A second monitor is still the better option as the screen will be much larger than your laptop so you’ll still be able to read your slides :D
It’s a brilliant setup you’ll enjoy using.
#23 Mount your webcam on a tripod instead of your screen top
Another simple hack is to place your webcam smack dab in the middle of your view path, on a little tripod on your desk. That way you are essentially staring straight through the webcam to see your slides, and because webcams are small it won’t interfere too much with the quality of your view.
Ideally you have the space to move your screen back a bit so it’s not right in your face. You can fudge this by sitting on the short side of your desk, or if you need to maintain your background view, just rotate the desk 90 degrees.
#4 Sit a little further away from the camera
One of the simplest techniques is to scoot your chair back a bit—again you will need a remote clicker. The further back you go, the more it will appear as if you’re making direct eye contact.
#5 Present standing up
The gold standard of virtual presenting. If you stand up (using a remote clicker and wireless microphone) you will easily be far enough away that when looking at your slides, you’ll appear to be looking at the audience.
Chapter 8
How to Use Audience Participation to Make a Zoom Presentation More Interactive
Audience participation is a really fun way to increase engagement, especially when they are sitting right in front of you in real life.
However, when you’re presenting on Zoom, not only is the audience invisible, but they’re completely silent. Fortunately Zoom has some features that can help. I discussed the non-verbal feedback features earlier in the guide.
By default your participants can only express a few reactions, such as clapping and thumbs up. In order to unlock the full set you need to allow the extra “Non-verbal feedback” setting (Zoom help doc).
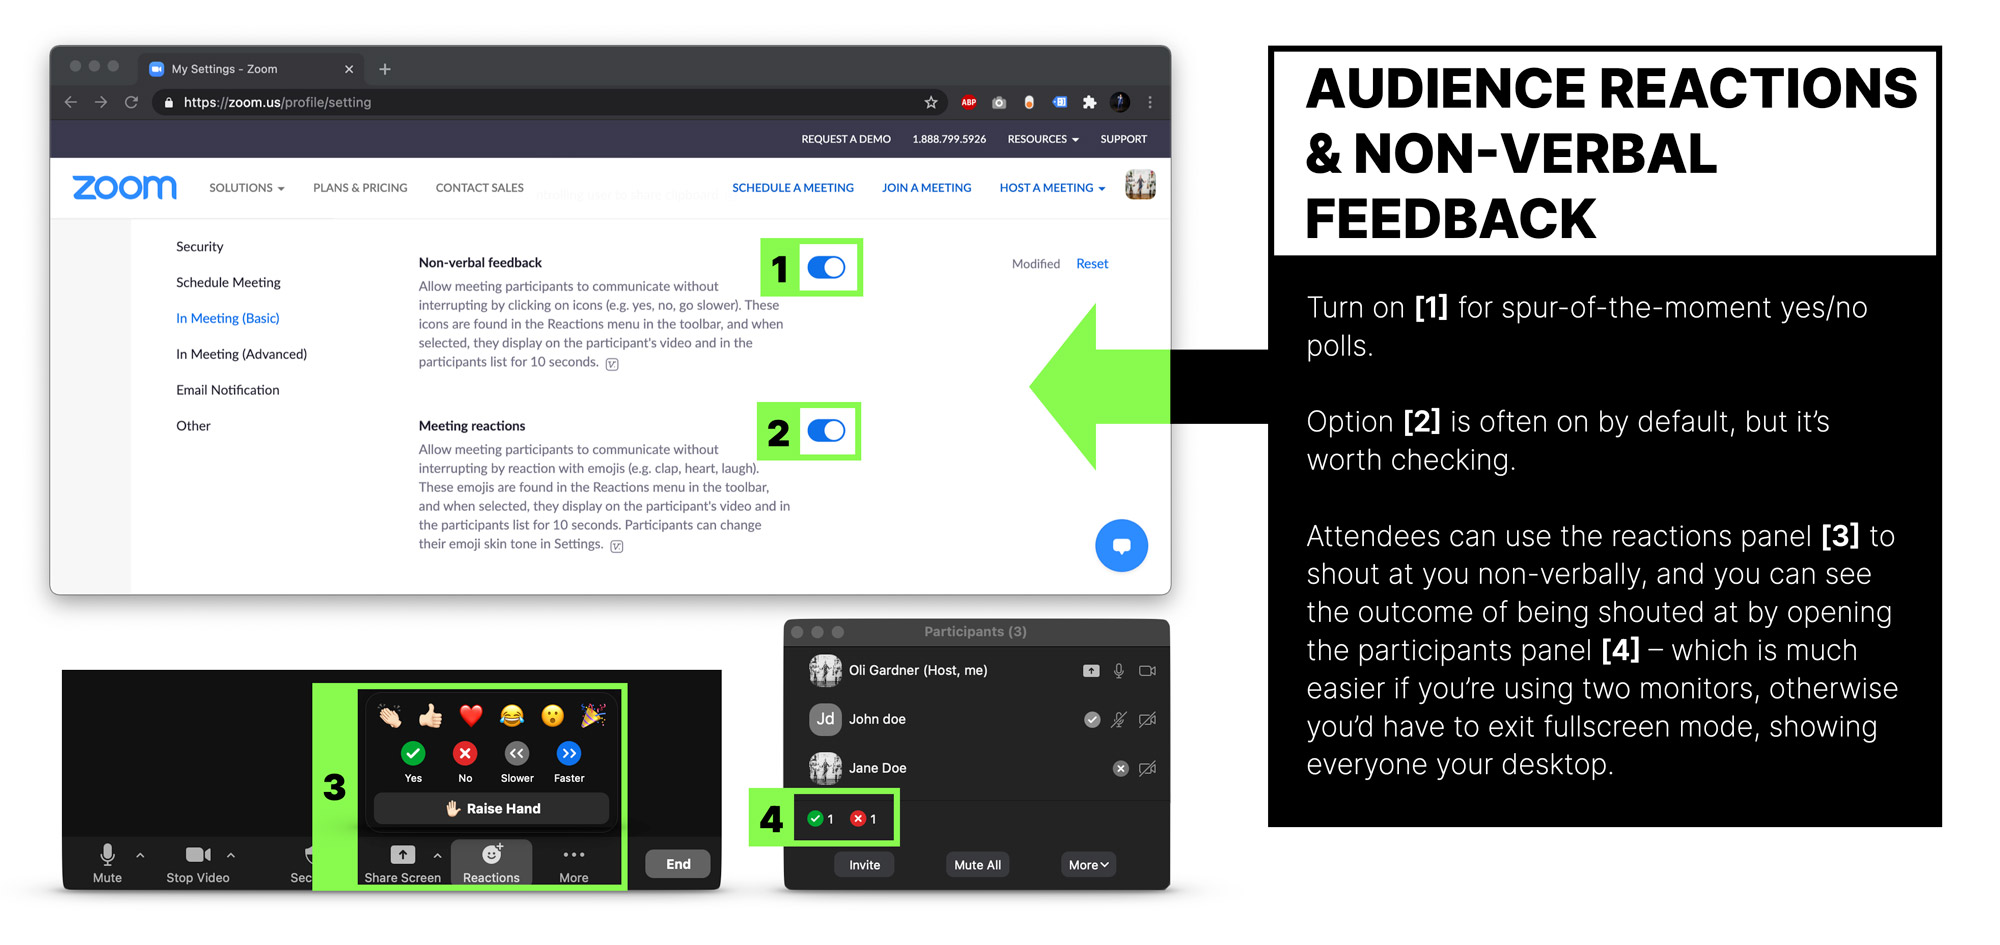
In order to see people’s reactions you need to be looking at the participants window. You can see individual reactions beside their name or a tally of the totals at the bottom. This is what you really want to pay attention to.
It’s important to know that these reactions only last for a few seconds, so it’s hard to get a truly accurate number as the counts will grow and shrink as each person’s reaction times out (or they turn it off).
Knowing this, it’s best to use the numbers as a rough gauge and try to get people to answer all at the same time.
The secret to getting people to answer an audience participation question at the same time, is to use a warmup question to show them where the feature is and how it works so you can call on them when you want and they’ll know how to participate.
And the very best way to do this is of course the QTINTA technique. You can read the complete post about QTINTA questions here, or watch the video below.
Types of audience participation you can do in a Zoom presentation
There are several options for how people can react, but they’re not all useful for audience participation. I recommend using “Raise Hand”, “Yes”, and “No”.
Asking a Segmentation Question – “Raise your hand if…”
When speaking in front of a crowd you can see, it’s easy to get a quick visual estimate of the % of people raising their hands, but with Zoom you need to be prepared to do some quick math.
You can see the number of attendees at the top of the Participants window, and my advice is to round the number up or down to the nearest 10/50/100 to make the math easier for a % calculation.
For example, if you have 138 participants just call it 150. Then if you ask them to “Raise (Your) Hand” if you’ve ever looked up at the sky while wearing your PJs, and 53 people raise their hands, you can call it 33% or 1/3.
You don’t want to be looking up and to the left while scratching your head (take a second and try that with me #AudienceParticipation) while you struggle with your division skills.
As long as you use the same rough number throughout you’ll have decent comparative results.
Alternative approach – “Who has? Yes or No.”
Another way to ask a segmentation question is to start it with “who has” and end it with “yes or no”. This gives you two answers that are easy to compare side by side.
For example: “Who has been to the moon? Yes or No.”
It can be hard to train yourself away from saying “Raise you hands” but if you want more than one answer you need to resist the urge and go with “Who has, yes or no.”
Chapter 9
The Best Tips for Sharing Content in Your Zoom Presentation
Whenever you share content in your talk (PDFs, websites, tools, videos, other resources etc.), you need to make it easy for people to take note of the URLs. There are a few ways you can make this easier for people.
#1 Use a landing page to share your slides and all of the tools and resources you mention in your talk
If you’re not familiar, a landing page is a standalone web page intended for a specific single purpose. By standalone I mean that it’s not connected to your website via the traditional navigation menus.
Your presentation landing page is where you place all of your resource links, including a link to download the slides. This is the very best technique for sharing content as you can update the page at any time, either to fix a problem or to add more resources. You can see an example below:
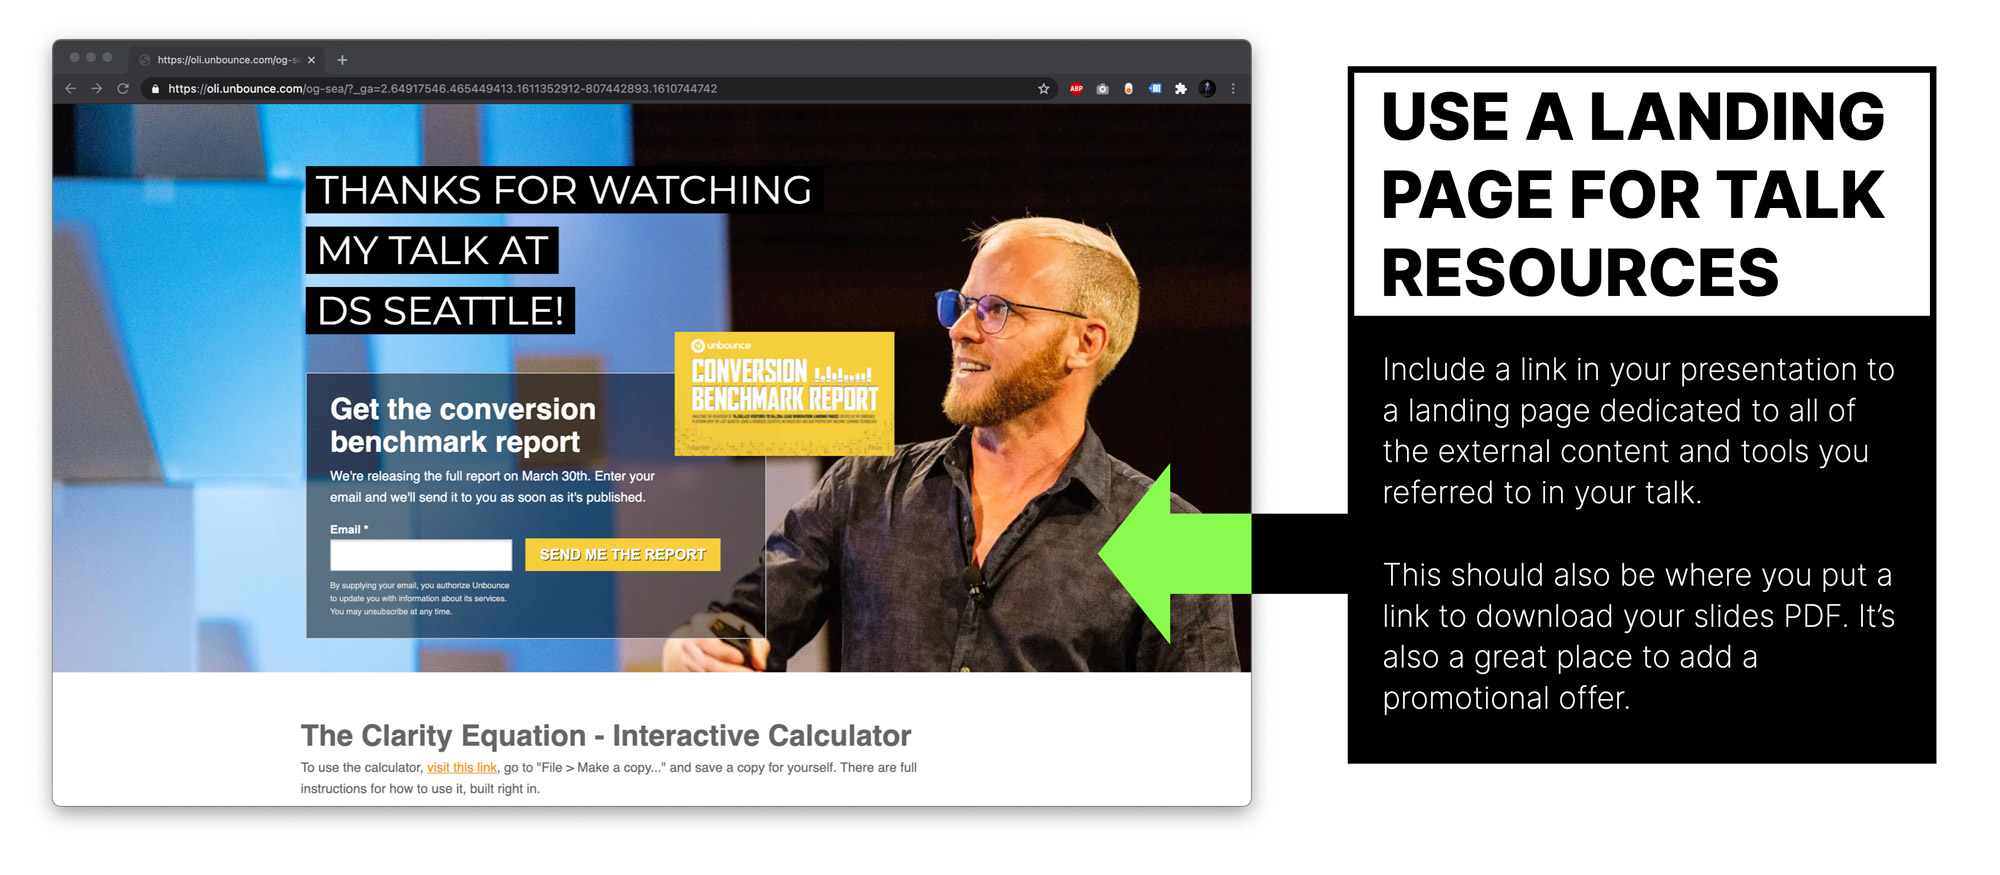
I built this landing page with a software platform called Unbounce. Disclaimer, I’m a co-founder of the company, but it is the easiest way to get a landing page up quickly.
If you have a website already, another easy option is to add a new page there. I would just make sure not to make it part of the navigation of the site as you only want people who have the link to be able to go there. In part because it’s nice to be able to see how many people visited from the event. Unbounce will show you this directly, or you can look in Google Analytics for your website if you have it set up.
#2 Use a URL shortener for sharing links in your slides
URL shortening services such as bitly.com allow you to take a long URL and convert it into a short URL which makes it easier to read, remember, and write down. A rookie slide design mistake is to include the full URL on a slide when mentioning a tool or resource for the audience to check out, and moving to the next slide without sufficient time for them to make a note of it.
For example, you could take https://bethekeynote.com/guides/virtual-presentations-on-zoom/ and shorten it to http://bit.ly/ultimate-zoom.
If you forget to do this and find yourself with a long URL on a slide, you can suggest that the audience take a screenshot or photo of the slide as an easier way to remember it.
#3 Help people to share your important slides
There’s an art to designing slides that are highly sharable and Tweetable and there are smart techniques for encouraging folks to take action.
If you’re presenting on a real stage, really important slides—interesting data or a great process diagram—can provide instant feedback that it’s a desirable slide because you’ll see people take out their phones to take a photo. You can then take this insight to pause and give people enough time to take their photo, knowing that next time, this is a slide worth extra emphasis.
With an invisible Zoom audience, you need a different approach. You need to actively suggest the action you want. For example, you can say something like “I can pause here for a moment if anyone wants to take a photo or screenshot of this slide.” Make sure to have your social media handle(s) on the slide, so you can check it out after your talk to see if people were actively sharing and engaging with it.