Chapter 15
Advanced & Creative Zoom Presentation Techniques
Part of becoming a better presenter is about learning new and more advanced methods. The following tips will do exactly this by teaching you a deeper technical understanding of giving virtual Zoom presentations.
#1 Use a second/proxy host so you can easily restart Zoom if you’re having issues
If you’ve used Zoom a lot–rhetorical statement–you know that sometimes your connection goes funky, and the only way to fix it is to restart Zoom
If you’re in a meeting it’s no big deal. The only thing you’ll miss is people making fun of you while you’re gone. If you’re an attendee at an event, the worst that’ll happen is you miss a few slides.
But if you’re the host/speaker, and you created the meeting yourself, ending the meeting can mean kicking everyone out, which means they have to go and find the invite link or ID again, which they might not be able to find or might not bother.
To keep the session alive when leaving, you have to assign host duties/permissions to someone else. The key is to click “Leave Meeting” as opposed to the big shiny red “End Meeting for All” that we’ve all been trained to click.
You have two options of who to assign host duties to:
- The event organizer: with this option you leave, re-enter, and then you have to ask them in the chat to re-assign control to you, yada yada it’s a giant pain in the ass and breaks the flow and quality of the experience for everyone – not to mention throwing you off your game – especially if you’re a fairly novice speaker. Pas idéal.
- Version 2 of yourself – the proxy host: this method uses a second proxy account set up in advance as your co-host.
What’s a proxy co-host?
A proxy co-host is a second Zoom (free) account you have open on your phone/tablet/second PC, that you can assign as the host, reboot Zoom or your machine if needed, and re-assign, all without talking to anyone or trying to wrangle it with the event organizer.
An important caveat is to only use this method if your attendee count is below the threshold of a free account (100 at time of writing). And when you log back in, you should re-assign control to your main account right away as the free account has a 40 minute time limit.
Note: in order to assign a co-host, you need to enable the feature in the Zoom web app.
More important note: while it’s easy to do, you should practice doing it.

#2 Use Bitly with your Personal Meeting ID (PMI) to create a branded talk link
When you’re sharing the link to your presentation, you can make it look less like a meeting ID, and more like an invitation to an event by creating a custom shortlink from a service such as Bitly.com.
For example: If your talk is called “The Ultimate Guide to Presenting on Zoom” you could follow the steps below to create a talk-branded link:
- First, you need to set up your Personal Meeting ID which I covered in the Zoom features list in Chapter 1.
- Start a new Zoom meeting and check the “Use my Personal Meeting ID (PMI)” box. the reason we’re using the PID is because it’s the only meeting ID that is persists after a meeting ends. Regular meetings are a one shot deal and the ID is toast when the meeting is over.
- Get the Invitation URL via the “Copy Invite Link” button. Or if you’ve turned on the “General > Copy invite link when starting a meeting” setting in Zoom preferences, it’ll already be in your clipboard.
- Visit bitly.com and create a shortlink.
- Edit the short link to customize the URL. I like to preface all of mine with my initials to increase the odds that the customized link is available. And also because my initials are OG :D
- Now you can share your customized link in all of your marketing for the event.
Another benefit of this approach is that if the sessions crashes or you have to restart for technical reasons, it’s going to be the same URL for people to get back in.
Important: Once your event is over, you should delete the shortcode from Bitly.com so the redirect it uses will no longer function, preventing random visitors in the future.

#3 Customize your Personal Meeting ID for faster recall
Paid Zoom accounts allow you to customize your PID. It still has to be 10 numbers (no letters or special characters), and it does need to be unique to you, so try to find something you can recall easily in a pinch. It’s very handy to be able to rattle it off in the chat if you need people to copy and paste to reconnect.
I like to use my phone number with one or two numbers changed. I do this when I’m filling in forms too so I have a set method for how I change it.
#4 Have a landing page with links to any videos in your slides, your slides PDF, and any downloads for your audience
It’s common that your videos won’t play very well when using virtual presentation software like Zoom. A great way to mitigate this is to have a landing page (with a simple shortlink URL for easy sharing) that has your videos embedded in it.
You can mention this before you reach the first of your videos, and ask the audience to keep the page open for the duration of your talk.
Then, if you have video issues you can direct people to the landing page and ask them to watch the video by themselves.
Be sure to know how long your videos are so you can give people that much time plus a few seconds as a buffer.
Hat tip to Michael Aagaard for this tip.
#5 Use a clicker and lav microphone to present while standing up
I’m going to drive this point home again as it’s probably the single biggest leap in energy you can make in your virtual presentations.
When you treat your virtual presentation like an on-stage gig and present standing up, you are naturally more energetic than when sitting behind a computer. You also have the added bonus of being able to practice your stage presence and footwork.
In order to use this technique you need a few things things:
- A remote clicker: The best clicker to get for this purpose is the Logitech R800.
- A wireless microphone: Wireless lavalier mics are your best bet here, but avoid the cheap ones as they’re all garbage. In my tests, the lowest price option with great audio quality is the Rode Wireless Go.
- An audio interface to patch the microphone through to your computer Try the Focusrite Scarlet Solo (affiliate link).
It’s definitely a $$ commitment, but I guarantee you’ll love presenting this way, and the benefits far outweighs the cost if you present often, and more importantly, if you’re going to make your own pro-quality recordings of your talks.
I did a full video review of the available microphone options in chapter 10.
Give it a trial run. You can order a clicker, mic, and audio interface from Amazon and return them if you don’t love it (check the return policy).
An alternative way to present standing up—albeit standing in place—is to present from a standup desk, this allows you to have a little bit of free movement and will still give you more energy compared to being seated.
Chapter 16
The Difference Between Presenting Using Zoom Webinars vs Zoom Meetings
While you might give a lot of presentations using the regular Zoom Meeting software–for internal company presentations or pitches–at larger virtual events, the software used will most likely be Zoom Webinars (or another platform entirely such as GotoWebinar, Webinar Jam, or Livestorm).
The two platforms are fundamentally the same except that the Webinar platform is designed for large audiences and has fewer audience interaction features.
Here’s a breakdown of some of the features of Zoom Webinars that you need to be aware of as a virtual presenter. You can read more about the differences on the Zoom website.
- User Roles
Zoom Meetings only have two roles, host/co-host and participant (attendee), whereas Webinars add Panelists which are essentially the same as a host, just with a few less permissions. They’re useful if you are running a session with multiple speakers or hosting a panel.
- Audience size
Meetings are limited to 100 for the free account and 1,000 for a paid plan. Webinars can host up to 100,000. Oh how I wish I had an audience of 100,000!
- Audio
In a meeting, attendees can mute and unmute themselves to join in the conversation, whereas in a webinar this is only available to the host/co-host and panelists.
- Attendee list
In a webinar this is only viewable by the host/co-host and panelist.
- Non-verbal feedback
Not sure why, but in a webinar the available options are limited to raising your hand, so you can’t do the yes/no type audience interactions I discussed in chapter 8.
- Polling
Both allow you to create up to 25 single or multiple-choice polls per session.
- Breakout Rooms
Only available in meetings.
- Q&A
This is a webinar-only feature that allows attendees to ask questions throughout the presentation. The hosts can answers these as they go and attendees can answer each other’s questions and upvote the ones they like. Typically, the host will keep track of the best and most popular questions and ask you them in a Q&A session at the end of your talk.
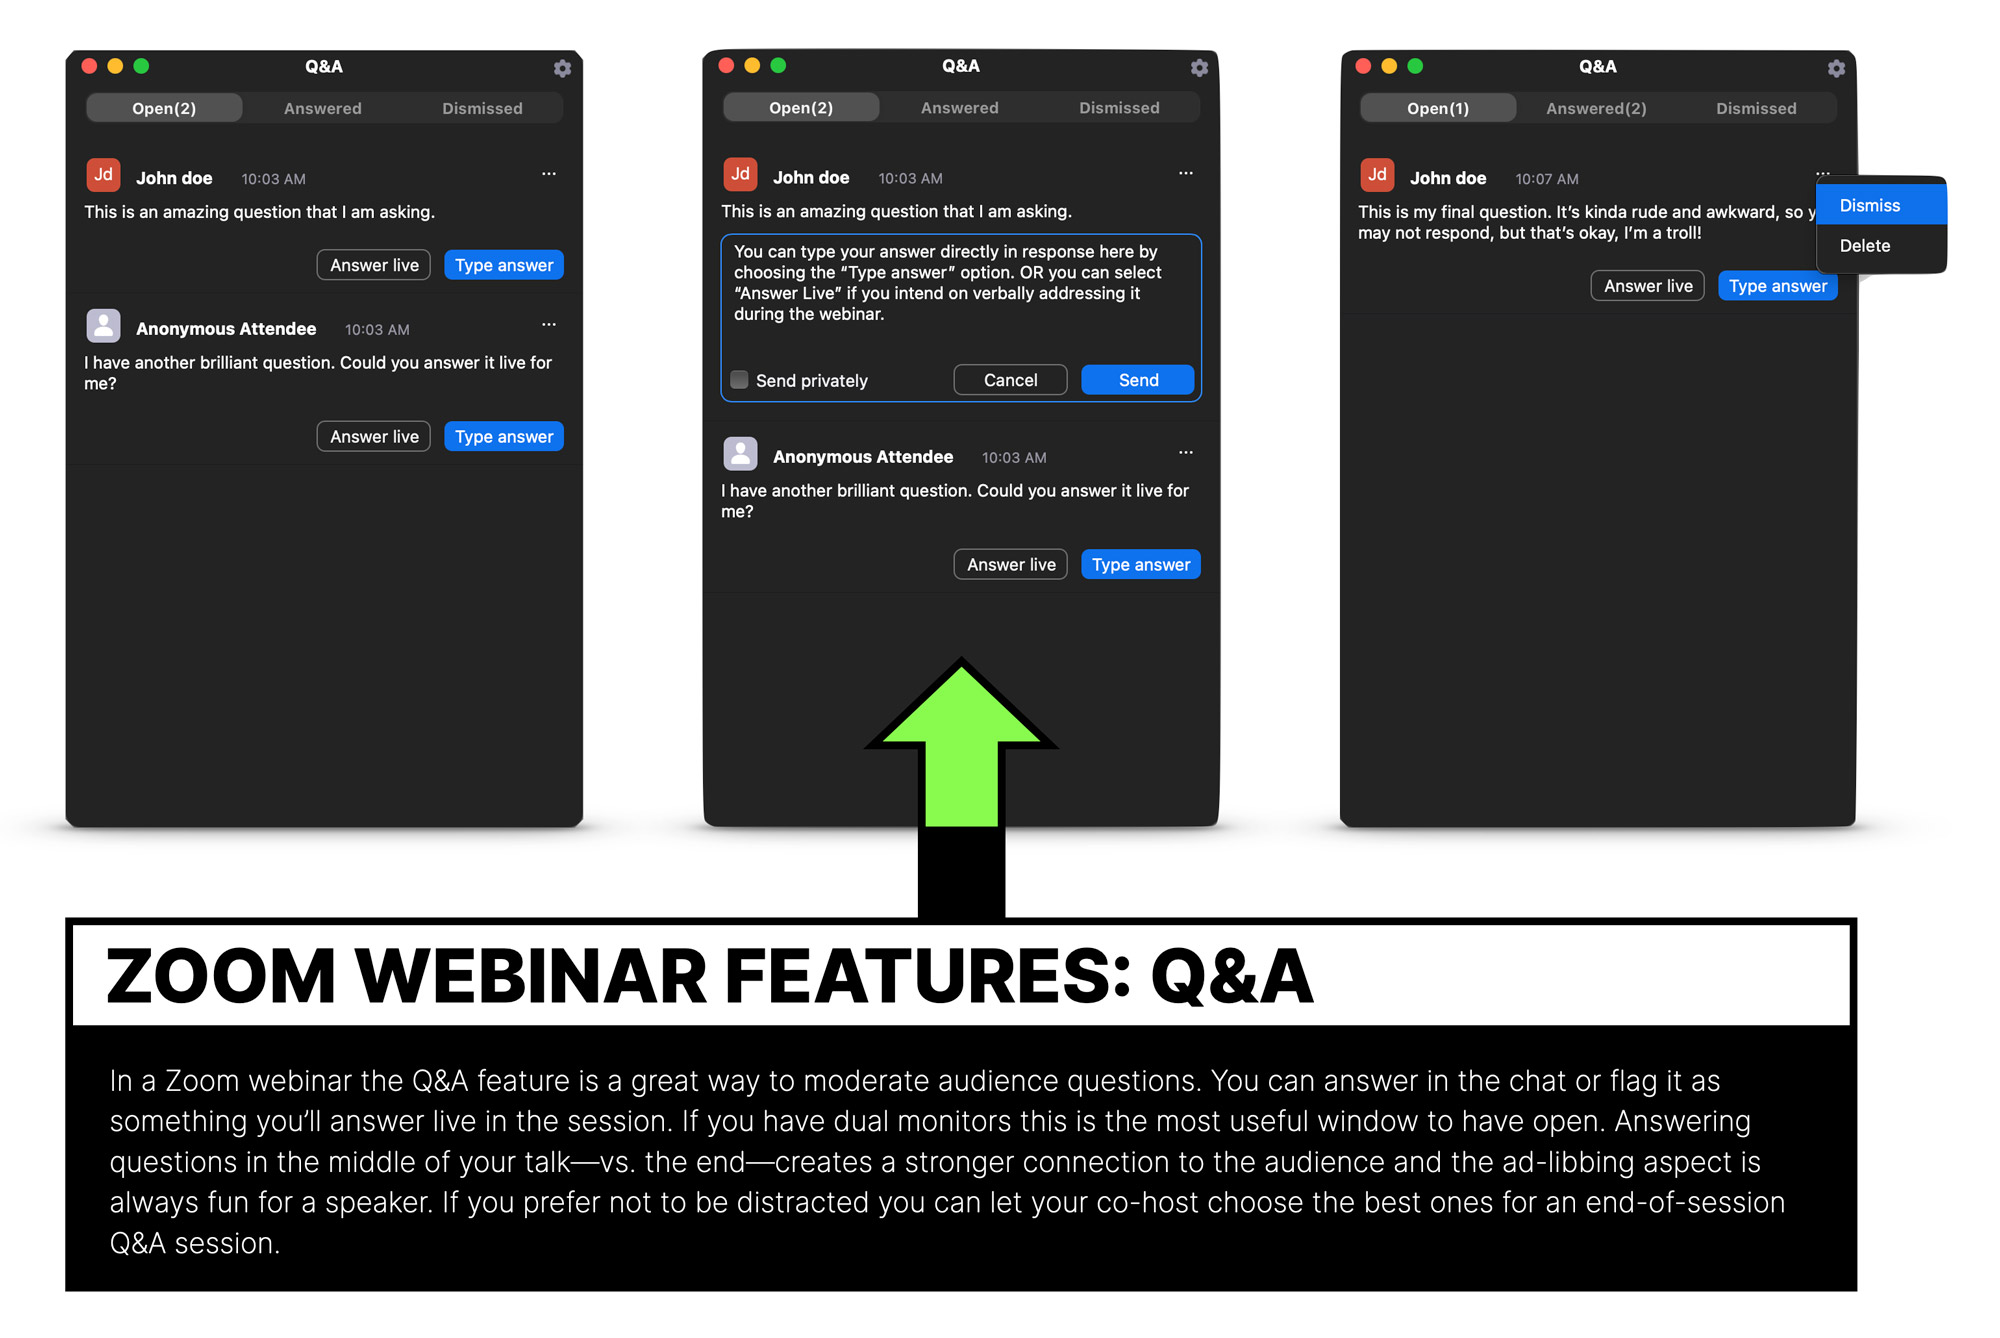 If you have the Q&A window open, you can type your response directly. A cool feature is that you can also answer live. When you click this button is marks it as such and you then respond to the question verbally in the presentation. Questions then move into the “Answered” tab to clear them from the interface. You can also dismiss or delete the question.
 - Practice Session
This is a fantastic feature that lets you test out your full your audio, video, and slide setup before the event. It’s common in some software that you don’t really get a true sense of how things will look until it actually starts, so this is a great way to put the speaker at ease and make sure the settings are all correct. You’ll have way fewer technical issues if you leverage this feature.
Chapter 17
23 Zoom Settings to Enable or Disable so You Don’t Mess up Your Virtual Presentation
Otherwise known as the 23 settings—out of Zoom’s grand total of 301 settings (I counted, manually)— you need to know exist because they may otherwise bite you in the ass.
It’s important to be familiar with Zoom’s settings (particularly the web portal settings) because that many of them don’t come into effect until you restart Zoom, so it’s too late to set them up if your session has begun.
So, consider this your gameday checklist, to use as your reference point for whenever you’re about to give a virtual presentation on Zoom.
Note: Settings that live in the Zoom app (104 settings) are listed as APP and those that can only be accessed from the logged-in Zoom web portal (197 settings) are listed as WEB.
Settings to Turn ON
#1 Co-host
WEB: Settings > In Meeting (Basic) > Co-host
This allows the host to add co-hosts, which is essential if you need to restart Zoom due to a technical problem. This lets you assign someone else up as a co-host as you exit the meeting. See the advanced tips section for a deeper dive into why you’d want to use this for a proxy co-host.
#2 Use dual monitors
APP: Preferences > General > Use Dual Monitors
If you are using dual monitors this feature makes it much easier than trying to wrangle where the windows go. It just works better than trying to fudge it yourself.
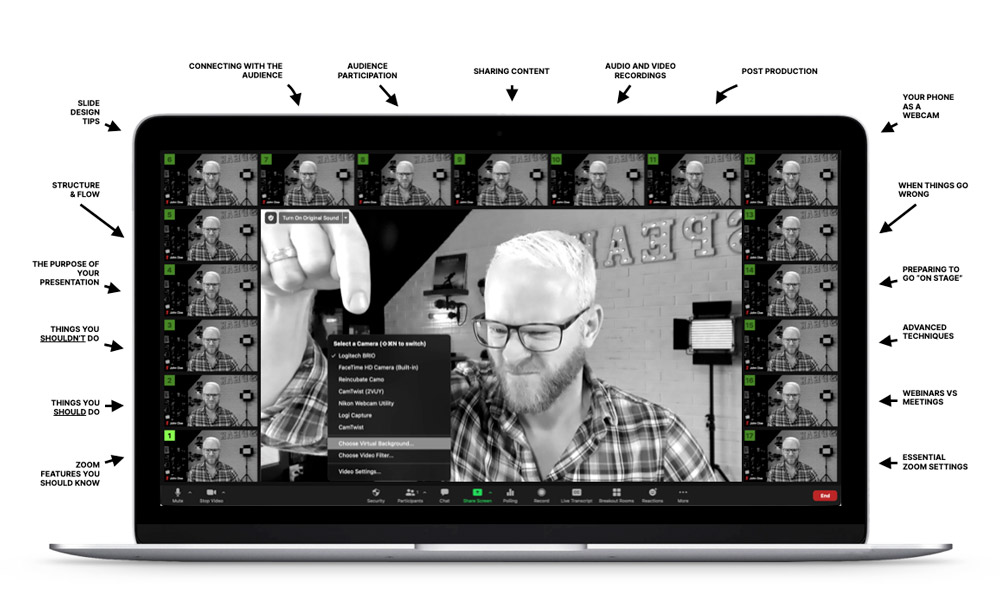
This is useful if you want to have your webcam/chat/Q&A/participant windows open, but not in the direct line of sight. This also makes it much easier to create a clean screen recording when you are recording locally without Zoom as you can remove everything you don’t want from the main screen.
#3 Touch up my appearance
APP: Preferences > Video > Touch up my appearance
This feature allows you to soften your appearance to give your skin a smoother look. Why not right? Everyone needs a little something to dull those tired eyes once in a while. Just don’t overdo it otherwise you’ll look fake and that’s not going to help you look professional. Just a wee dab of skin smoothing is all you need.
#4 Stop my video and audio when my display is off
APP: Preferences > General > Stop my video and audio when my display is off
If your screen is off, your intent is to be inactive, and you don’t want big brother to continue to broadcast. Unless you have a specific reason for having your display off, turn this setting on and leave it on.
#5 HD Camera
APP: Preferences > Video > Camera > [x] HD
Check this option to get a higher resolution view from your webcam. Chances are when you turn it on you’ll get a wider angle view that isn’t as zoomed in on your face. This is great because it gives you a larger area for physical presenting: gesturing with your arms, or standing up and moving. If you are having connectivity issues and your video is appearing glitchy to others, see if turning it off helps. But be aware of the difference in the visual, it’s not just the quality it’s the zoom factor.
#6 Optimize for 3rd party video editor
APP: Recording > Optimize for 3rd party video editor
If you’re going to use Zoom’s recordings (local or cloud) you should turn on this setting. It will give you a video file that’s more compatible with any editing software you use later on.
#7 Press and hold ‘Space Key’ to unmute
APP: Preferences > Audio > Press and hold ‘Space Key’ to unmute
This is an essential setting in general, but as a speaker it has a really big benefit if you find yourself in a multi-speaker scenario.
If you’re sharing the stage with another speaker, it can be nice to mute yourself to really give them the metaphorical stage as a professional courtesy. If it’s a back and forth conversation, Q&A session or AMA, don’t use it, but if the other person might be speaking for minutes at a time its’a smart move. You can sit at the ready to unmute yourself to interject when needed.
#8 Show in-meeting option to “Enable original sound” from microphone
APP: Preferences > Audio > Show in-meeting option to “Enable original sound” from microphone
If you’ve invested in some high-quality audio equipment, you will want to test this setting. Zoom by default does several things to audio to try to improve the quality, which is generally a good thing. But if you have great gear it will be better with this setting turned on so you can choose to use the pure audio from your sweet mic.
It’s worth testing “echo cancellation” within this setting if you have an echo’y room. In this instance, if you’re going to record your own audio separately, this setting will only impact the audience – in which case turn it on if it helps create a better experience.
#9 See myself as active speaker while speaking
APP: Preferences > Video > See myself as active speaker while speaking
It’s common when presenting to want to show your own webcam video window (to check you look awesome as you present), while hiding others. Doing this involves pinning your video and changing the view to single speaker. You can negate one step by turning this setting on removing the need to pin your video.
#10 Share Screen > Desktop
This is more of a selection than a setting, but it’s an important one. When sharing your screen to present, resist the urge to choose your presentation software’s direct window.
Instead choose desktop. This lets you share anything.
“But why not just share my presentation software?”
Great question. It’s because Zoom can get confused about where the active window is, throwing all sorts of error messages on the screen which can mess up your video recording.
Sharing your desktop also lets you pop into your web browser if you need to do anything online as part of your presentation, without Zoom deciding to not show it to the audience.
#11 Silence system notifications when sharing desktop
APP: Preferences > Audio > Silence system notifications when sharing desktop
This is a companion setting to the “share your desktop” setting. It’ll help prevent unwanted rings and dings that may emerge from other apps if you forgot to turn them off.
#12 Meeting/webinar polls
WEB: Settings > In Meeting (Basic) > Meeting polls
You need to turn this on if you want to be able to run polls during your virtual presentation. This is a classic example of a feature you either wouldn’t know about, or would be confused that it’s not in the app, if you didn’t know it was in the web settings.
If you’re using Zoom Webinars – there’s also a setting for “Webinar polls”.
#13 Webinar survey
WEB: Settings > In Meeting (Basic) > Webinar survey
If you’re using Zoom webinars, this can be a great way to gather some intel from your audience after the presentation. If you’re the one running the event it’s all in your control, but if not, work with the event organizer to see if you can run a post-event survey, then work on questions that will help you make your presentation better the next time you give it.
#14 Q&A in webinar
WEB: Settings > In Meeting (Advanced) > Q&A in webinar
If you plan on having a Q&A session at the end of your talk this must be on. You don’t want key interaction features to be missed as it will require you to reboot zoom for it to take effect after the fact.
Settings to Turn OFF
#15 Ask me to confirm when I leave a meeting
APP: Preferences > General > Ask me to confirm when I leave a meeting
This is the biggest compaint everyone using Zoom seems to have. The terrible click two buttons to leave a meeting while awkwardly staring down at the corner of the screen. Well no more!
#16 Automatically adjust microphone volume
APP: Preferences > Audio > Automatically adjust microphone volume
If you want to purposely vary your volume when speaking—something I highly encourage to raise or lower the energy level once in a while—this setting could mess with how it sounds.
A whisper presented at regular volume is just weird.
And if you’ve ever heard a comedian work the mic, where they move their head to the side to shout really loudly out of frustration or just for comedic effect, you’ll know how wonderful a technique it is.
The goal is to let the audience know you’re screaming super loud, while keeping the level the same. In this instance you don’t want Zoom to try to do something weird and mess with your intended outcome.
In general, I don’t like features that mess with what you’re trying to do, but as with anything, do some test recordings to see how you like it when it’s on or off.
#17 Feedback to Zoom
WEB: Settings > In Meeting (Basic) > Feedback to Zoom
This one is more about cleaning up the Zoom UI. Whenever you try to end a meeting, there’s a little checkbox asking if you want to provide feedback to Zoom. It’s annoying and almost never needed. I find that the cleaner the UI is, the faster you can work in Zoom, and the less likely you are to click something that can make you fumble as you exit. A minor point, but every little helps.
Settings to Turn ON or OFF – Depending on Your Mood
#18 Mirror my video
APP: Preferences > Video > Mirror my video
This is an interesting one that you have to try to see what you prefer. As the name suggests it lets you flip your video around so you appear as you see yourself or as others naturally see you. I find that when I’m gesturing with my hands, if I catch a glimpse of myself with mirrored video I get confused about which way I should be pointing. This is more of an issue when doing a screencast vs. a presentation, but it’s something you need to try for yourself as it’s kinda weird for everything to work backwards.
#19 Adjust for low light
APP: Preferences > Video > Adjust for low light
Test this to see how it looks. If your lighting isn’t great it will brighten the scene, but this isn’t always good as it will increase the ISO to do so, making it look more grainy. Check it out on a second laptop to see it from the attendee perspective and increase the size of the speaker vs slides window to see how you look when you’re big. It makes a difference. If it’s too grainy and doesn’t look flattering, add some lighting pointing at your face and you’ll be good without this setting.
#20 Suppress background noise
APP: Preferences > Audio > Suppress background noise
This is always on in an “auto” setting, with the option to manually set it to low/medium/high. This could be great or terrible. In other words you have to test it.
In general, audio features like this can function well, but they crush the clarity of the audio. To test it, make four recordings (cloud or local doesn’t matter) in the middle of the most typically noisy part of the day in your home.
For a good test you want to have a mix of you speaking quietly, loudly, and not speaking at all so you can hear a baseline level of silence.
Do it with each setting and compare to see which you prefer.
#21 Video Filters
APP: Preferences > Backgrounds and Filters
While I recommend you don’t use a Zoom background during a presentation, I do thing there’s merit to some of the more subtle video filters. Personally, I always turn on the first one in the list “Boost” as it adds some nice contrast and knocks the saturation back a bit which is good if you sometimes get flushed under pressure, or have a skin tone you don’t particularly like on camera. I tend to look too red for my liking so this filter helps me feel a bit better about my appearance on camera.
Note: this doesn’t stay selected. You have to re-select it for every meeting. You can access it via preferences, or from the “Stop Video” button’s dropdown menu—when a meeting is active—where you choose backgrounds and video settings.
You also need to turn the feature on in the web portal to have this feature show up in the app.
WEB: Settings > In Meeting (Advanced) > Video filters
#22 Non-verbal feedback
WEB: Settings > In Meeting (Basic) > Non-verbal feedback
Allows meeting participants to communicate without interrupting by clicking on icons (yes, no, slow down, speed up). This can be handy if you want to use these methods for less formal on-the-fly polls, or to see how the audience feels your pacing is. Not a setting to try if you’re a novice presenter as it may throw you off your game.
#23 Closed captioning
WEB: Settings > In Meeting (Advanced) > Closed captioning
If you plan on having closed captions for your session you should turn this on, and turn on the sub-setting “Enable live transcription service to show transcript on the side panel in-meeting” to make it more accessible for the audience.