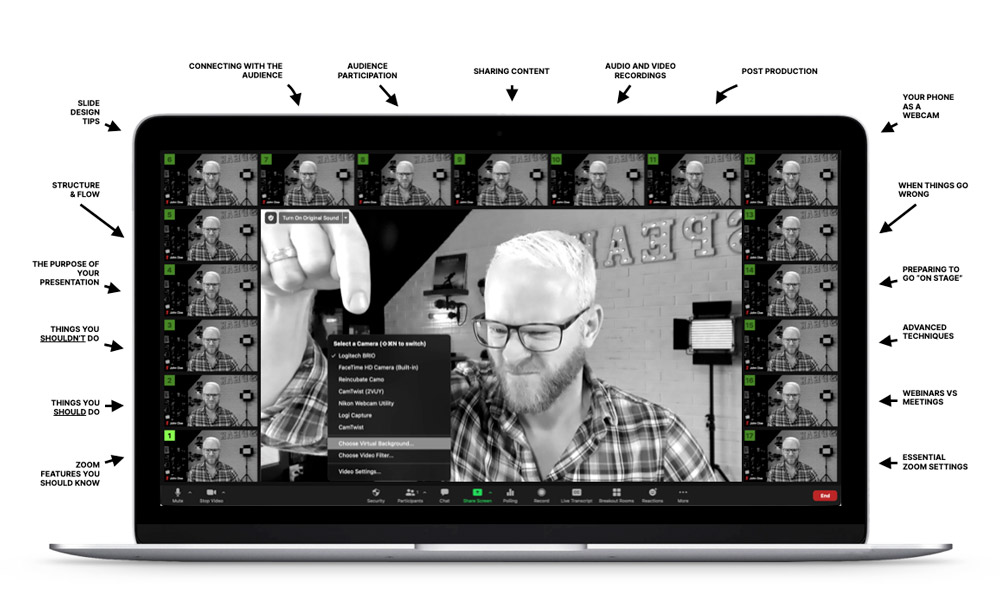
Chapter 10
How to Create a Stunning Video & Audio Recording
Quick definition about Zoom recordings. Zoom allows you to record your meeting or webinar in two ways: “Local recordings” save the video to your computer when you close Zoom after your meeting. Whereas “Cloud recordings” saves the files in the recordings section of your Zoom web portal (requires a paid subscription).
Definition in hand, let’s look at 4 reasons why you should make your own recordings and only use Zoom’s recordings as a backup
- Zoom recordings produce limited and unpredictable video quality
Zoom recordings are limited by two factors: System resolution (how big your screen is) for local and cloud recordings, and Internet speed/bandwidth for cloud recordings. The resolution seems to be capped at QHD (which is still good at 4x 1080p) even if your monitor is better than that. Cloud recordings can range from QHD down to a miserable 360p if you have a weak Internet connection, which is utterly unusable. The point here is that it’s unpredictable.
- Virtual presentation software struggles to render visual complexity
Zoom recordings (cloud and local) cannot handle slide transitions and animations smoothly, they will appear either as a blurred janky mess, or potentially not at all—appearing to skip from the start of the animation to the end.
- Videos embedded in your slides won’t play properly
Similarly, videos embedded in your slides will suffer from frame jumps and lag, and sometimes the audio won’t play at all.
- Any audio and video sync issues will appear in the final recording
If your audio and video aren’t in sync due to unexpected Internet speed variations, it will all be captured in the final recording, and if you’re using closed captions they will have both a delay and mis-transcriptions. these issues are fixable in post-production but it’s a really big pain.
It sounds like we need a better way.
Fortunately, all of these issues can become non-issues if you make your own recordings locally on your computer, using software to capture the screen, webcam, the audio from your microphone, and any audio embedded in your slides.
We have three options when it comes to recording a virtual presentation: Zoom local recording, Zoom cloud recording, and non-Zoom local recording.
HOW MANY OPTIONS ARE GOING TO BE IN THIS GUIDE!!!!? Lots more, sorry.
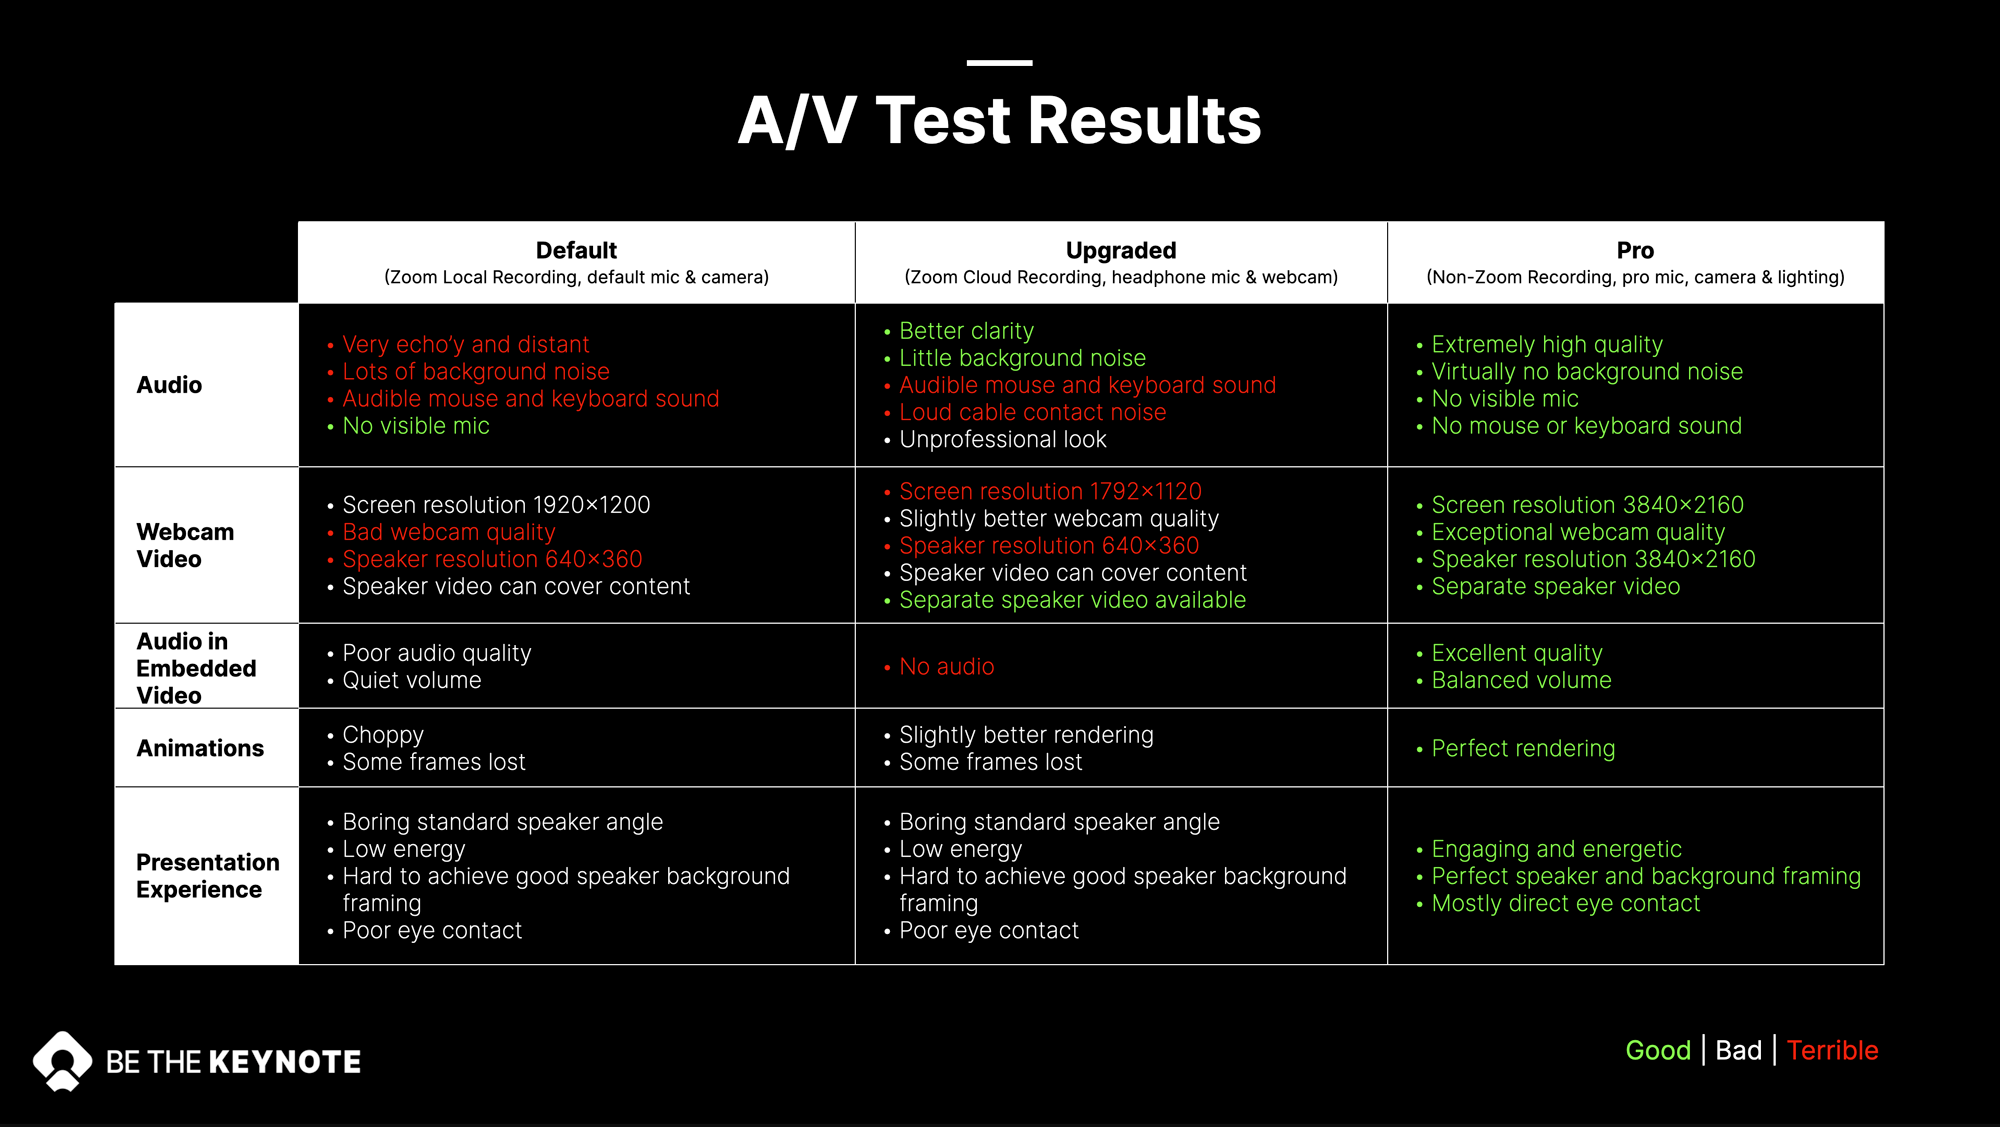
Comparison of 3 A/V Setups for Recording Virtual Presentations
Before I dive into the details of how to make a great recording of your virtual presentation, let’s take a comparative look along the recording quality spectrum, so you can see the difference between when an event organizer records your Zoom talk, versus doing it yourself (using everything you’ll learn in this section of the guide).
The three different technical scenarios I’ll compare are:
- Scenario 1
Screen Recording: Zoom Local
Microphone: Laptop mic
System Audio: Default
Webcam for live stream: Laptop camera
Speaker Live View: Picture-in-picture visible in speaker view
Speaker Recording: Embedded in Zoom recording
Presenter Position: Seated
Lighting: Regular ceiling lights
Makeup: None
Slide advance: Keyboard or mouse - Scenario 2
Screen Recording: Zoom Cloud
Microphone: Mic in wired headphones
System Audio: Default
Webcam for live stream: Brio 4K webcam
Speaker Live View: Picture-in-picture visible in speaker view
Speaker Recording: Embedded in Zoom recording
Presenter Position: Seated
Lighting: Regular ceiling lights
Makeup: None
Slide advance: Keyboard or mouse - Scenario 3
Screen Recording: Apple QuickTime
Microphone: Rode NTG4+ Shotgun microphone
System Audio: Loopback
Webcam for live stream: Logitech Brio 4K webcam
Speaker Live View: Picture-in-picture hidden from speaker view
Speaker Recording: Nikon Z6ii mirrorless camera for high production video
Presenter Position: Standing
Lighting: Video lighting
Makeup: Just a smidge of video makeup
Slide advance: Wireless clicker
Watch the video to see (and hear) the difference between the three scenarios
The table below shows a summary of the quality results from the comparison video.
Sounds great! How do I do it? Let’s break down what actually goes into a great presentation recording.
The 6 elements of a great presentation recording
There are six major elements in a professional quality virtual presentation recording:
- Screen recording video (your slides)
- Webcam video (you)
- Lighting
- Microphone audio
- Slide/system audio
- Closed captions for accessibility and playing without sound.
If you leave the recording in the hands of someone else—by someone else I mean the presentation platform or event organizer—you may end up with a low-res video, patchy audio, glitches, mistakes, jerky motion and caption lags.
Or you get lucky and the video you get looks really good. Until you watch it all the way through, and notice the picture-in-picture cam view is overlapping your most important data point, and the 89-second “segment” where you had to exit PowerPoint multiple times to adjust a setting, showing flashes of your embarrassing lack of desktop tidiness.
So let’s do it right. Let’s put in the effort to create an absolutely fantastic A-Grade professional presentation recording that we can be proud of, and hopefully make money from in the future.
#1 Recording Element #1
High resolution screen video (your slides)
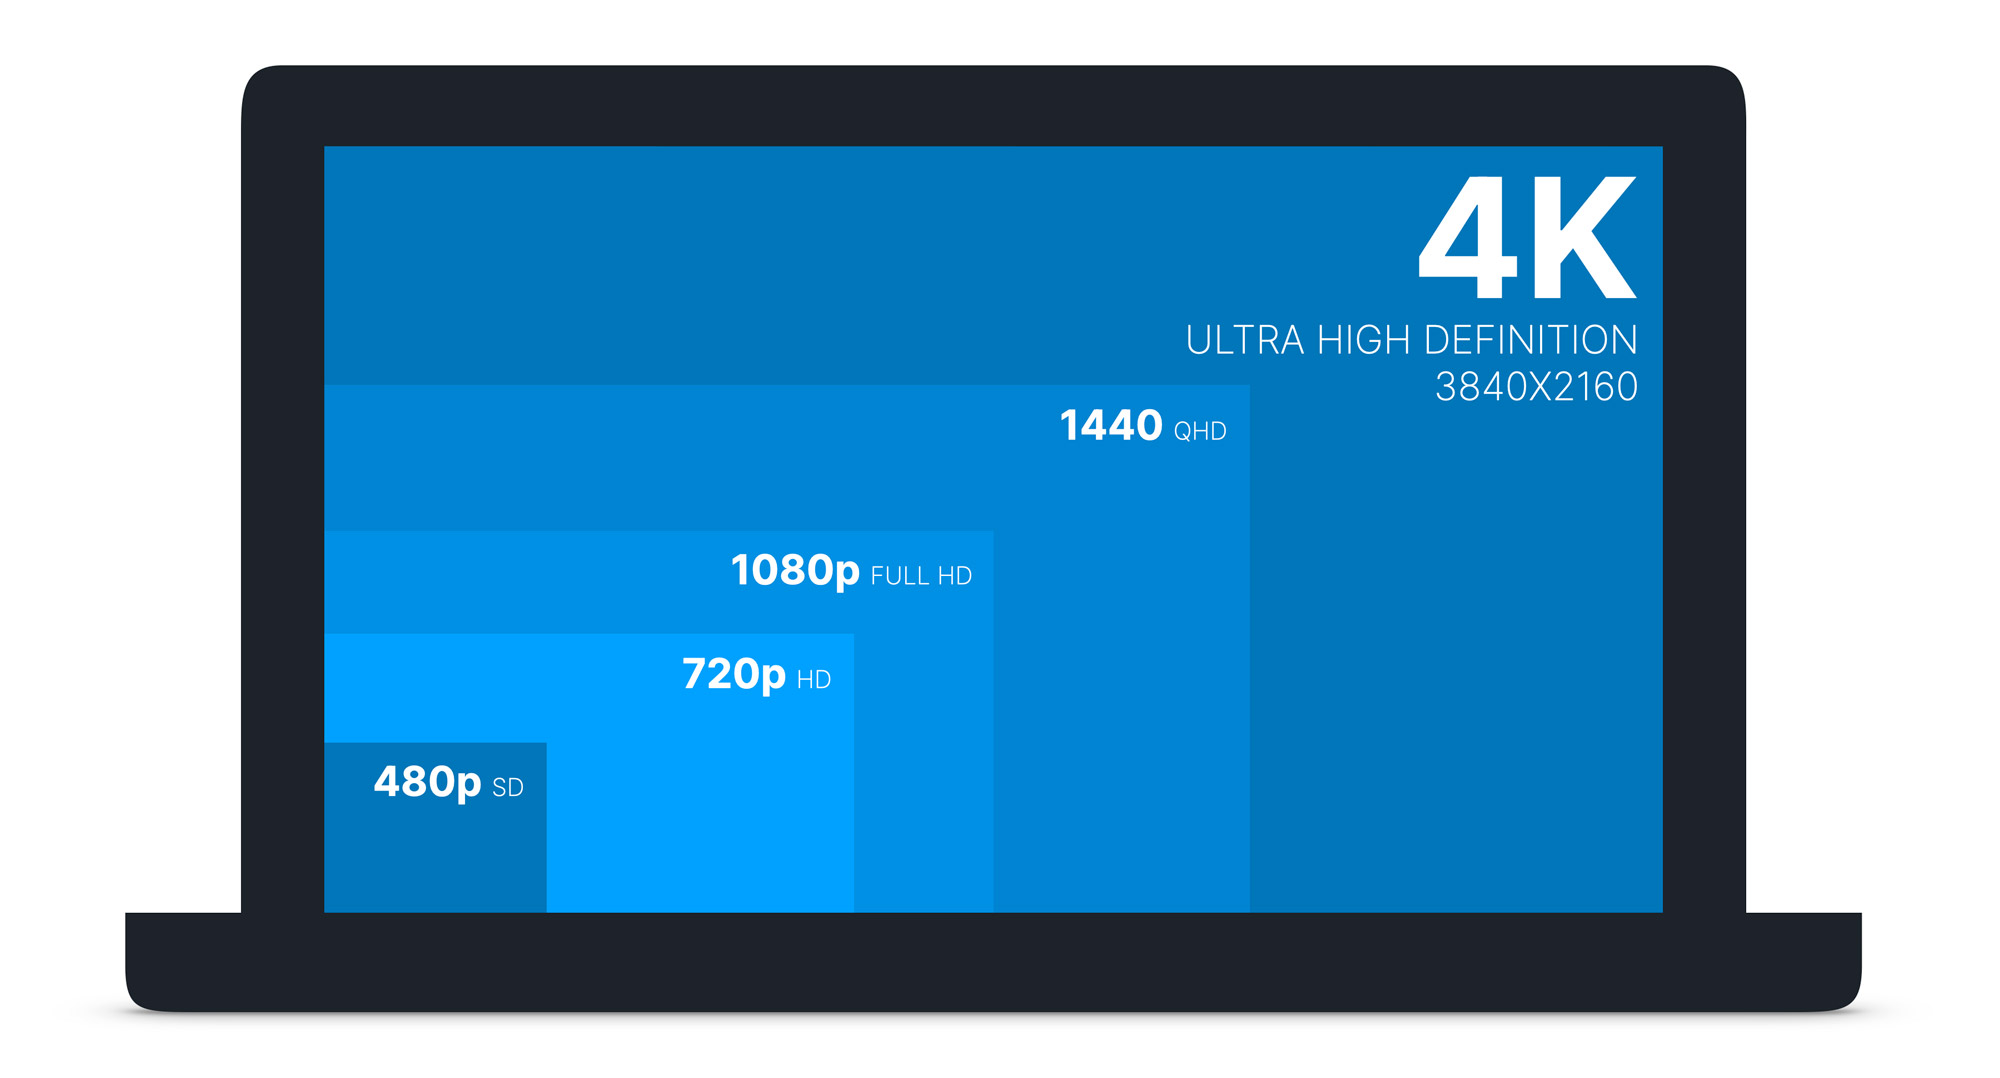
The diagram below shows different screen resolutions. While Zoom’s recordings can be of good quality (sometimes reaching QHD), they have limitations and the cloud recordings in particular, are unpredictable as they are based on your Internet speed and can fall as low as sad old HD.
What we want for our recordings is 4K or better, and the easiest way to do this is with software on your laptop.
For macOS users, this is easily achieved with QuickTime—free built-in software that can capture as much resolution as your machine can produce.
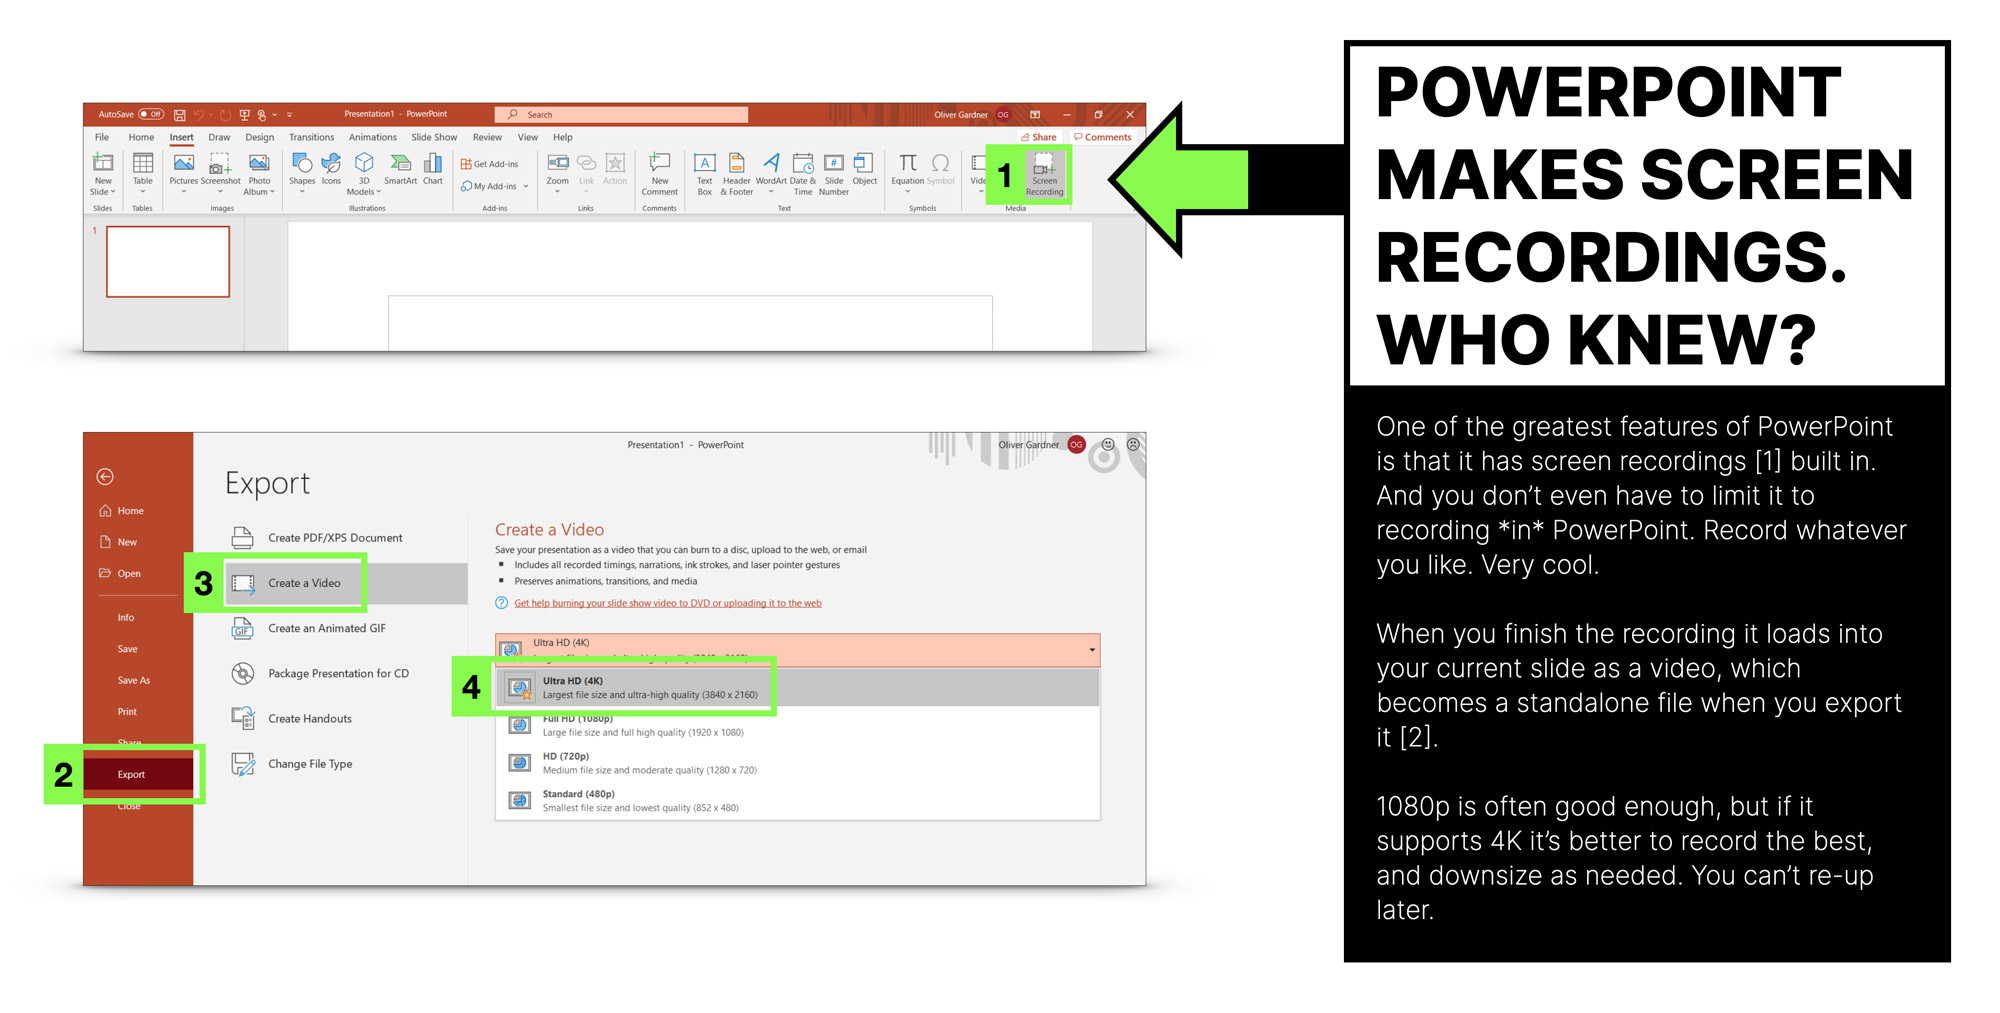
For PC users, a really cool feature of PowerPoint is that you can create a screen recording directly within the software. So if you’re using PowerPoint for your slides, you can do it all in one place, and you can use the screen recording feature even if you’re not using PowerPoint as your slide platform.
The finished recording will appear on a slide inside PowerPoint. You can then go to the Export feature and choose the quality of the exported file as shown below.
Pretty cool.
To show or not to show your webcam – in your screen recording
In the live broadcast of your talk, you want attendees to see you and your slides. But the recording doesn’t have to be exactly the same as the live event.
By recording the webcam separately from your screen you open up more options for how the final video looks. You can do picture-in-picture, side-by-side, fullscreen slides switching to fullscreen webcam, etc.
The creative opportunities are huge when you have separate video files.
Let’s take a look at how your video will look depending on the webcam view you choose.
Screen & Webcam Recording Option 1 – Zoom Local Recording
Zoom calls your webcam view the “Self Cam” and there are two ways you can set it up: side-by-side mode or picture-in-picture mode.
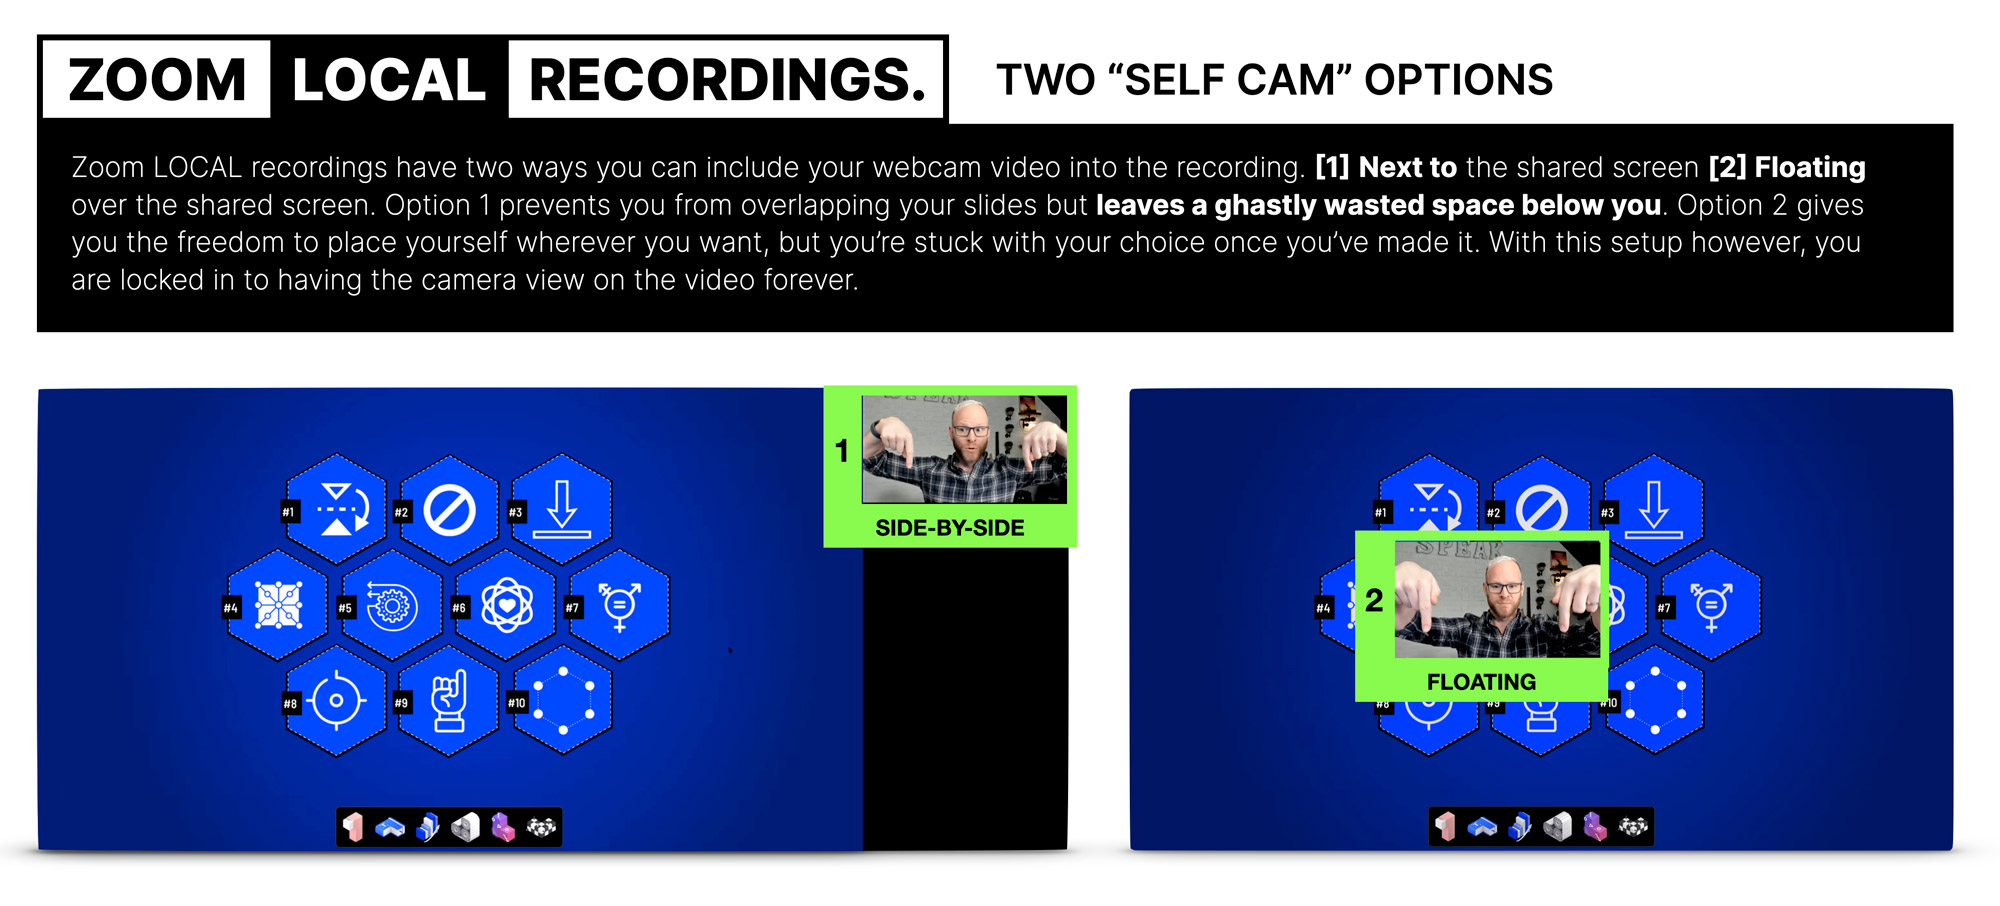
Side-by-side mode places your face beside your slides, keeping your self cam from overlapping your slides, but it results in a big empty column below you which is a giant waste – and looks bad in your video recording. You can make it bigger but that only serves to make the black column wider. The bolted-on column also makes the aspect ratio of your video look super widescreen, which is very unconventional.
To enable this, go to Zoom Settings > Recording > Record video during screen sharing > Place video next to shared screen in the recording
Picture-in-picture mode lets you position your self cam anywhere on top of the video, and you can enlarge up to a capped max size. You can also move and resize as much as you like throughout the presentation. This preserves the aspect ratio of your video but does risk covering up important elements on your slides.
You can of course hide it from your view to prevent it interfering with your recording and the audience will still be able to see it.
Beware, in side-by-side mode, if you enlarge your cam video at any point in the recording, it will remember the largest size you reach, and the black side column will be fixed to that width, even if you shrink it again—resulting in a big black sidebar with a tiny video inside. An awful consequence.
Screen & Webcam Recording Option 2 – Zoom Cloud Recording (paid accounts only)
Zoom cloud recordings again have two options. The first shows a picture-in-picture view in the top-right corner, but even if you resize or move the cam view the recording won’t capture the changes.
The size appears to be a fixed size, so ff you have a low-res screen it will be quite large, but if you have a high-res screen it can be tiny—so the value in having it there is negligible, and somewhat confusing.
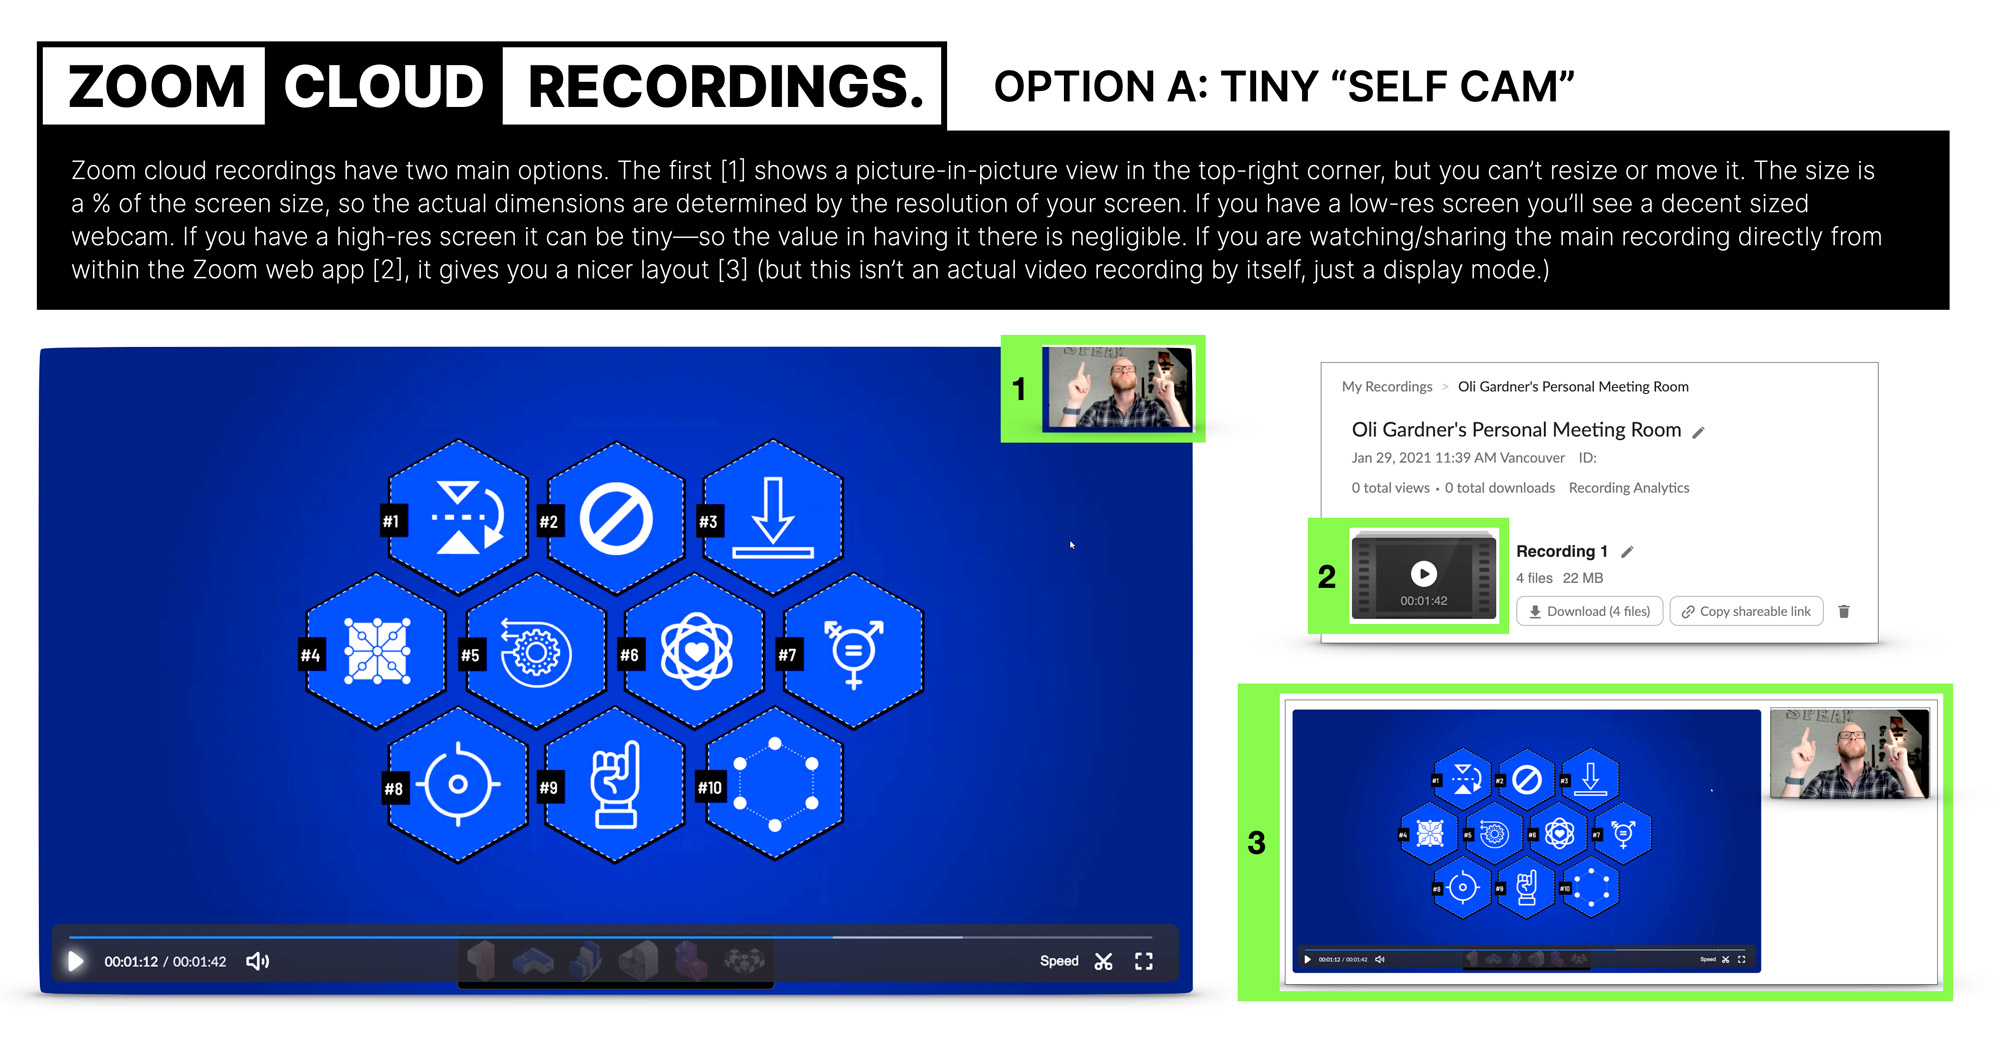
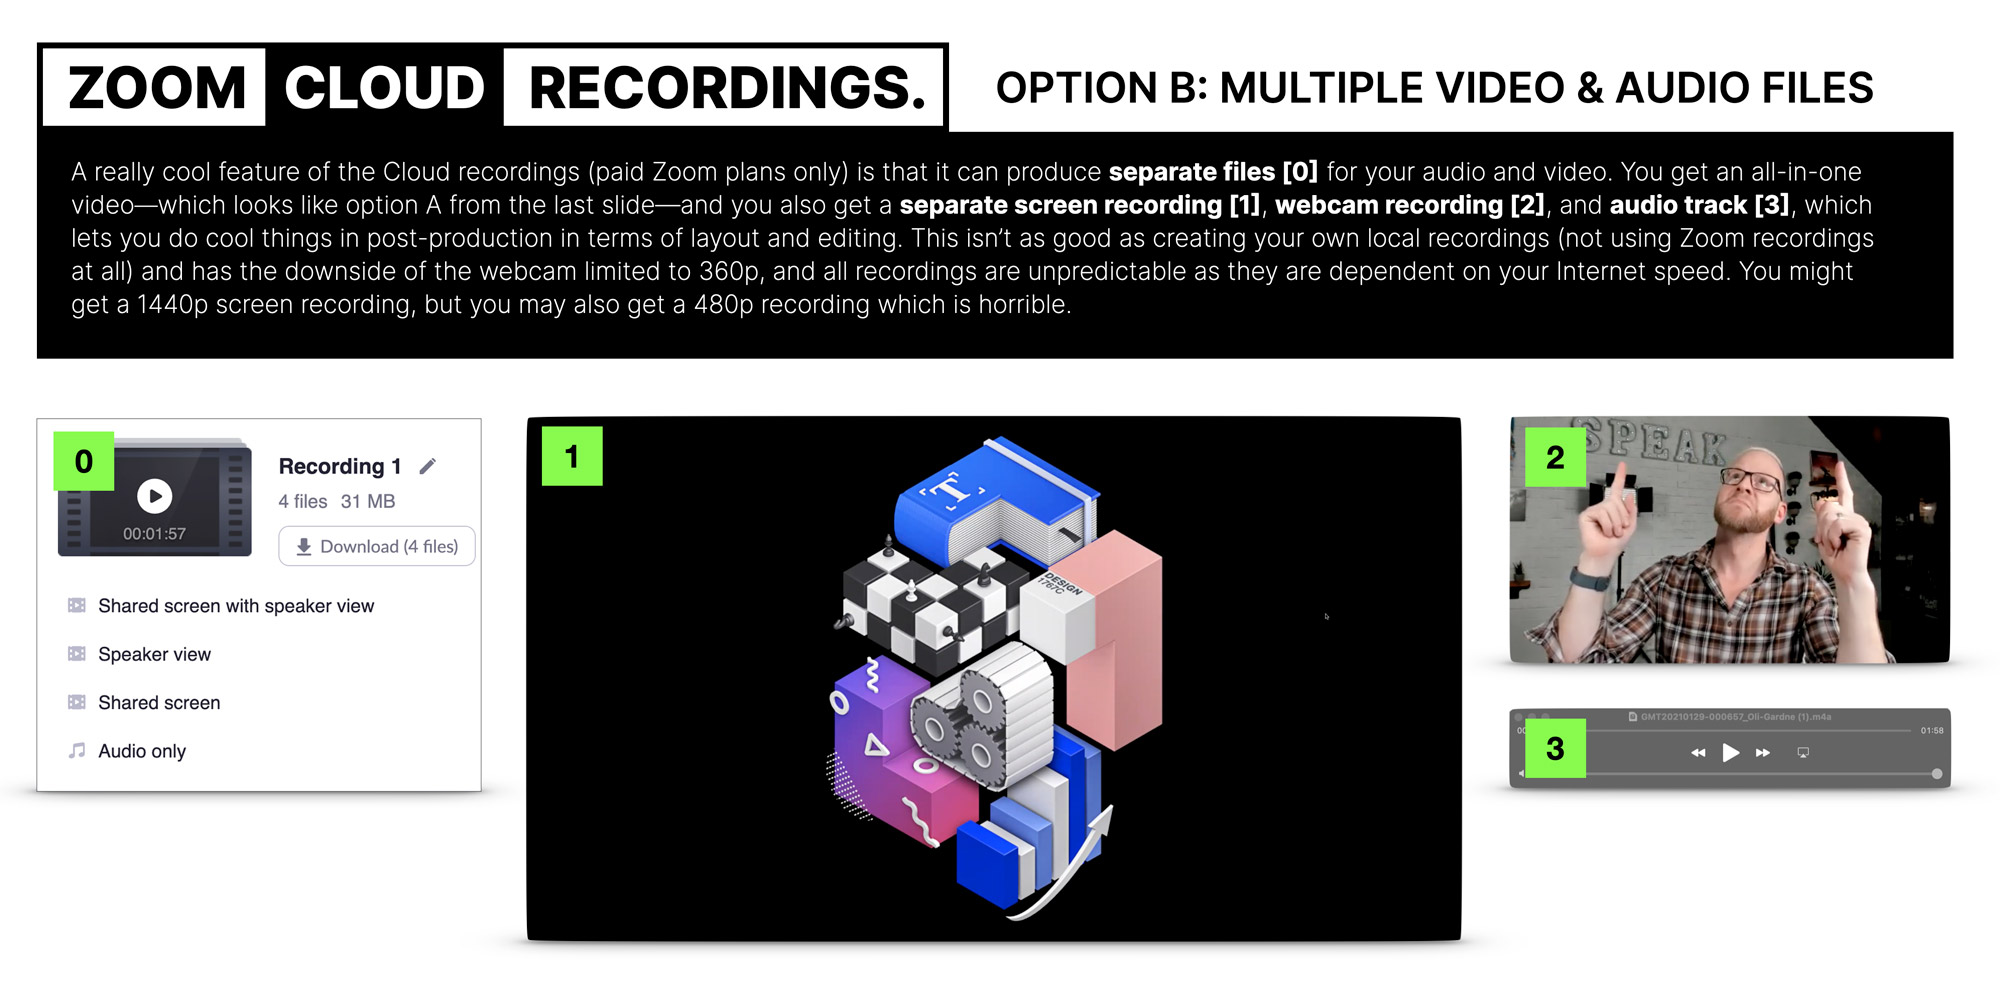
A really cool feature of the Cloud recordings is that it can produce separate files for your audio and video.
You get an all-in-one video and you get a separate screen recording, webcam recording, and audio track, which lets you do cool things in post-production in terms of layout and editing.
This isn’t as good as creating your own local recordings (not using Zoom recordings at all) and has the downside of the webcam being limited to 360p, and the unpredictable resolution based on your Internet speed. You might get a 1440p screen recording, but you may also get a 480p recording which is horrible.
All in all, I’d say that both recording options within Zoom are great to have as a backup, and for quickly sharing clips if you need to—while you work on editing your masterpiece.
Screen & Webcam Recording Option 3 – Non-Zoom Local Recording
In my opinion this is the absolute best option to choose. It’s more work but worth it once you get your workflow figured out.
If you want to show your webcam in the final video, you can either go with the picture-in-picture mode (again this will be locked into your final video recording as we’re recording the entire screen), or you can turn it off and record your webcam’s video separately and customize how and where it appears in post production.
Tip: If you don’t want it recorded over your slides but you still want to see yourself while presenting, you can drag the cam view to a separate monitor if you have one.
If you’re going to hide the self cam the audience will still be able to see your video, so you don’t need to worry about it being turned off.
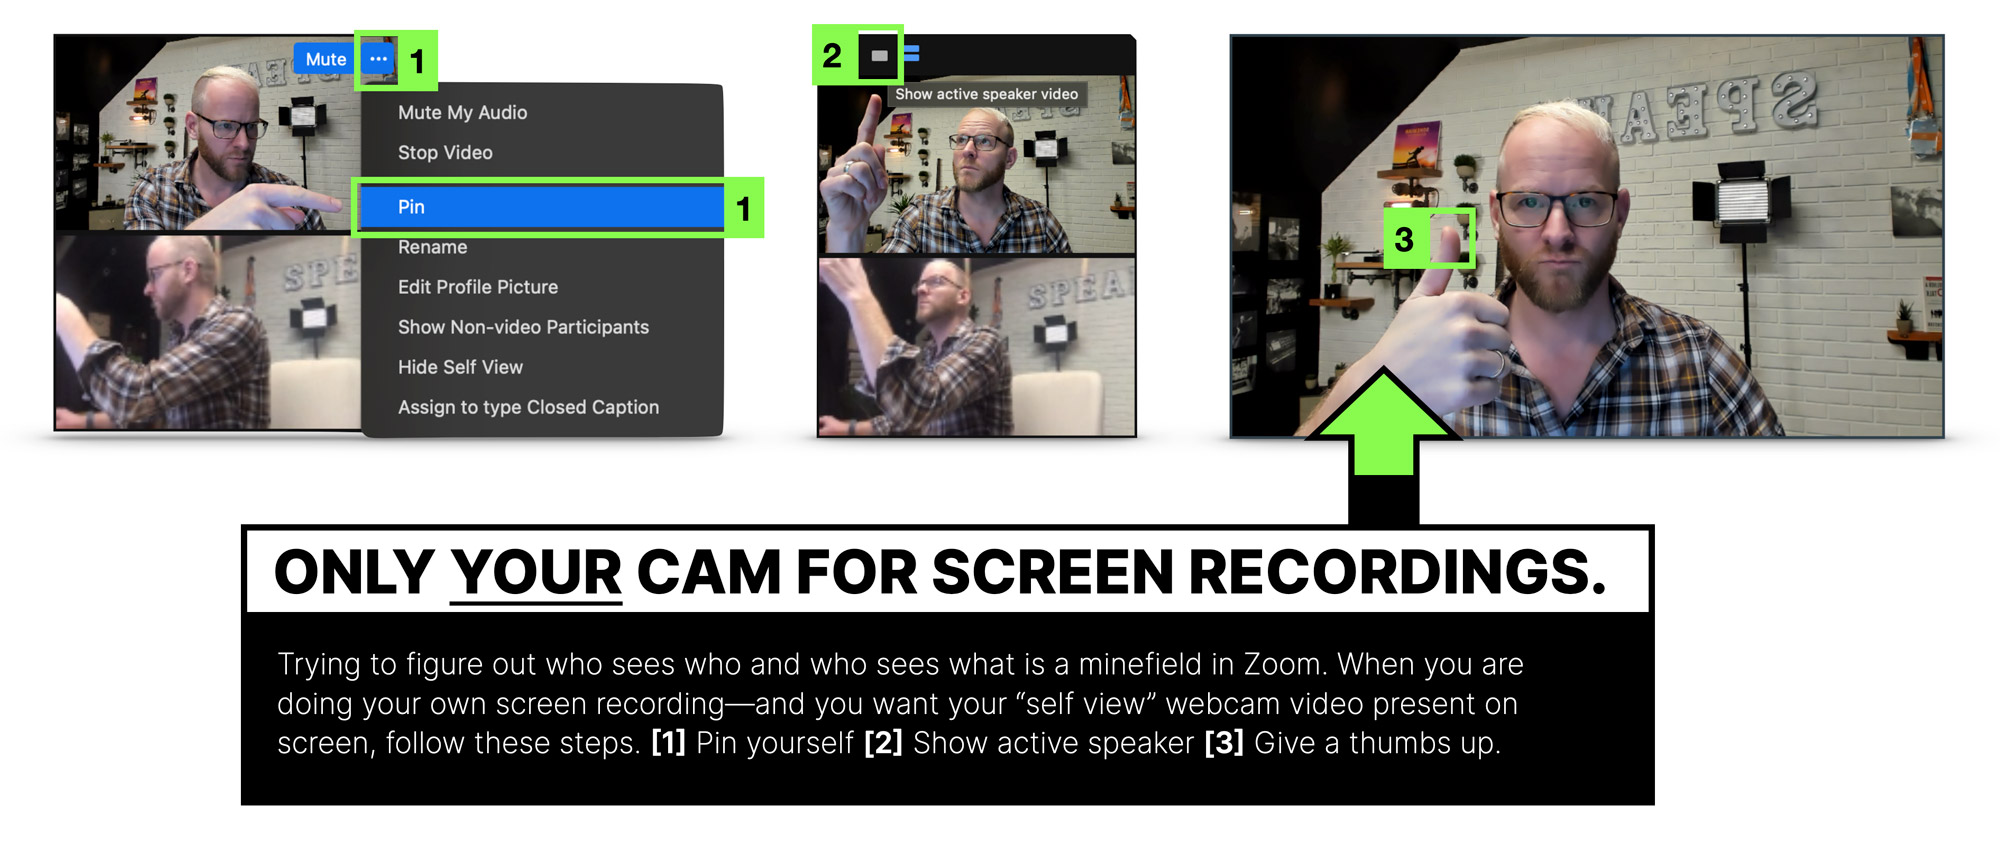
If you are going the picture-in-picture route (and this goes for the Zoom recordings too) you need to check a few settings to make sure it’s only your webcam that shows up (and not any attendees or co-hosts). Follow the steps in the image below.
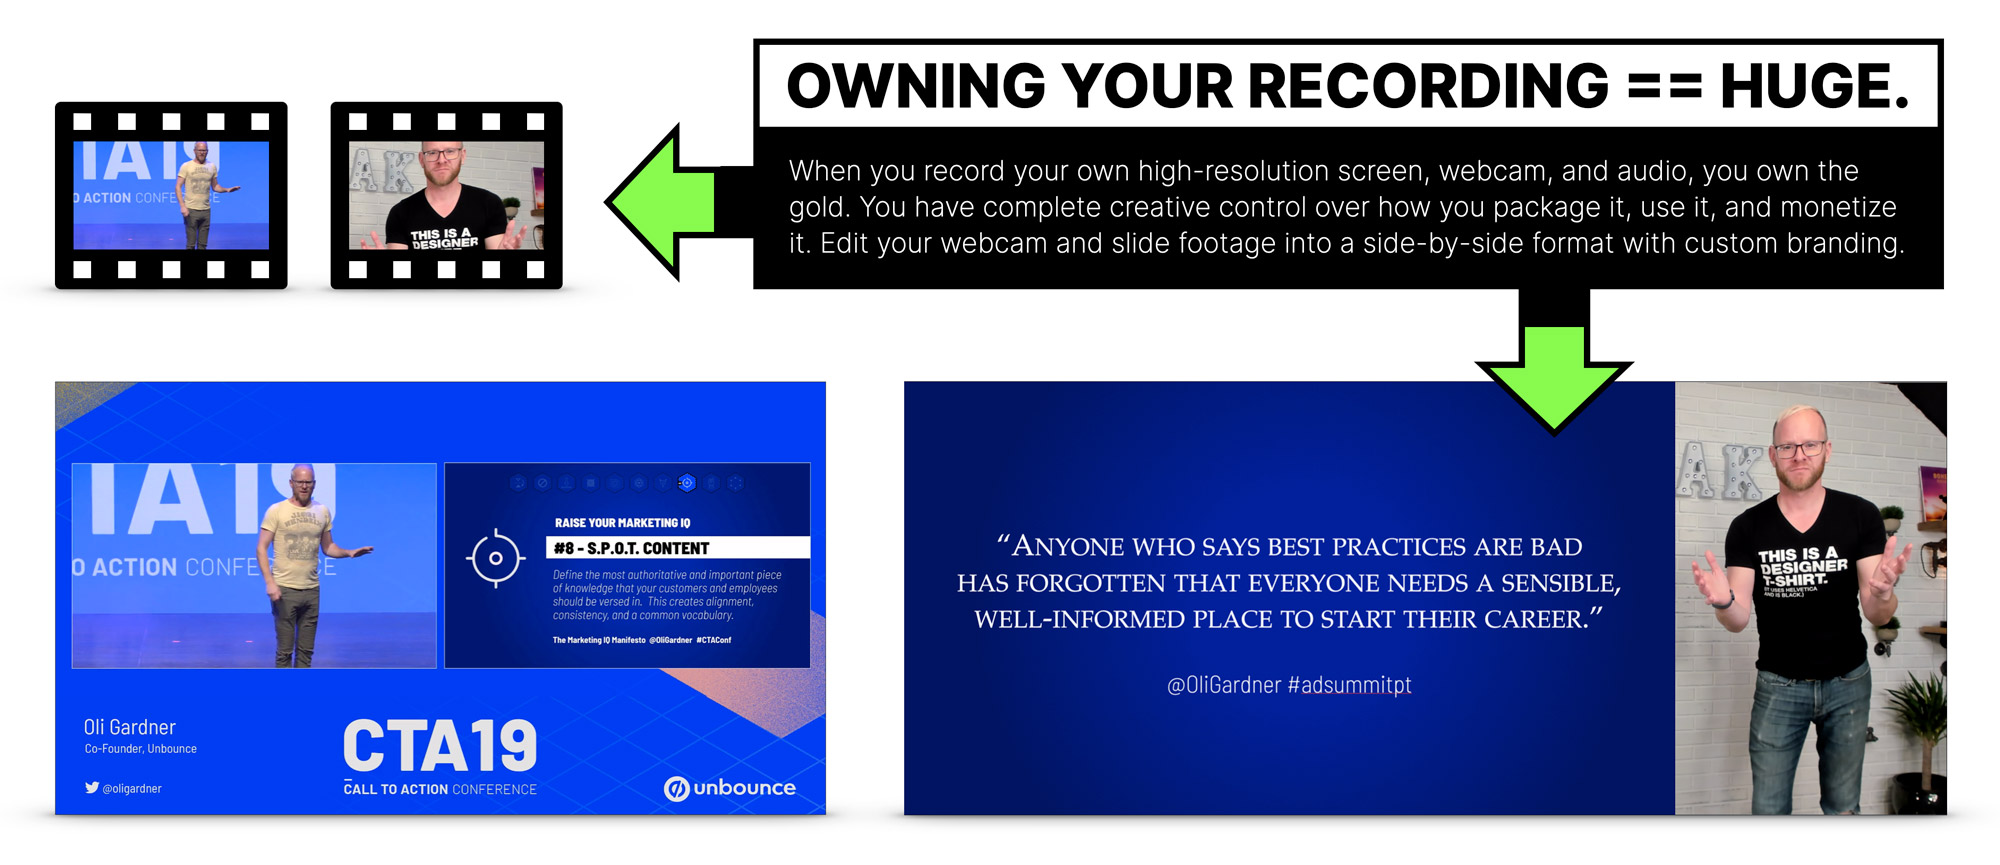
The big upside of recording your webcam separately is being able to overlay or position the high-res footage however you like in post-production, including custom side-by-side modes as shown below, which affords you the opportunity to add some excellent branding to your video.
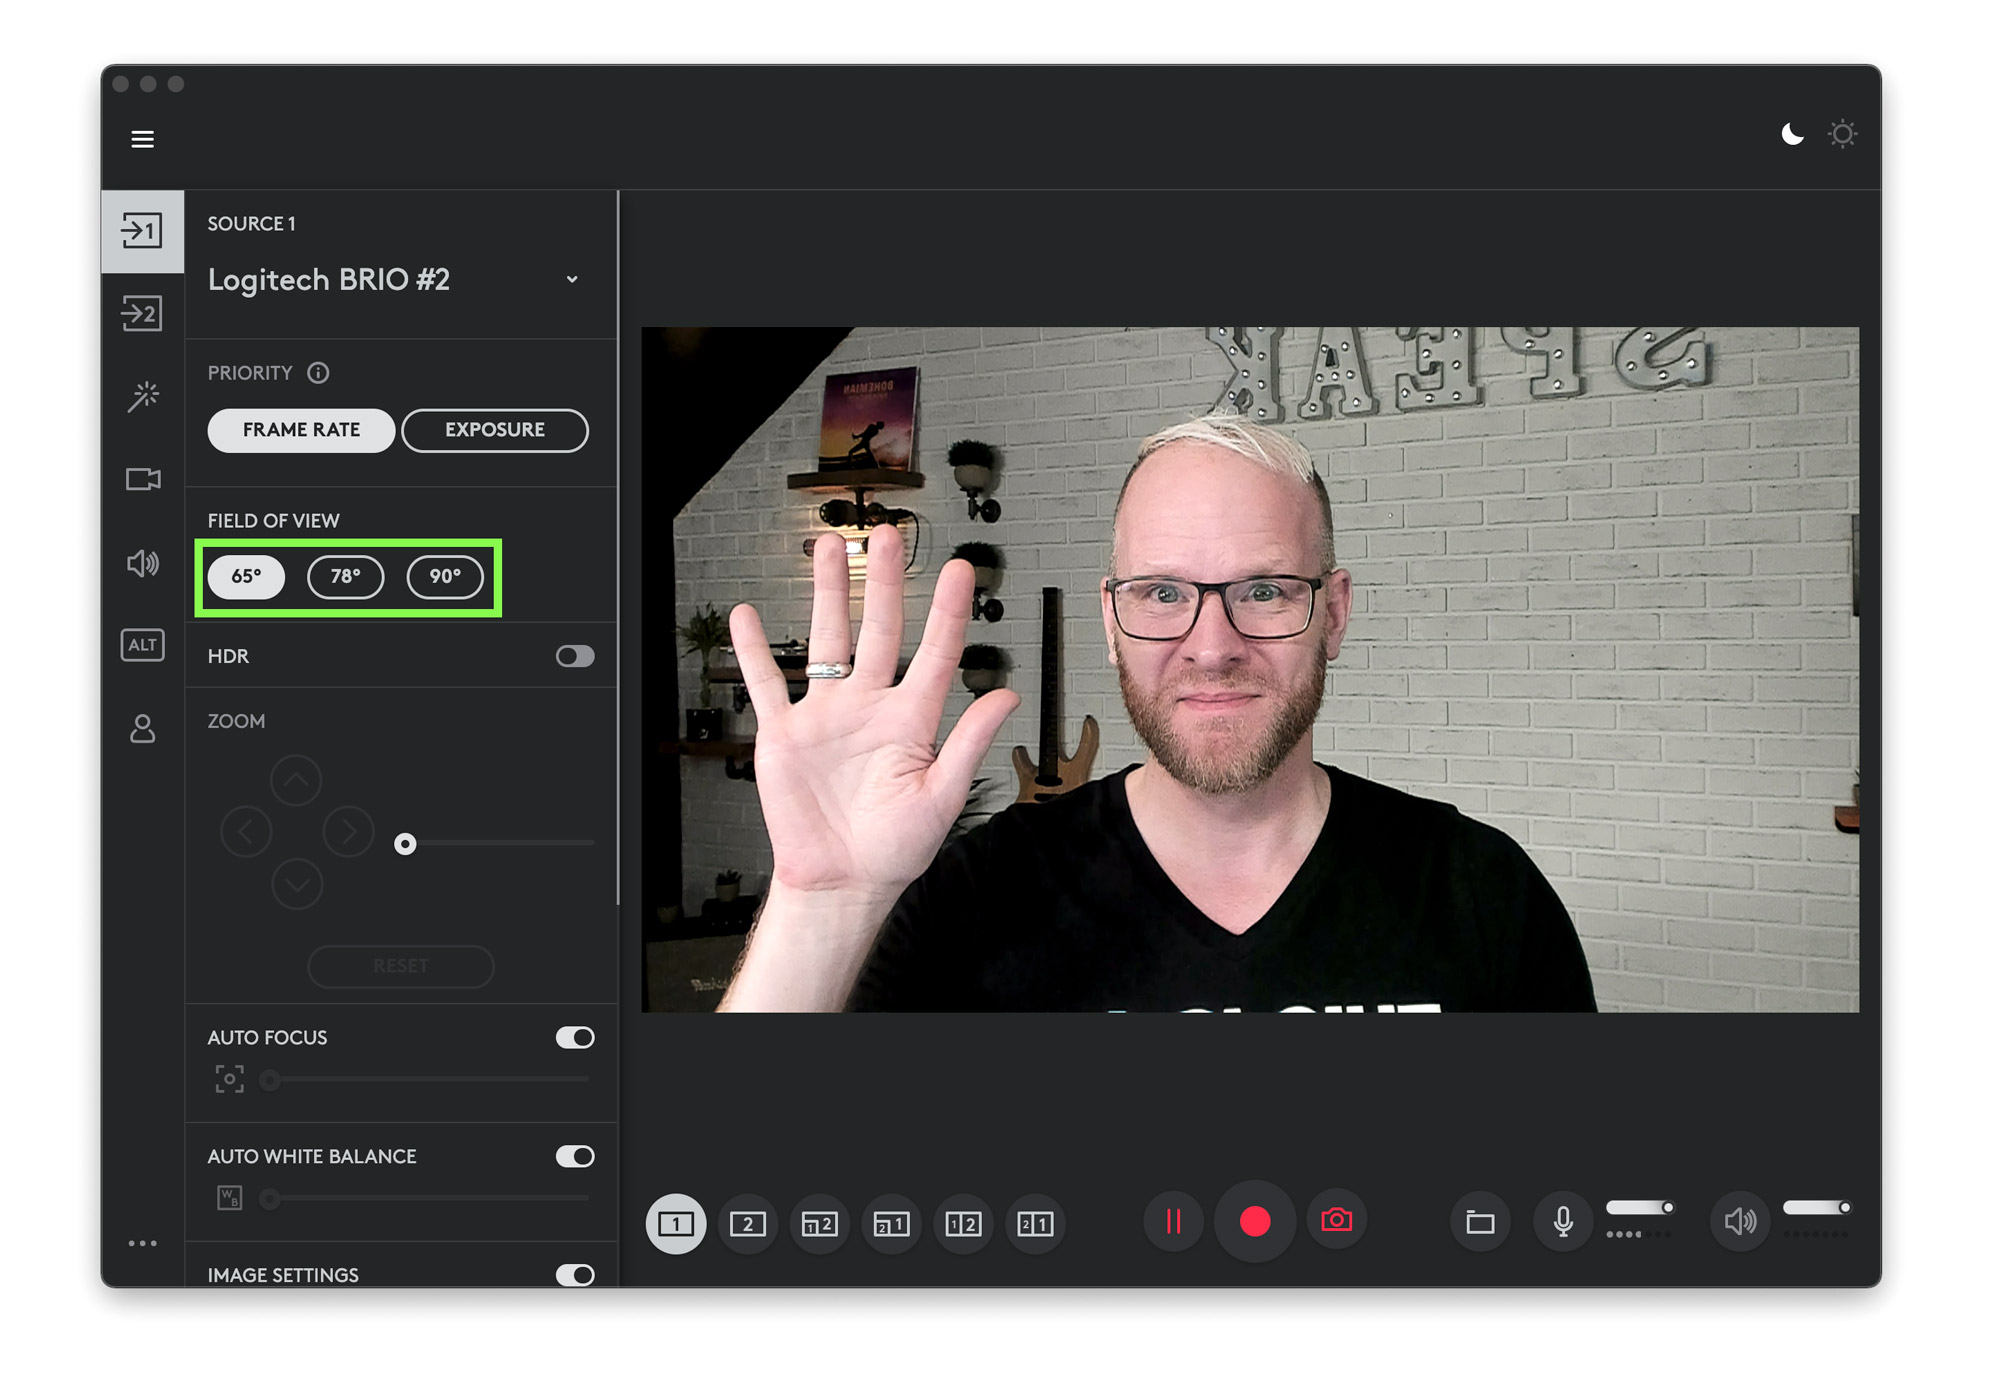
When recording your webcam, it will most often be done through the webcam’s own software. Before you do this, you should test it to make sure it doesn’t slow your machine down. For the Brio webcam, the software is called Logi Capture, and it lets you choose a whole bunch of visual settings as well as being able to record.
Important notes
- If you record your own webcam video, make sure that whichever camera you are using also records the audio. You’re not going to use this audio, it’ll be low quality, but you will use it to sync your different video clips (slides and cam) with your high quality audio in post production.
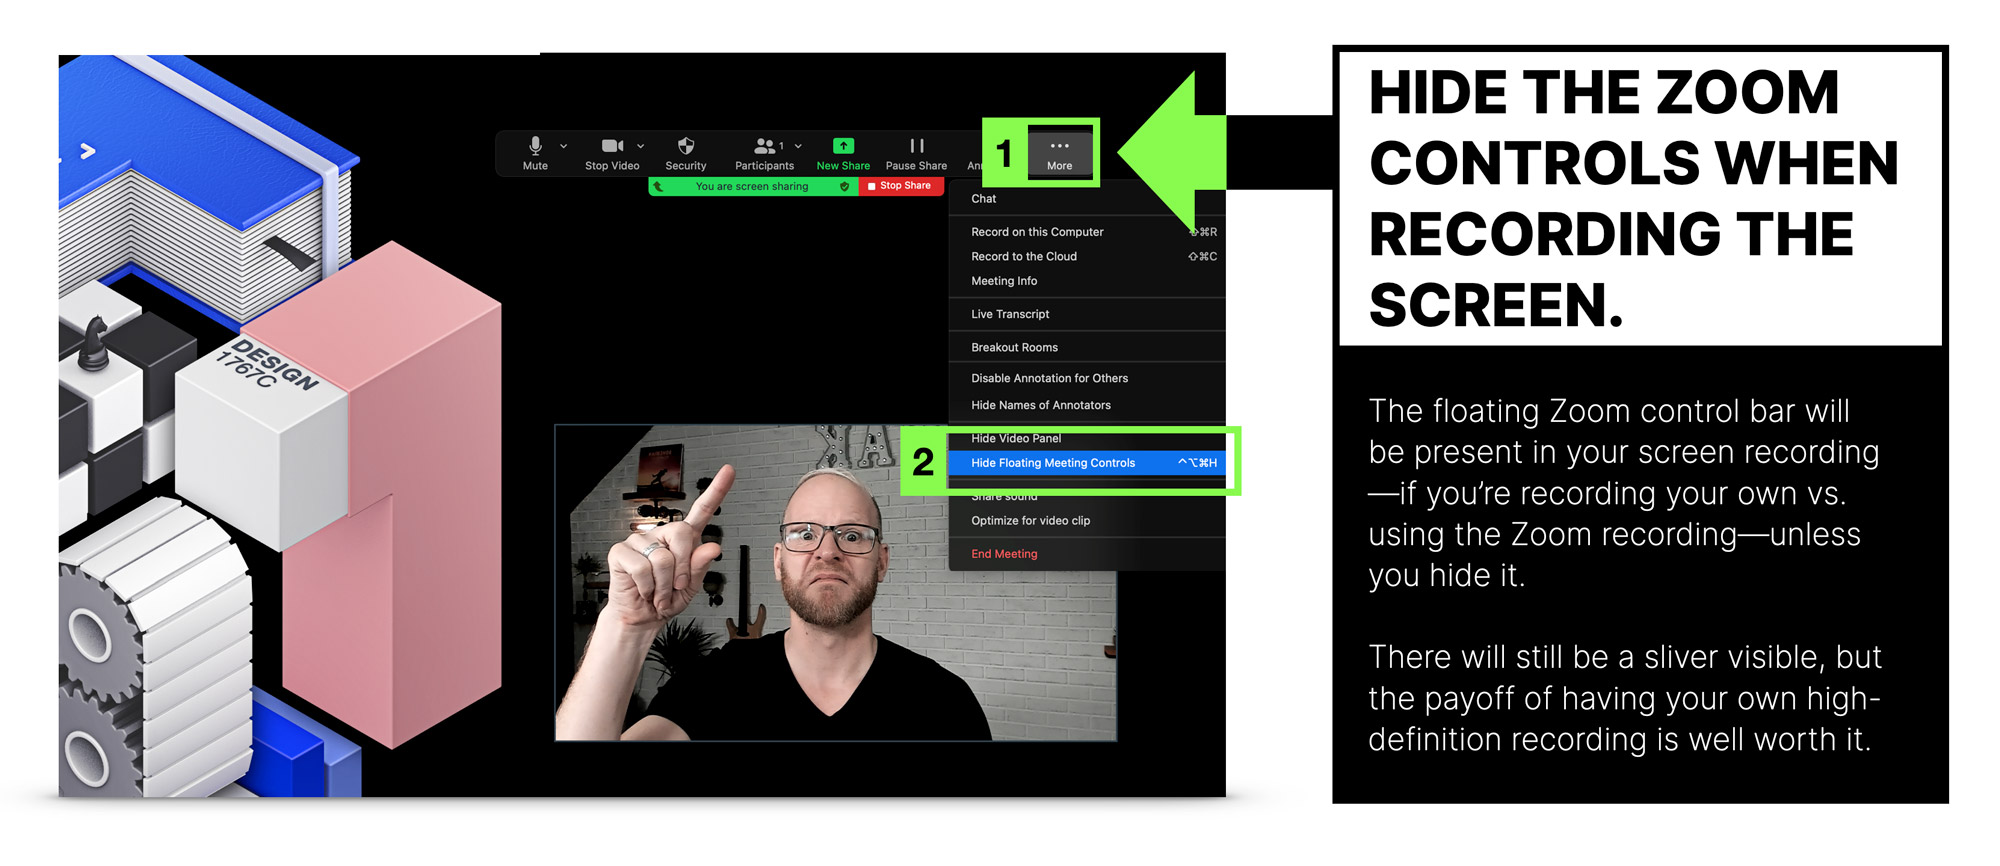
- If you interact with Zoom menus while presenting, they won’t be captured in Zoom’s local or cloud recordings – you just see your mouse go up and down near the top of the screen. However, if you are recording your screen locally with your own software (QuickTime/PowerPoint etc.) the menus will be visible in your screen recording unless you turn them off in the settings. Even with the control bar hidden you still see the thin screen share portion of the bar. The only way to get rid of it entirely is to drag it over to a second monitor if you have one. Note, that when they are hidden, the only way to get them back is to hit the escape (ESC) key, so if you’re mid-talk and need access to features like annotations or chat etc. just know that you’ll have to do this, and then hide the toolbar again once you’re done. An editing tip here is to not speak while you do this. That way you can edit the portion with the toolbars coming and going out of the final video if you so desire.
An all-in-one solution for your own recordings – ScreenFlow (Mac only)
If you’re a Mac user, the easiest way I’ve found to record everything you need all at once, is to use software called ScreenFlow, which lets you capture EVERYTHING. You can capture the webcam, your laptop screen, your external monitor screen, system audio, and microphone audio, all at the same time, creating separate tracks for all of them. It’s also an editing platform, and while it’s not as feature-rich at something like Final Cut Pro or Adobe Premiere Pro, it costs less and is easier to use.
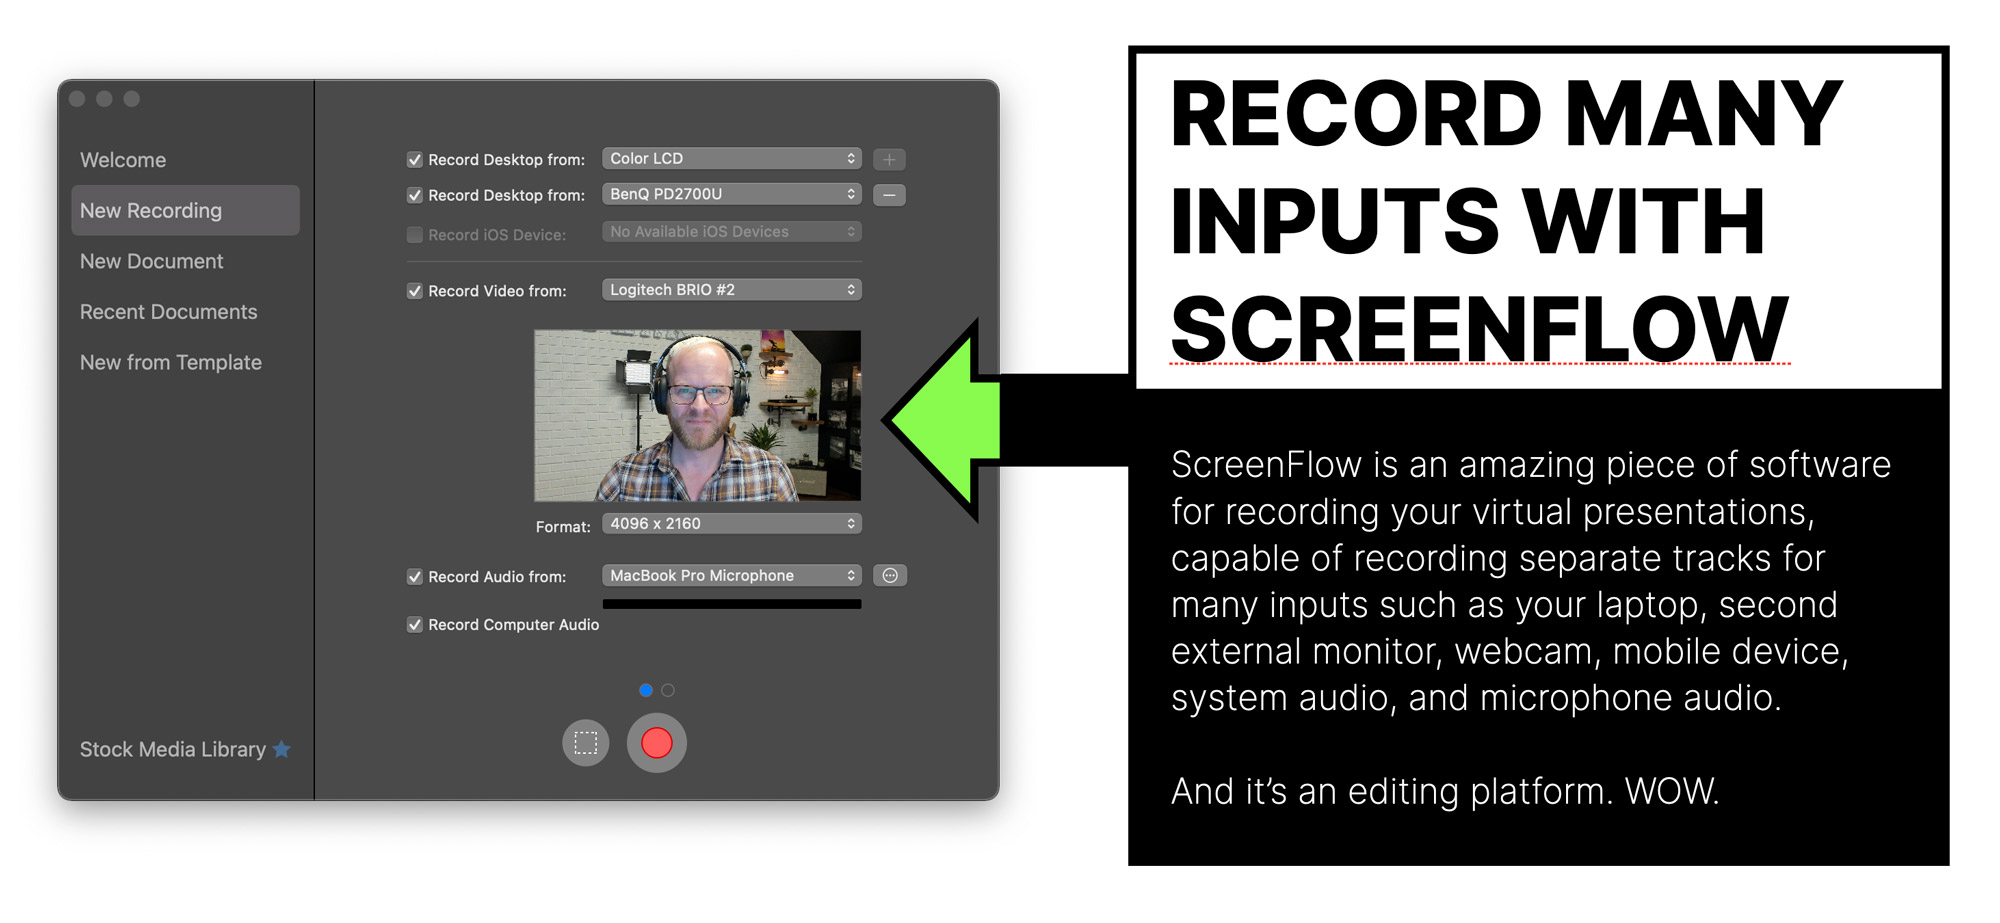
The sheer number of inputs that ScreenFlow can record simultaneously makes it an invaluable tool for anyone recording virtual presentations.
#2 Recording Element #2
High resolution camera video (of you)
While your slides are typically the focal point of your presentations, you are still the star, and the difference between a Zoom presentation with and without webcam video of you is huge. People can easily tune out when only looking at slides, but when your face is visible—or even all of you if you present standing up—you have the opportunity to give a much more dynamic presentation, and capture a more interesting recorded video.
We know what your webcam display options are from the previous section, but which webcam should you use?
Presentation camera options – ordered by cost
There are three aspects to your video camera setup: the camera you use, the settings on the camera, and the video settings you apply in Zoom. In terms of camera options, it’s fairly simple, you either use the camera in your laptop (if it has one), a webcam, a DSLR/mirrorless, or your phone, and I’ll discuss the pros and cons of each below.
| Cost | Equipment | Pros | Cons | Rating |
|---|---|---|---|---|
| Free | Built-in Laptop Camera | Easiest method. You don’t need to buy anything. | Not all laptops have one. You need to have your laptop screen at a specific angle to frame you properly which might not be ideal. It’s probably not very widescreen. Won’t have many visual settings. If you use an external monitor, your laptop will be off to the side, mening you need to rearrange your office in order to present. | Good place to start, but plan on upgrading to a dedicated webcam. 4/10 |
| Free-$ | Phone | We all have one. Lenses on the latest models are fantastic. The apps that are available have way more photographic control than webcams or laptop cameras. Specifically they let you control the depth of field, making the visual experience superior (when seated at your desk), not relevant if you’re presenting standing up. | Might be hard to get reliable stream for a live event. Requires a paid app to operate and not all operating systems have good ones. You can’t use your phone while it’s in use. Not that you should be texting while presenting :D but you sometimes want to use your phone as a timer – or to record you giving your talk. High likelihood of you forgetting to set in do-no-disturb mode which still might let through the occasional notification, buzz or alarm | Too early in its infancy as a solution to be a professional option. 4/10 |
| $$ | Webcam Logitech Brio 4K |
Greater variety of settings. Wide angle options. Probably hase some exposure controls. More control over placement and angle. Can be attached to an external monitor if you use one, so you don’t need to alter the layout of your desk. | Audio quality is awful. Make sure you don’t accidentally set this as the active input. | Still the safest option available right now. 8/10 |
| $$-$$$$ | DSLR / Mirrorless | The best possible quality. Awesome for recording screencasts. | Can range from difficult to impossible to set up as a streaming webcam with most cameras. Requires multiple different pieces of software to get the stream going. Can have a timeout setting that turns it off. You can adjust this most of the time but if you forget, ouch. | Too much complexity. 6/10 |
Honestly, I think going with a dedicated webcam is the best and most flexible option for presenting on Zoom. It gives you the opportunity to sit or stand, and a 4K camera will give you much better results for recording your presentation than the one in your laptop (if it has one).
Regardless of the camera option you choose, you have two more things to optimize for the best video experience, the lighting, and how you appear in the camera frame.
Good lighting will make you look better, and prevent the webcam from potentially dropping the quality in an effort to squeeze more light out of the shot.
How you are framed will define the dynamic aspects of your performance. You can sit, or you can stand. You can appear as a head-and-shoulders closeup or have more space to gesture and move your body.
#3 A/V Setup 3 – Excellent lighting to make you shine
Great lighting can make the difference between looking like you’re presenting from your basement (it’s okay if you are – you just don’t want it to look that way) and sitting in a professional studio. And it doesn’t cost much to make a big improvement.
Yes, you can use your regular old ceiling lights, but if you want to stand out, you need to invest in some more controllable lights.
One of the simplest setups is to have two lights, a key light (primary light) and a fill light. These are typically positioned as shown below, with the fill light set to approximately 50% of the strength of the key light. This helps give some shadows to your face which is much more authentic and natural looking than a completely evenly lit face.
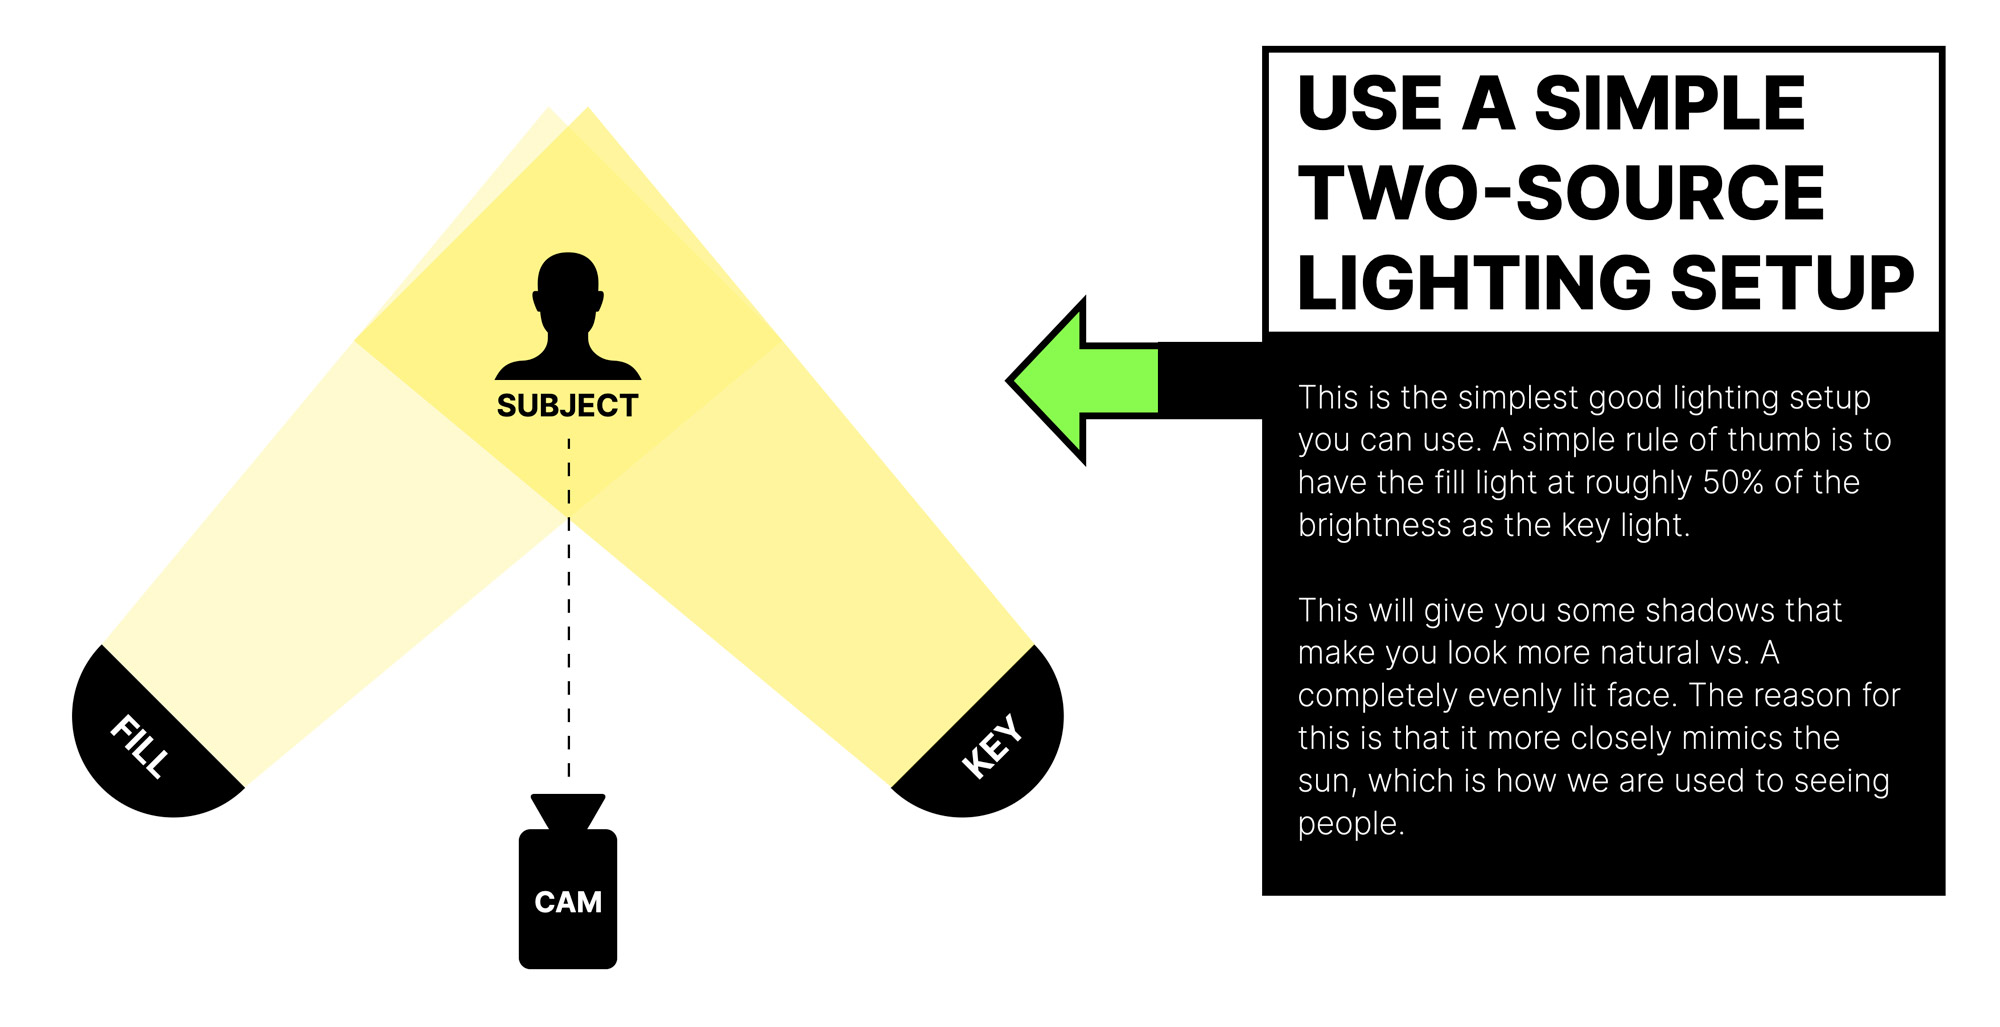
I use these LED lights from Neewer which are good low to mid range lights. I actually upgraded them recently to a slightly better version which has electronic control of the colour temperature which is very handy but not essential.
There are also a ton of cheaper DIY options on YouTube (search for “DIY video lighting”), if you want to try those. And also a fantastic guide to building a lighting setup for under $100 by Wistia.
Pro lighting tip: You want to match the colour temperature of your lights as closely as possible. There are two common temperatures to shoot at 3200K (warmer tungsten) and 5600K (cooler daylight). Both look good, but if you can, get some light bulbs for your regular ceiling lights that matches those temperatures (Amazon and Home Depot have all the options you need). For a good primer on colour temperature and white balance in your lighting watch this video.
Pro lighting tip 2: If you wear glasses, do a test recording on Zoom to see what the reflections are like with your lighting setup. A small light reflection is okay, but if it’s really big and distracting try lifting the lights higher. It creates a more natural angle (imagine the light coming from the sun) and will remove the glare from your specs. If you can’t fix it, and you don’t need your glasses to see the screen, consider removing them if you are comfortable doing so.
Pro video tip: Use some simple video makeup to remove glare and reflections form your skin and give it a more matte appearance. It’s simple and works wonders, and I’m not talking about “real makeup” like foundation. What you need is a simple setting powder which you dab on gently with a fluffy Kabuki makeup brush.
You should also grab some oil blotting tissues to wipe the oil from your face (before you apply the setting powder). This will remove unwanted shine and sweat on your face.
#4 A/V Setup 4 – High quality microphone audio
Great audio is essential if you want to up your game and present at a level that’s superior to most other speakers. It’s especially important for making your presentation recordings as polished as possible.
Unfortunately, great audio isn’t free, and there’s a daunting spectrum of options and quality. There are a million resources on YouTube for getting started, and I’ll cover some of the setup options I’ve tested based on different price points.
Different audio setup options ordered by cost
Note: for wireless mic options—when you’re presenting standing/walking—there is the extra cost of a remote clicker in order to present standing up – which I highly recommend. The Logitech R800 (affiliate link) is universally loved by pro speakers. Some of the cool features are that it vibrates when you have 5 mins then 2 mins remaining, and it has a countdown timer on it that you can set for the length of your talk.
Watch and listen as I compare 7 different microphone options.
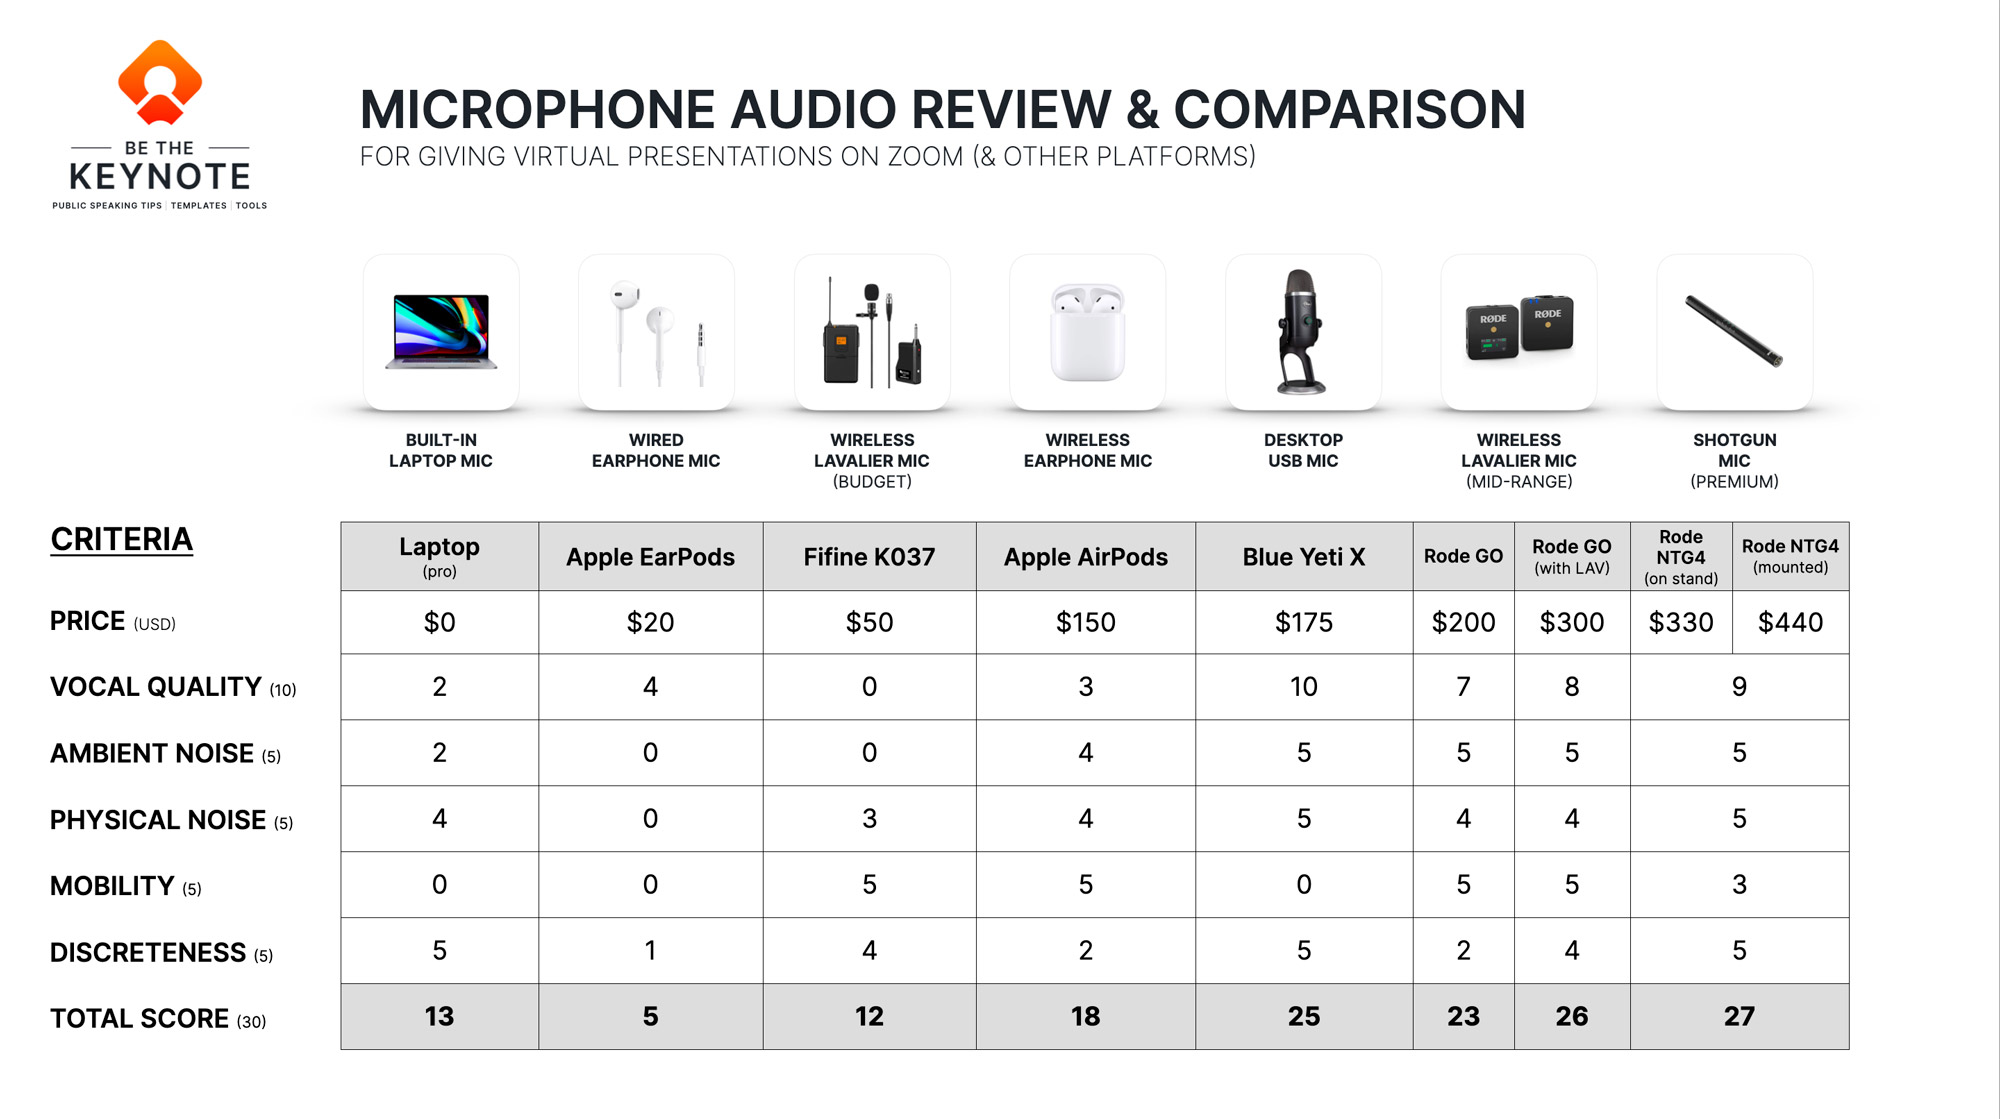
As you can see, quality is strongly correlated with price, and it comes down to what you are comfortable with. If nothing else, this illuminates issues with the setup you might already be using, and perhaps weren’t aware of. Most of us have never listened to our audio from attendee side of the presentation.
While an awesome wireless lav mic setup is the best way to have complete freedom of movement, in all of my tests (and I’ve tested a lot of mics) the only mid-range priced one I’ve found to be in any way adequate for recording audio is the (RODE Wireless Go).
My absolute favourite audio setup is the Rode NTG4+ shotgun mic mounted to the ceiling on a boom arm. I use it for podcasts, screencasts, and presenting from my desk, and with a quick position change, I can use it to present standing up for the max-energy effect.
My advice would be to try presenting standing up as a test (not during a live performance until you’ve practiced) and record the audio on your laptop. Yes, it’ll be echo’y, hissy, and quiet because you’re not sitting in front of it, but you’re testing the feeling of presenting standing up, not the audio. Then if you decide you like it, you can save up for some better gear.
How to remove background noise and enhance your audio
An expensive option for enhancing your audio and removing uncontrollable background noise is to use a physical audio pre-amp/processor such as the DBX 286s (affiliate link). This is a fantastic piece of hardware that can do several things:
- Add bass (depth) and treble (clarity) to give you the professional radio broadcast sound
- Remove harsh ess sounds (try saying “discussing” out loud)
- Remove background noises with a sound gate. This allows you to set a specific gated decibel level, to prevent any sounds quieter than that level—such as mouse clicks, background hum, or mouse movement scratching—from passing through. It only passes audio through when you start talking above that db level. It’s brilliant.
Clearly this is a very advanced setup, but it performs wonderfully and is especially good if you’re not good at post-production audio (which requires complex tools to fix).
#5 A/V Setup 5 – Broadcasting audio that’s in your slides (system audio)
Let’s talk about a big issue with audio in virtual presentations.
Mixing your audio (microphone audio) with audio from your slides (system audio)
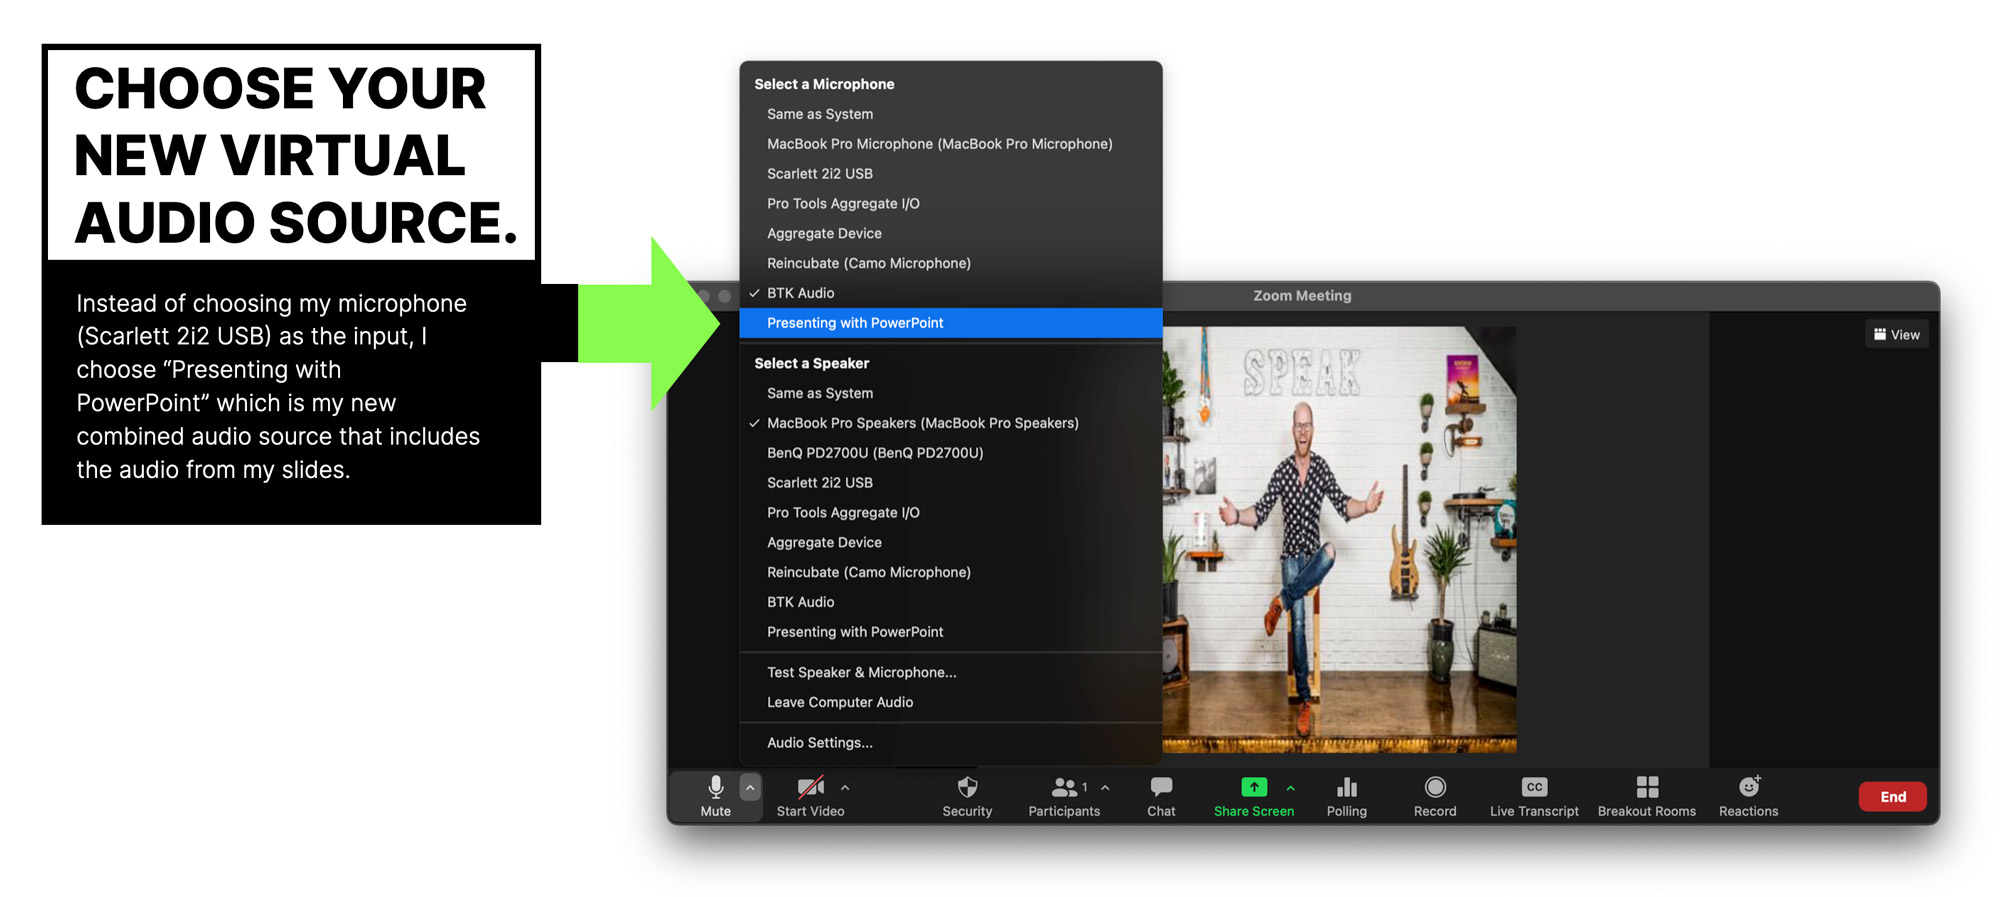
If you have audio and video in your slides you may have experienced the problem where your microphone takes control of the audio input rendering your system audio (the sound on your slides) silent. To solve this problem you can use software to create a virtual input source that combines your microphone and system audio (and lets you balance the volume) at which point whenever you are on a call or presenting, you can select that input and voila, you have complete control of your audio.
The software I recommend for this is:
- macOS: Loopback – Cost $99 USD
- Windows and macOS: VB Audio Cable – donation or free
The image below shows how Loopback works. VB Audio Cable works in a very similar way.
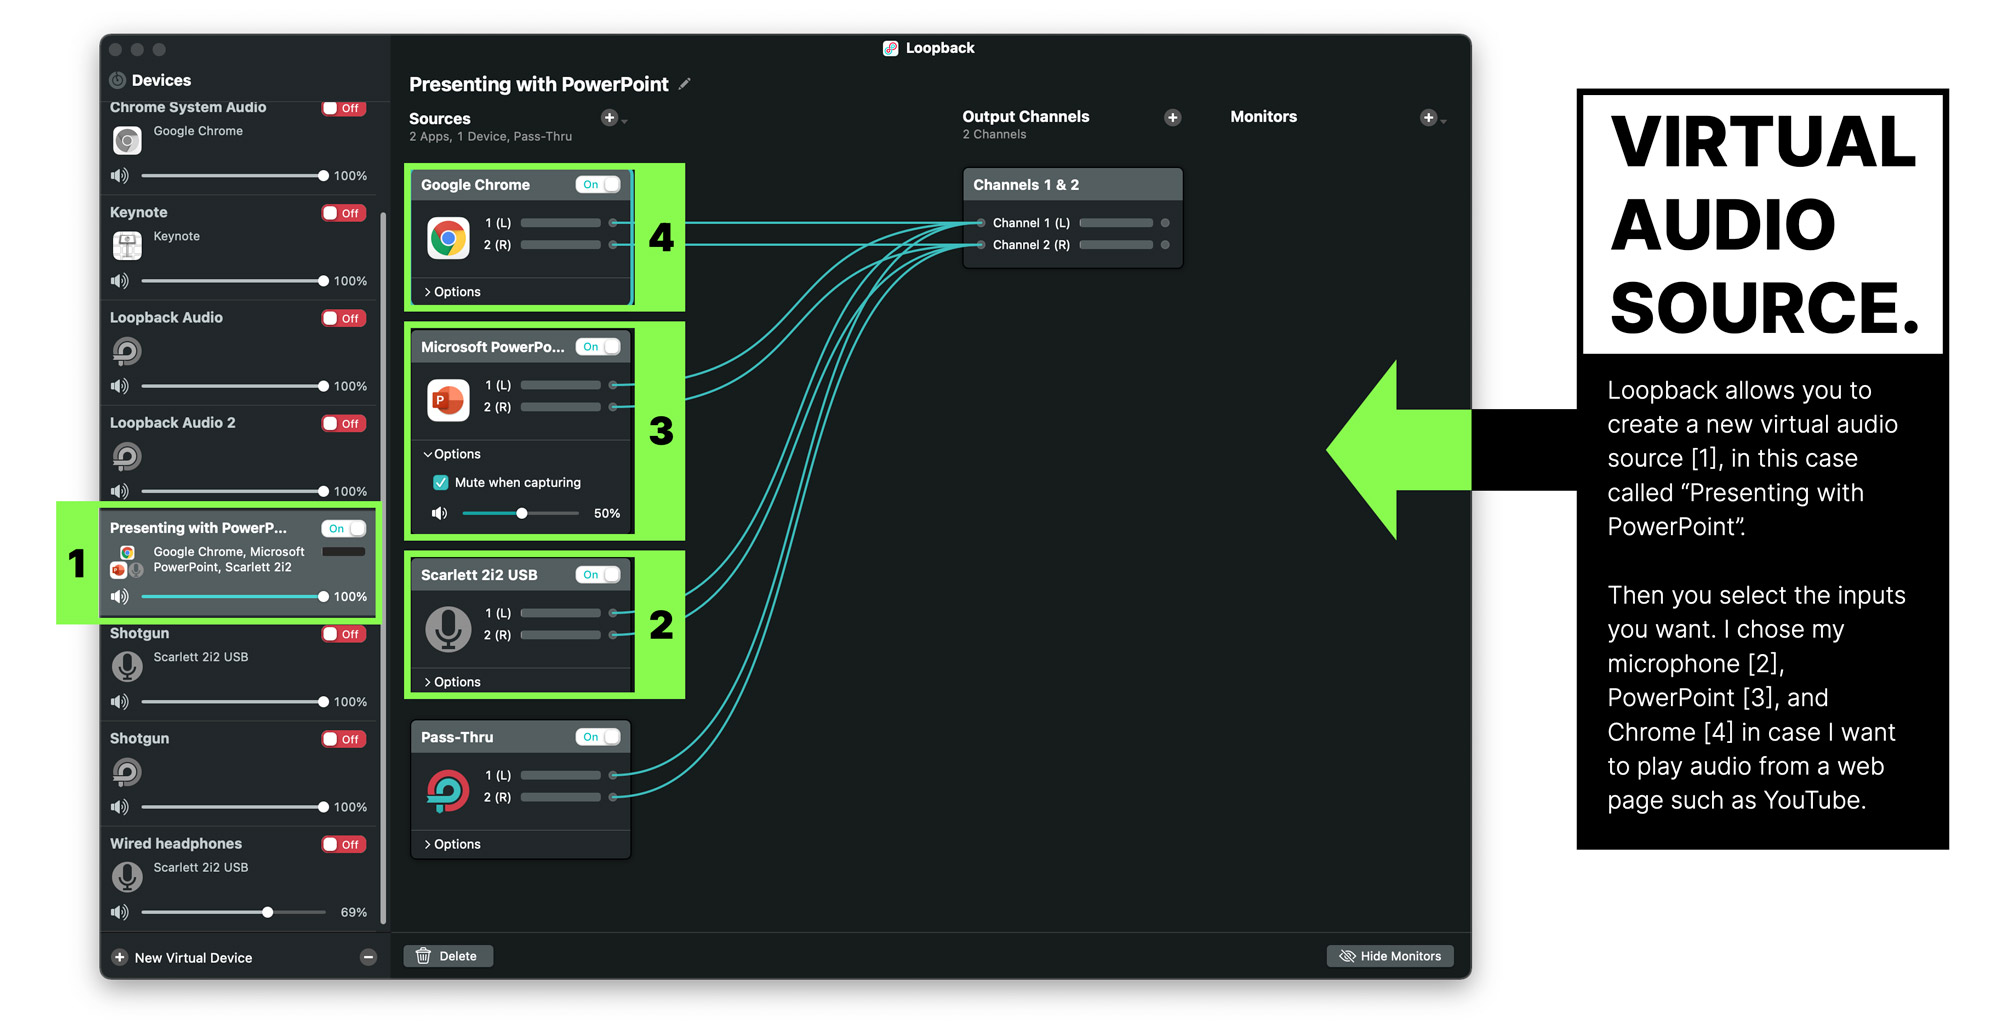
Once you’ve set up your new virtual audio device, you would then select that as your audio input in Zoom, instead of just your microphone, as shown below.
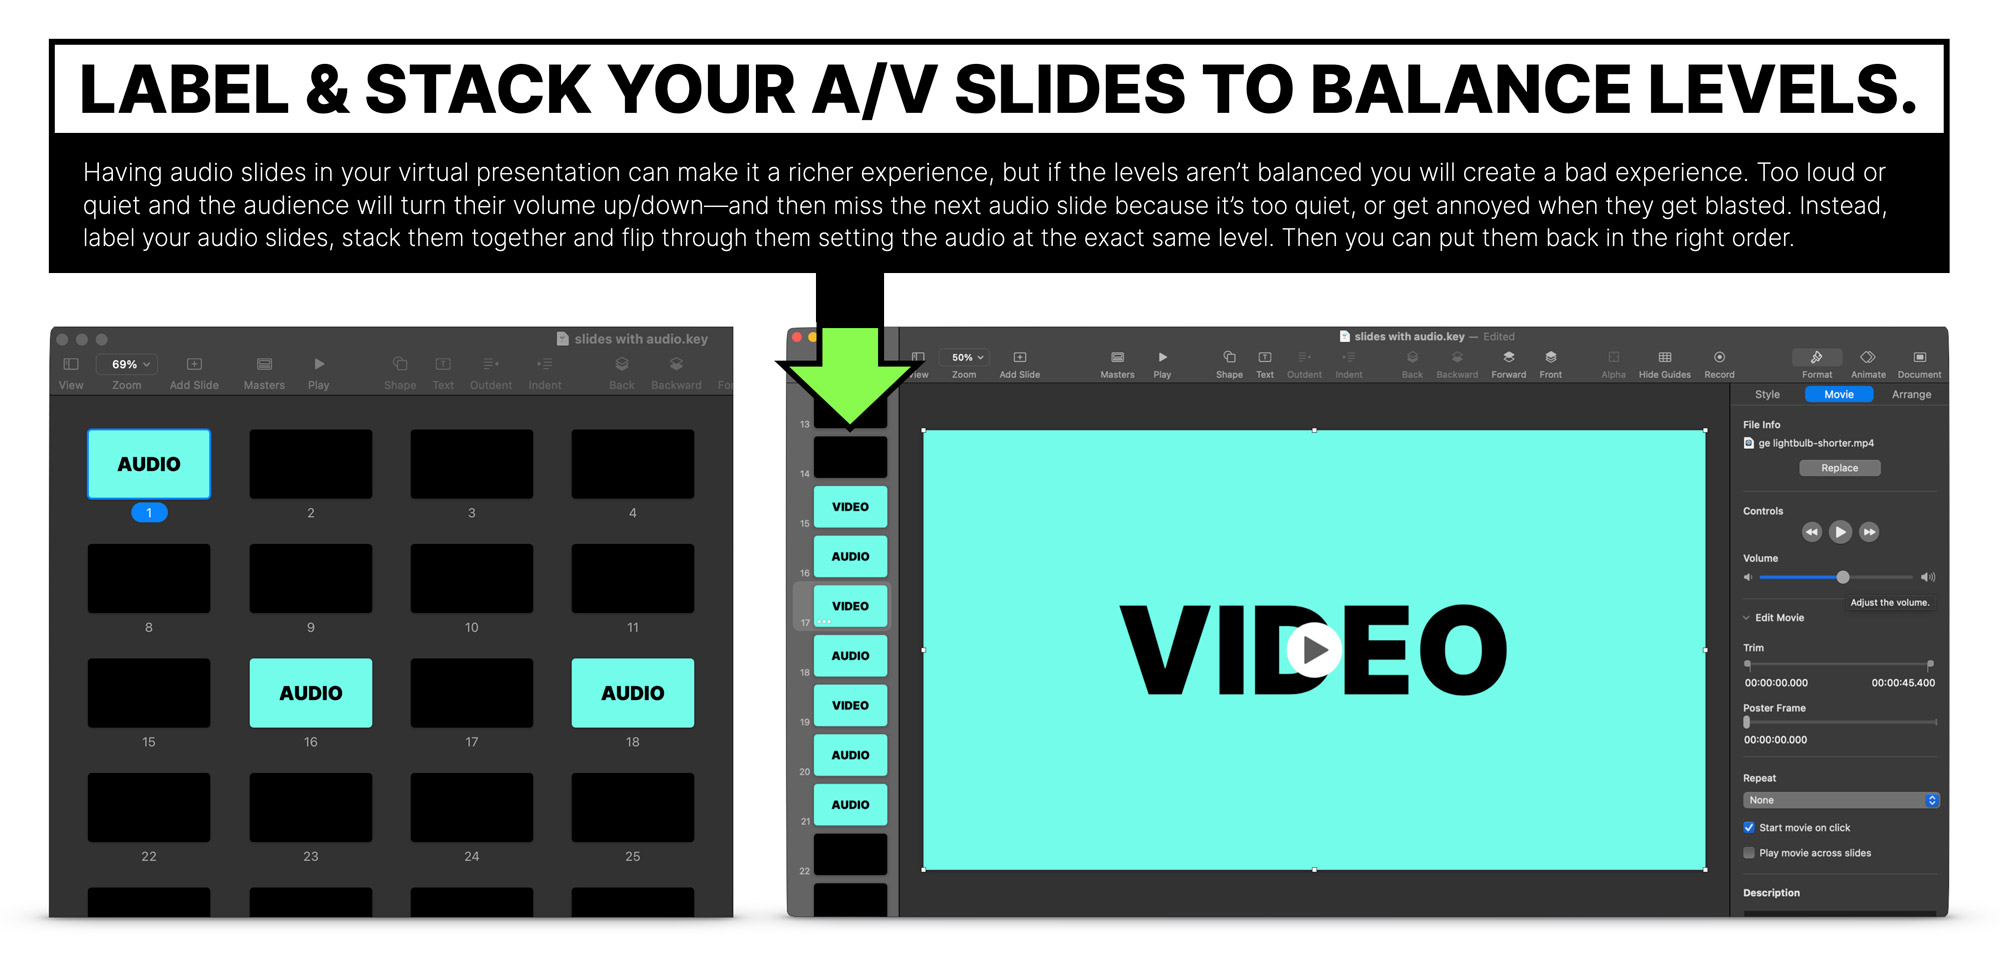
Something you must do if you have audio in your slides is to balance the levels so that they are consistently the same. If they are too loud listeners might turn down their volume which can make the next audio slide too quiet and they’ll miss something important. Similarly, if it’s too quiet they’ll crank the volume and the next slide might blow their speakers.
The best process to get the balance right is to stack all of your slides with audio together and run through them adjusting the volume of each clip in the settings of your presentation software. The screenshot bellow shows how to do this in Keynote:
Once they are all equally balanced, you can then use Loopback/VB Audio Cable to set the volume of your slides to be the same volume as your speech by speaking into your mic at the volume you would in your talk, and adjusting the levels so they sound good when flowing back and forth.
Note: Loopback tends to maintain its settings in the background even when closed, I recommend turning off all of your virtual input devices before closing Loopback to prevent issues where your audio isn’t doing what you want and you forget you had this set up.
#6 A/V Setup 6 – Adding closed captions to your live and/or recorded video
Whenever I’m reading a blog post containing videos clips—particularly on my phone—I find myself much more likely to stop scrolling and pay attention to them if they have closed captions.
Rev.com lists 5 reasons why closed captions are important:
- Accessibility: When you make your content accessible, you allow people who might be deaf or hard of hearing to have access to the videos you produce.
- Indexing for SEO: Search engines can’t crawl video, but they can crawl text. If you want your videos to rank on Google, back your video up with captions and a transcript of the audio.
- User experience: Give your audience the ability to enjoy your content, regardless of the environment they are in.
- Helping foreign-language learners: If you want to reach a larger audience, you should use captions and subtitles to make it easier for foreign-language audiences to comprehend your message.
- Improve average watch time: Captions grab and hold your audience’s attention, people are more likely to watch your video to completion if they have the option to turn captions on.
Deque.com has an excellent list of presentation accessibility best practices, including:
- Describe Visuals: Describe what is being visually presented on your slides for attendees who are blind or have low vision (you do not need to describe decorative images).
- No Content that Flashes (Zero Tolerance): Do not display any content that flashes. Content that flashes can be harmful to people who suffer from photosensitive epilepsy.
- Identify and Describe Speaker(s): Say who is speaking when there are multiple presenters in one presentation. If your camera is on or you’re presenting in person, be sure to describe what you visually look like and your environment at the start of the presentation.
How to Get Closed Captions From Your Zoom Presentations
There are a few ways to do this.
- You can let Zoom transcribe it live
- You can use a 3rd party service to transcribe it live
- You can wait until you have a final edited video and use a 3rd party service (or person) to transcribe it
Options 1 is useful if you want to show the closed captions during the event, but you will suffer from time lag and transcription inaccuracies, and having the captions locked into your recording
Option 2 is useful if you want to record the transcription live – but not show it at the time. This lets you edit any mistakes before you add it to your video recording.
Option 3 is the best approach. Reason being, if you want a professional looking video recording of your talk, you need to edit portions out such as the ramblings at the start and end, and any technical glitches. When you do this, the timing of the closed captions will be thrown off and you’ll have to manually update them which is a royal pain in the arse. By having it transcribed afterwards, you’ll have perfect timing, which makes everything much simpler.
Option 3 is what I use, but I’ll show you how to do 1&2 in case they fit with your use case.
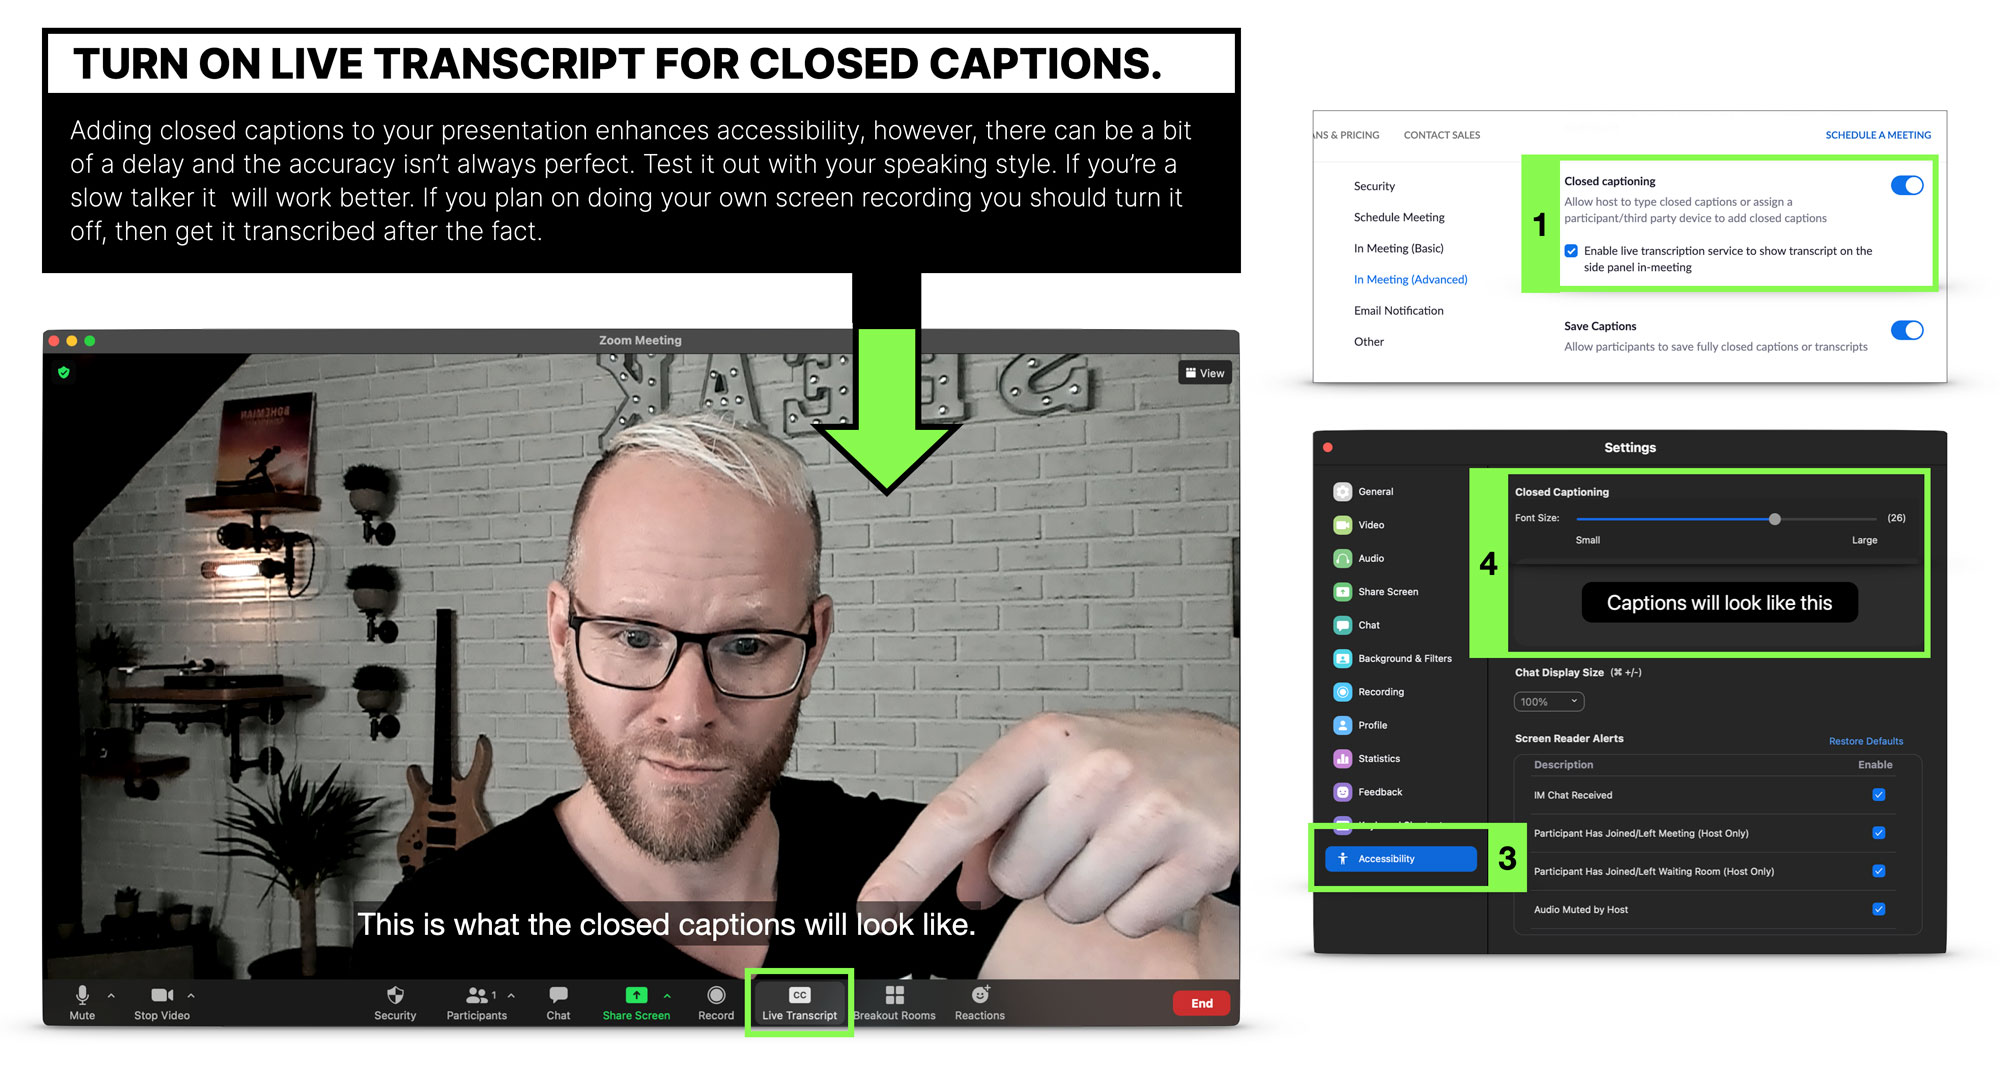
Option 1 – Use Zoom’s Auto Transcription feature to produce Closed Captions
I mentioned earlier in “Zoom Feature #9 – Closed captions” that Zoom lets you add live closed captions to your Zoom presentation. You can either have someone type them in live—not exactly ideal as it requires a professional—or you can turn on “Auto Transcriptions”.
To get this going visit Settings > Meetings (Advanced) in the Zoom web portal.
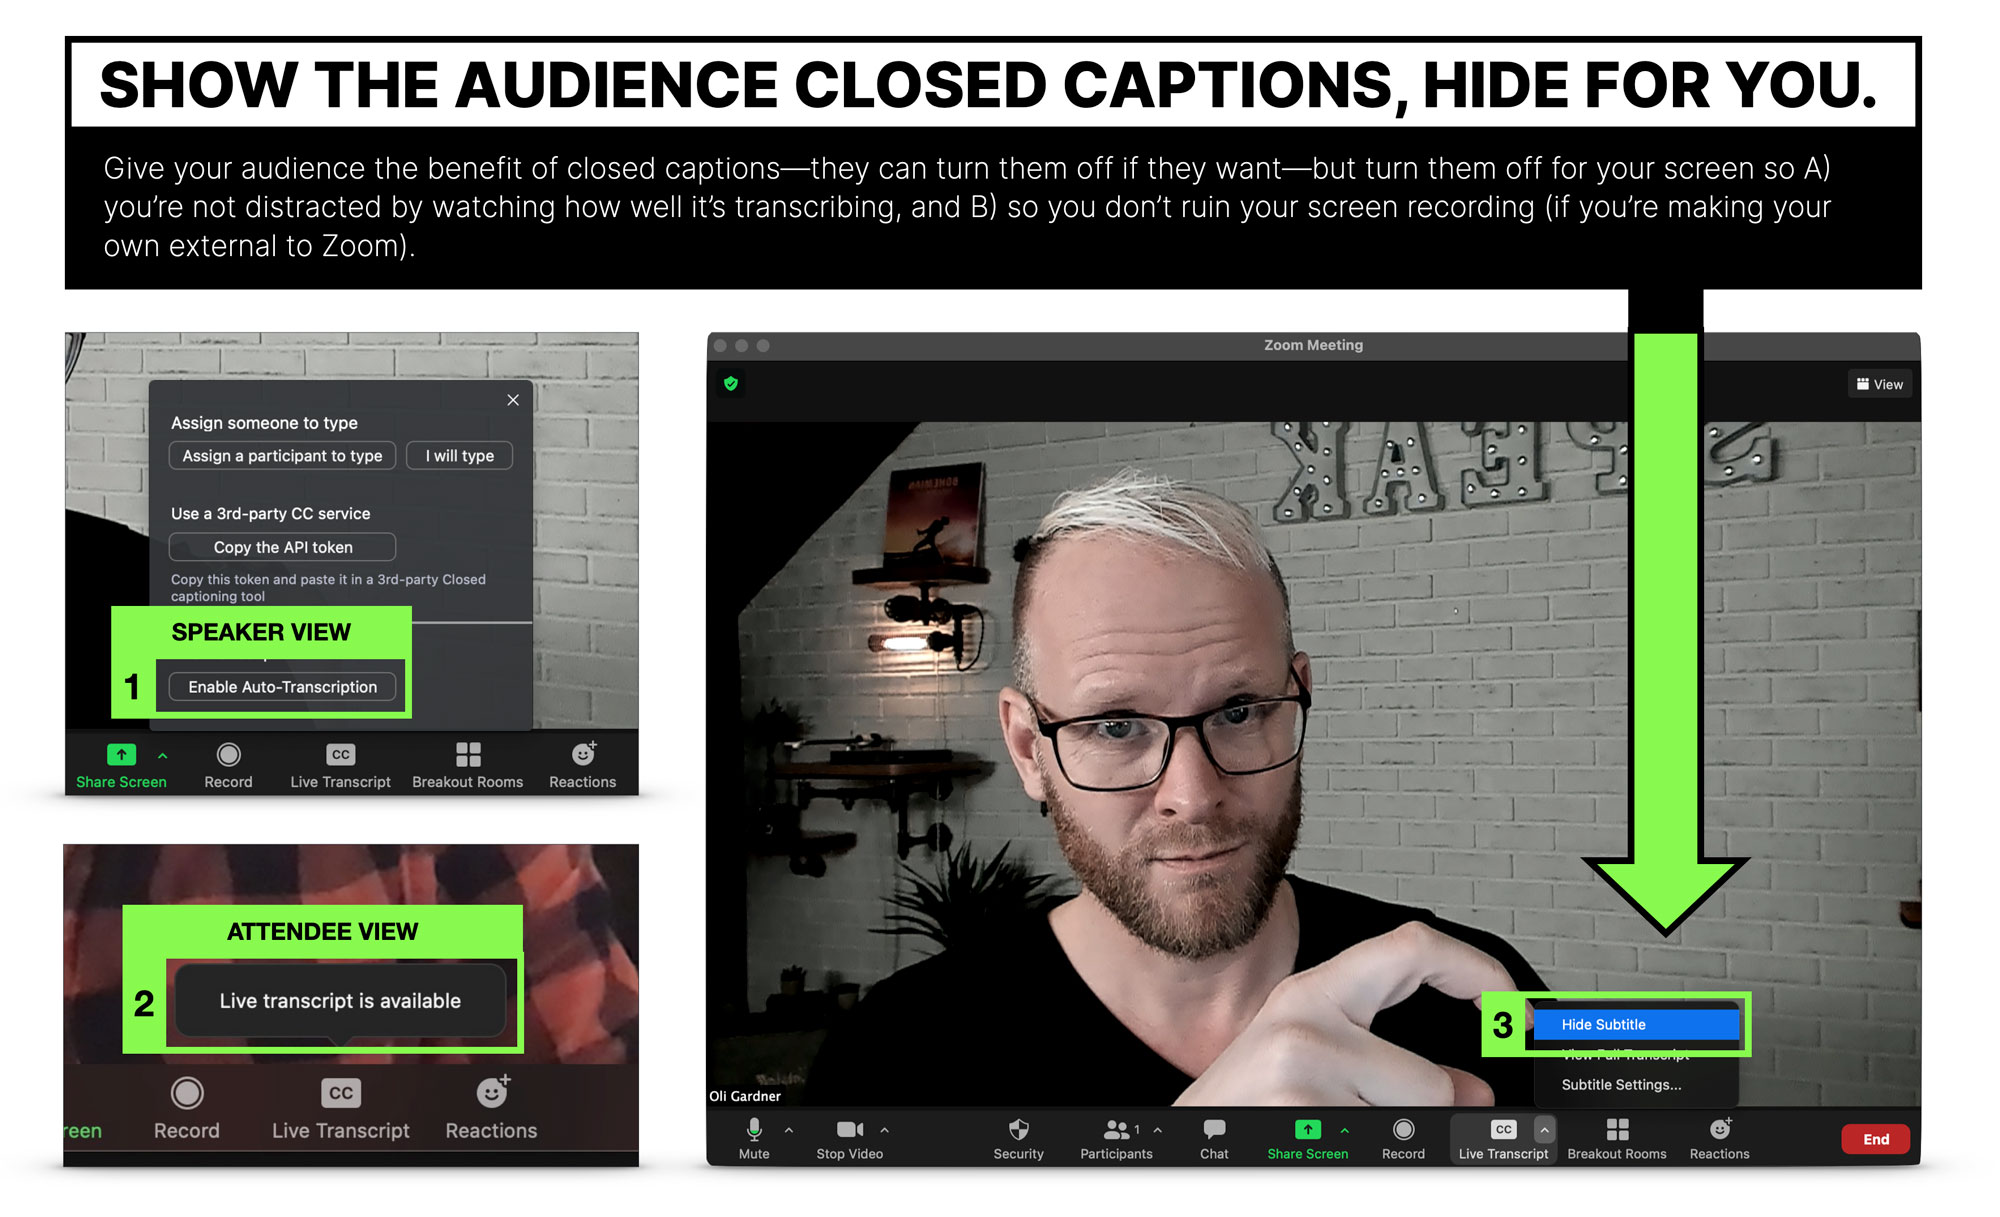
This will add a “Live Transcript” button to the Zoom toolbar. When you choose auto-transcription from the toolbar via the Live Transcript button attendees will get a notification in their toolbar saying that “Live Transcript is available”.
If you are recording the screen locally using software (ScreenFlow, QuickTime or PowerPoint etc.) you want to have our video recording as clean as possible, so it’s best to select “Hide Subtitle” from the transcript menu. Don’t worry, the attendees will still see them. This also prevents you being distracted by any delay or mis-transcription.
The closed captions will only be saved if you choose the cloud recording option, and you’ll find them in the Recordings section when logged into the Zoom website. Note, the transcription can take a while to show up after the recording appears depending on how long your presentation is.
If you are recording the screen locally using software (ScreenFlow, QuickTime or PowerPoint etc.) you want to have our video recording as clean as possible, so it’s best to select “Hide Subtitle” from the transcript menu. Don’t worry, the attendees will still see them. This also prevents you being distracted by any delay or mis-transcription.
The closed captions will only be saved if you choose the cloud recording option, and you’ll find them in the Recordings section when logged into the Zoom web portal. Note, the transcription can take a while to show up after the recording appears depending on how long your presentation is.
To download the captions you can click into any of your videos in the Zoom web portal and download the closed captions .VTT file.
This is an editable text file where you can make any changes to correct mis-transcriptions. You then upload this to the platform you are using to host your videos.
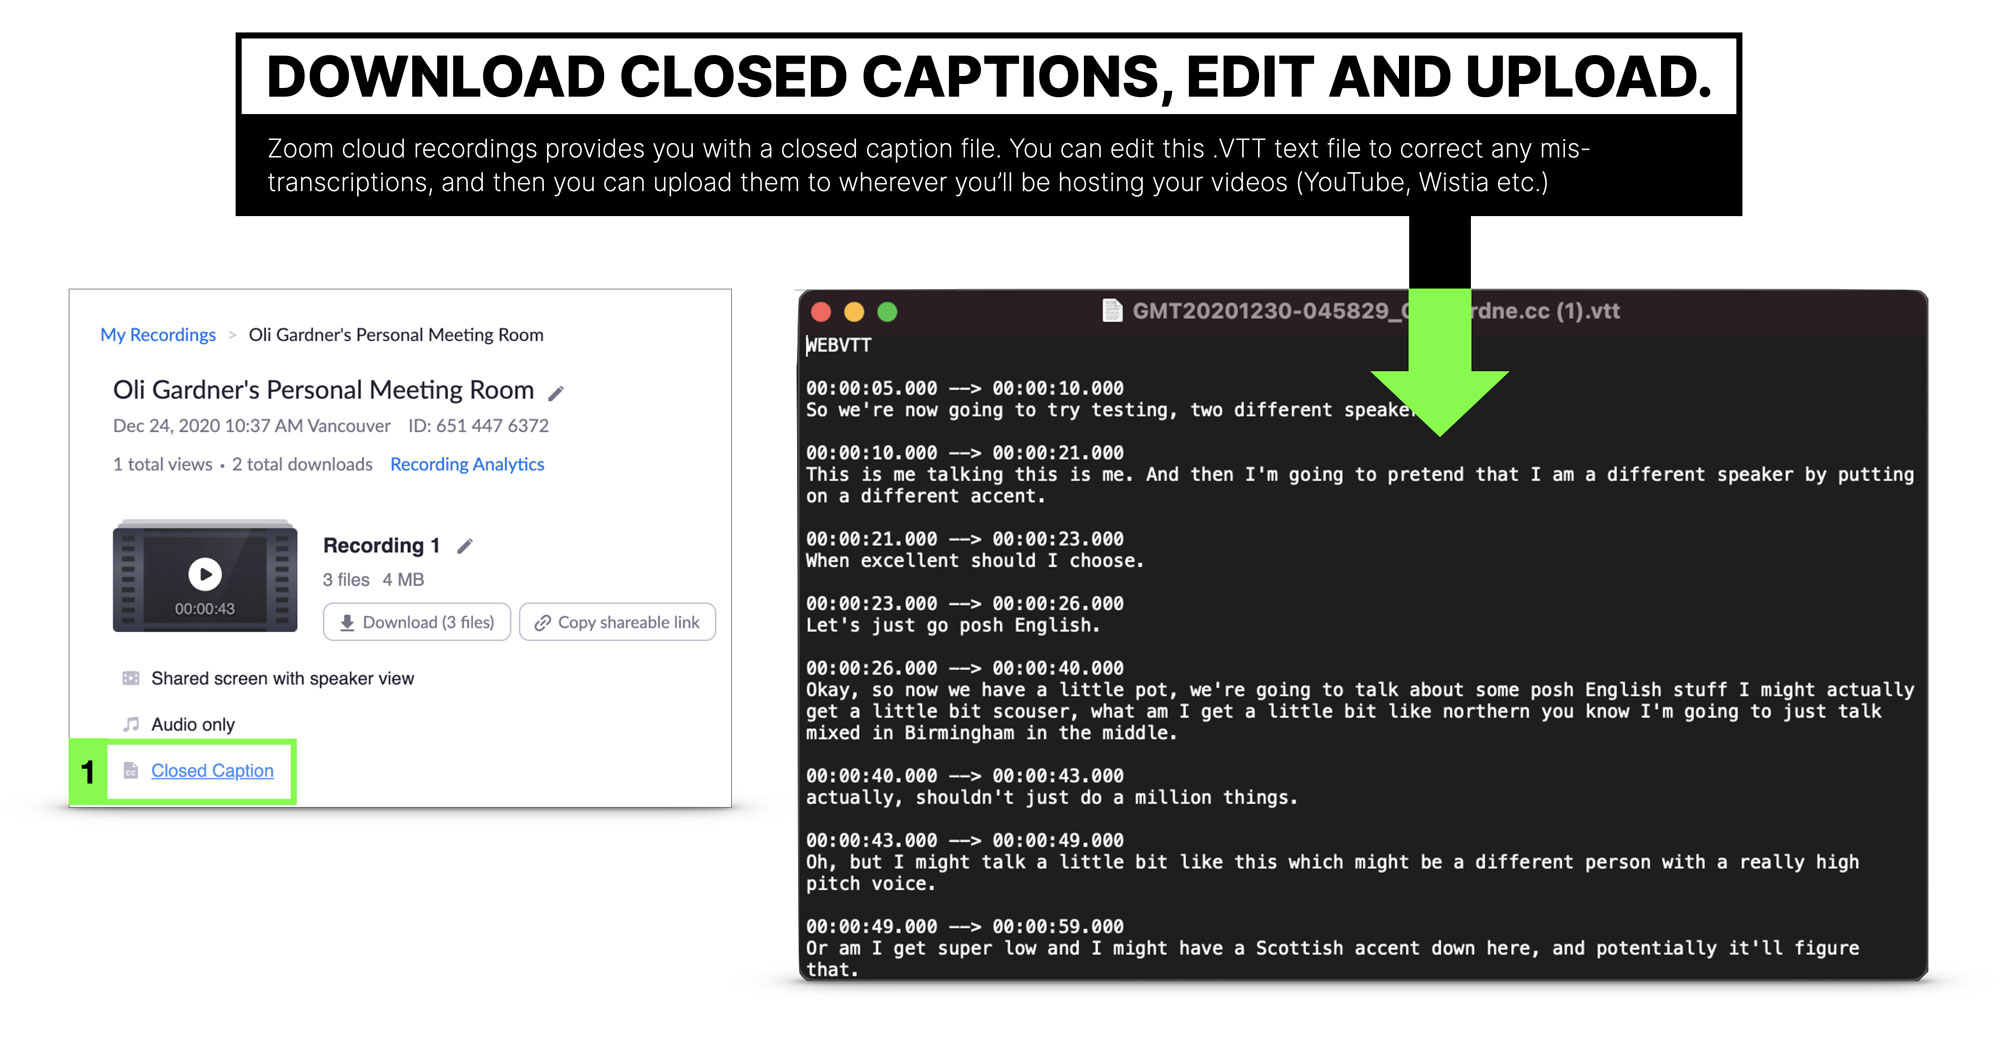
Editing a raw text file like this is time consuming and a skill in itself.
The Zoom transcriptions are pretty accurate, but live transcriptions always have some lag when shown to your attendees. It’s up to you if you want to show them or not. It’s best to test them with your style and speed of speaking to see if they sync well enough with your slides to be useful in a live environment.
Option 2 – Use a 3rd Party Live Transcription Service
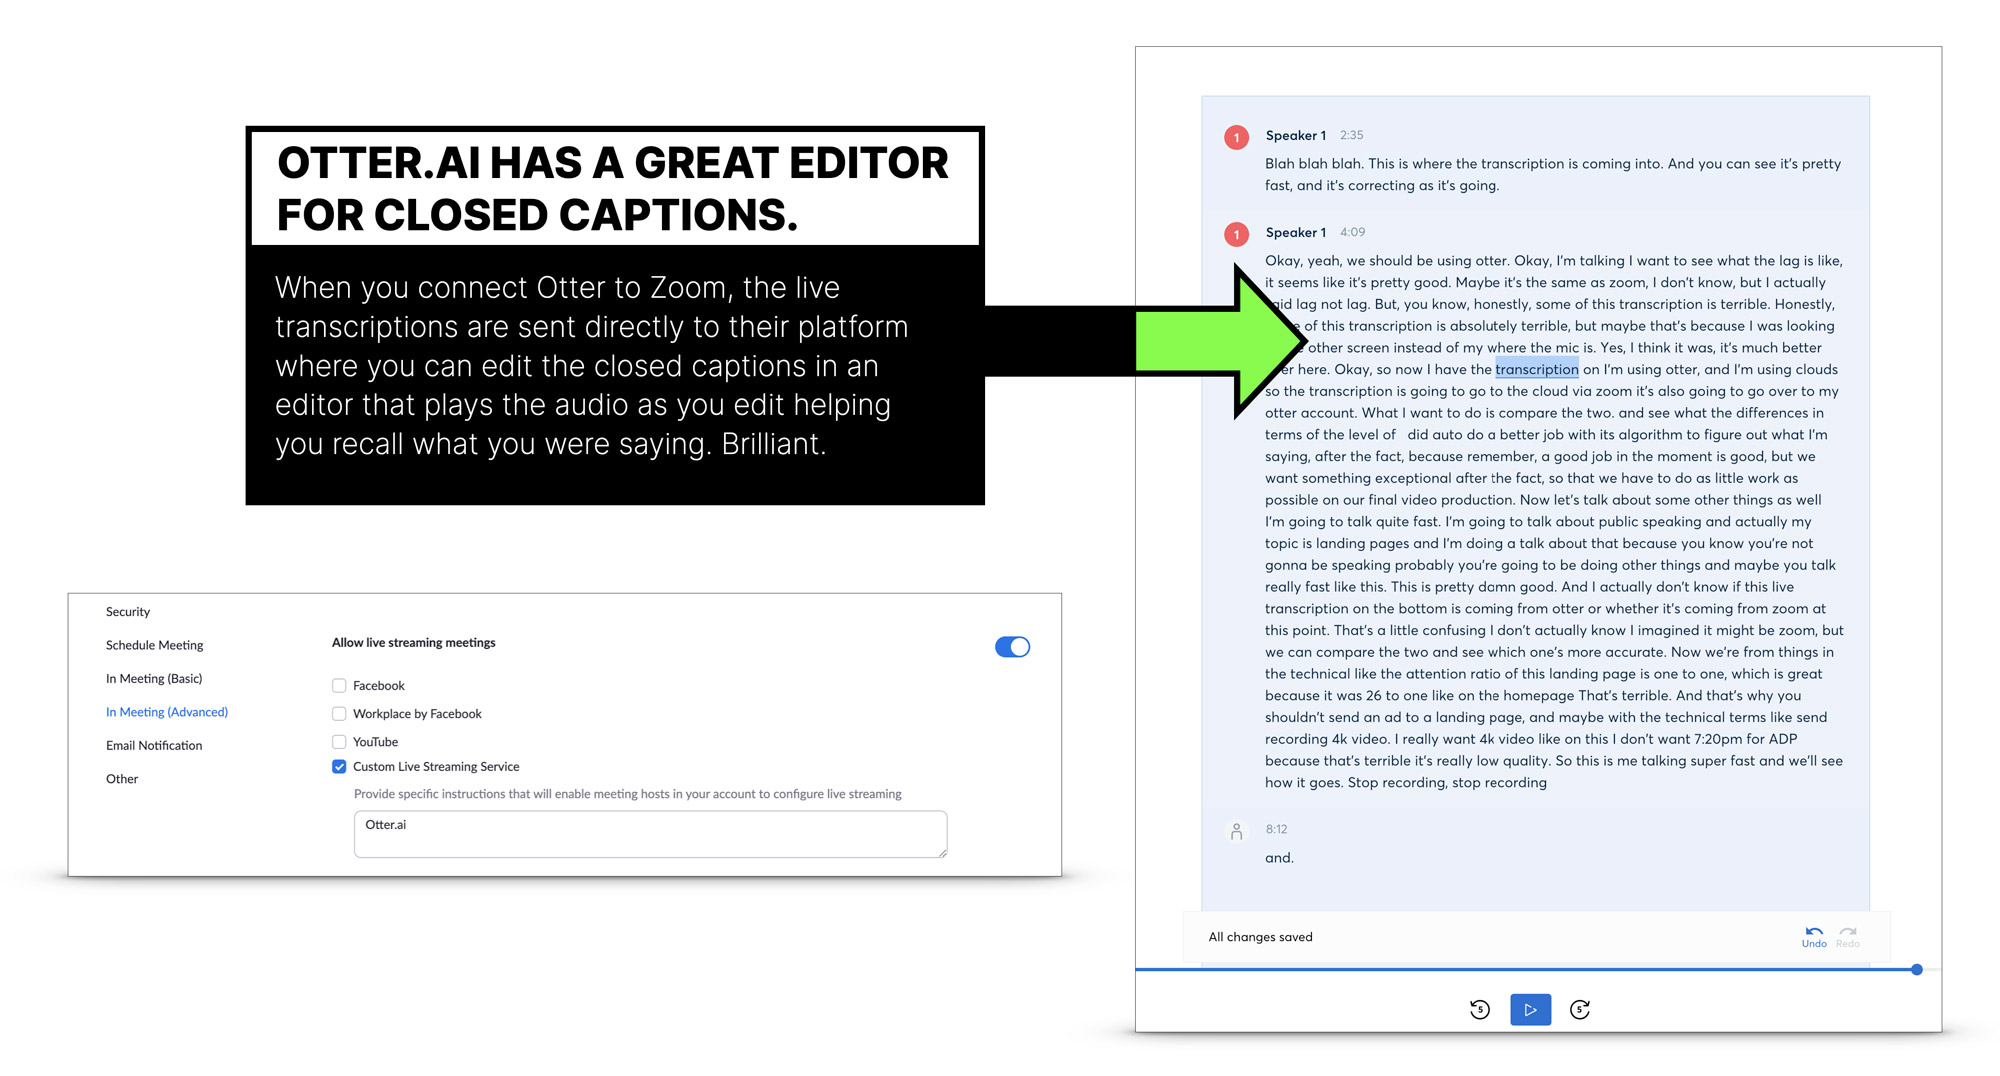
My preferred 3rd-party platform is Otter.ai. It does a really fast job of transcribing live, but more importantly—when we’re talking about making a great video recording—it makes it really easy to edit any mistakes in the transcription.
With Otter, you don’t just get a text file. You get a text editor with the audio connected to it. So if the translation is off, and you don’t remember what you were saying (let’s face it – we all ramble from time to time in a presentation) you can just listen to it and make an edit. Which is much easier than finding the video recording and moving back and forth in it to figure out what you said.
As a paid option it might not make sense for everyone, but if you do a lot of presentations or have a backlog of videos, it’s well worth taking it for a spin, even for just a month.
Here’s how to set up Otter with Zoom for live transcriptions and to get your closed caption files.
- Open an Otter account (they do have a limited free version to try out too)
- In the Apps section, add Zoom then follow the setup instructions
- If you are on a corporate account, your administrator will have to complete some of the steps in the process
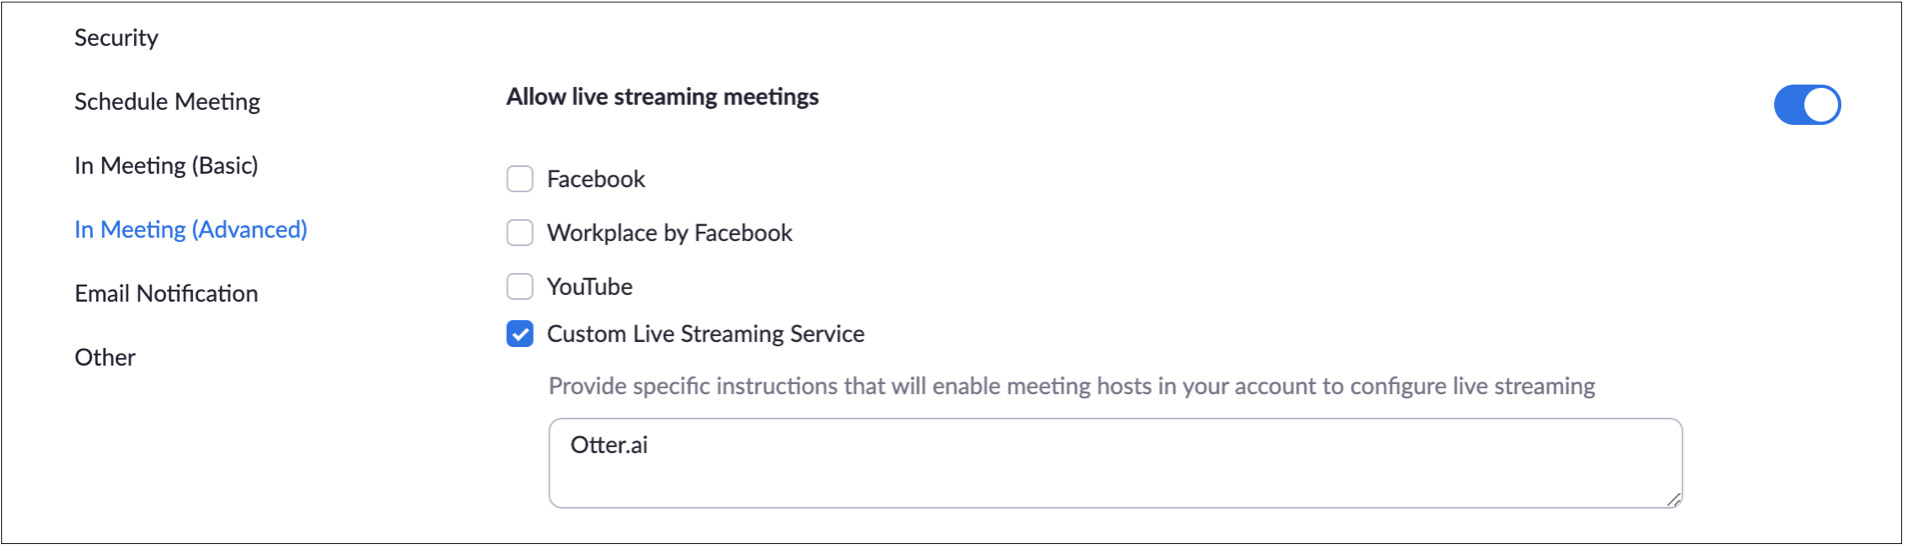
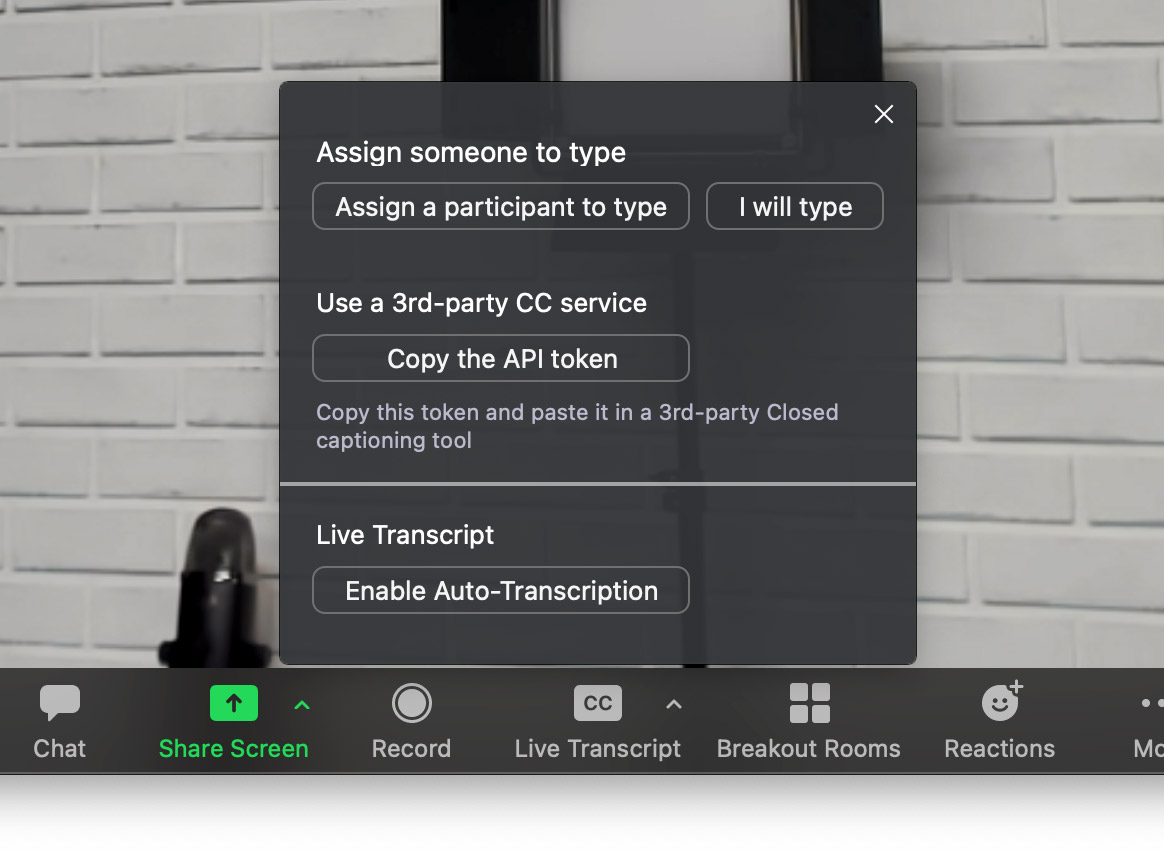
- Once the apps are connected, you need to “Allow live streaming meetings” option in Zoom and check the “Custom Live Streaming Service” option.
- Launch a Zoom meeting and you’ll see the Otter connection in the top-left corner
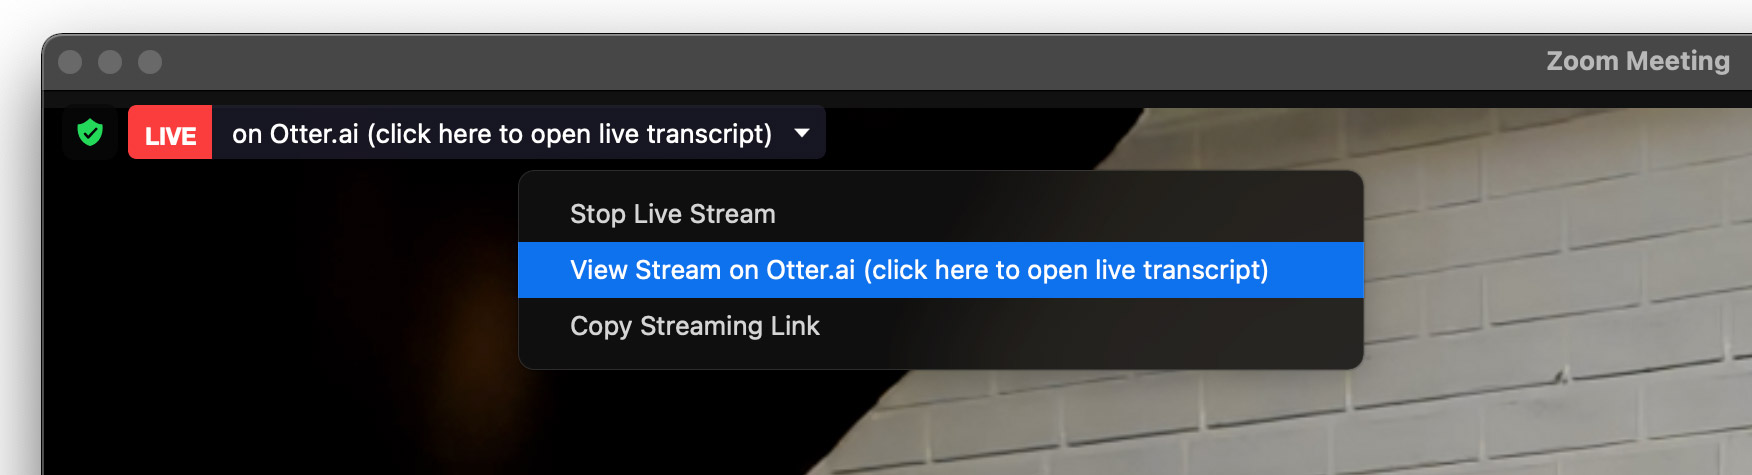
- You don’t need to click on “click here to view live transcript”, but if you do you’ll see where the transcription is happening in your Otter account.
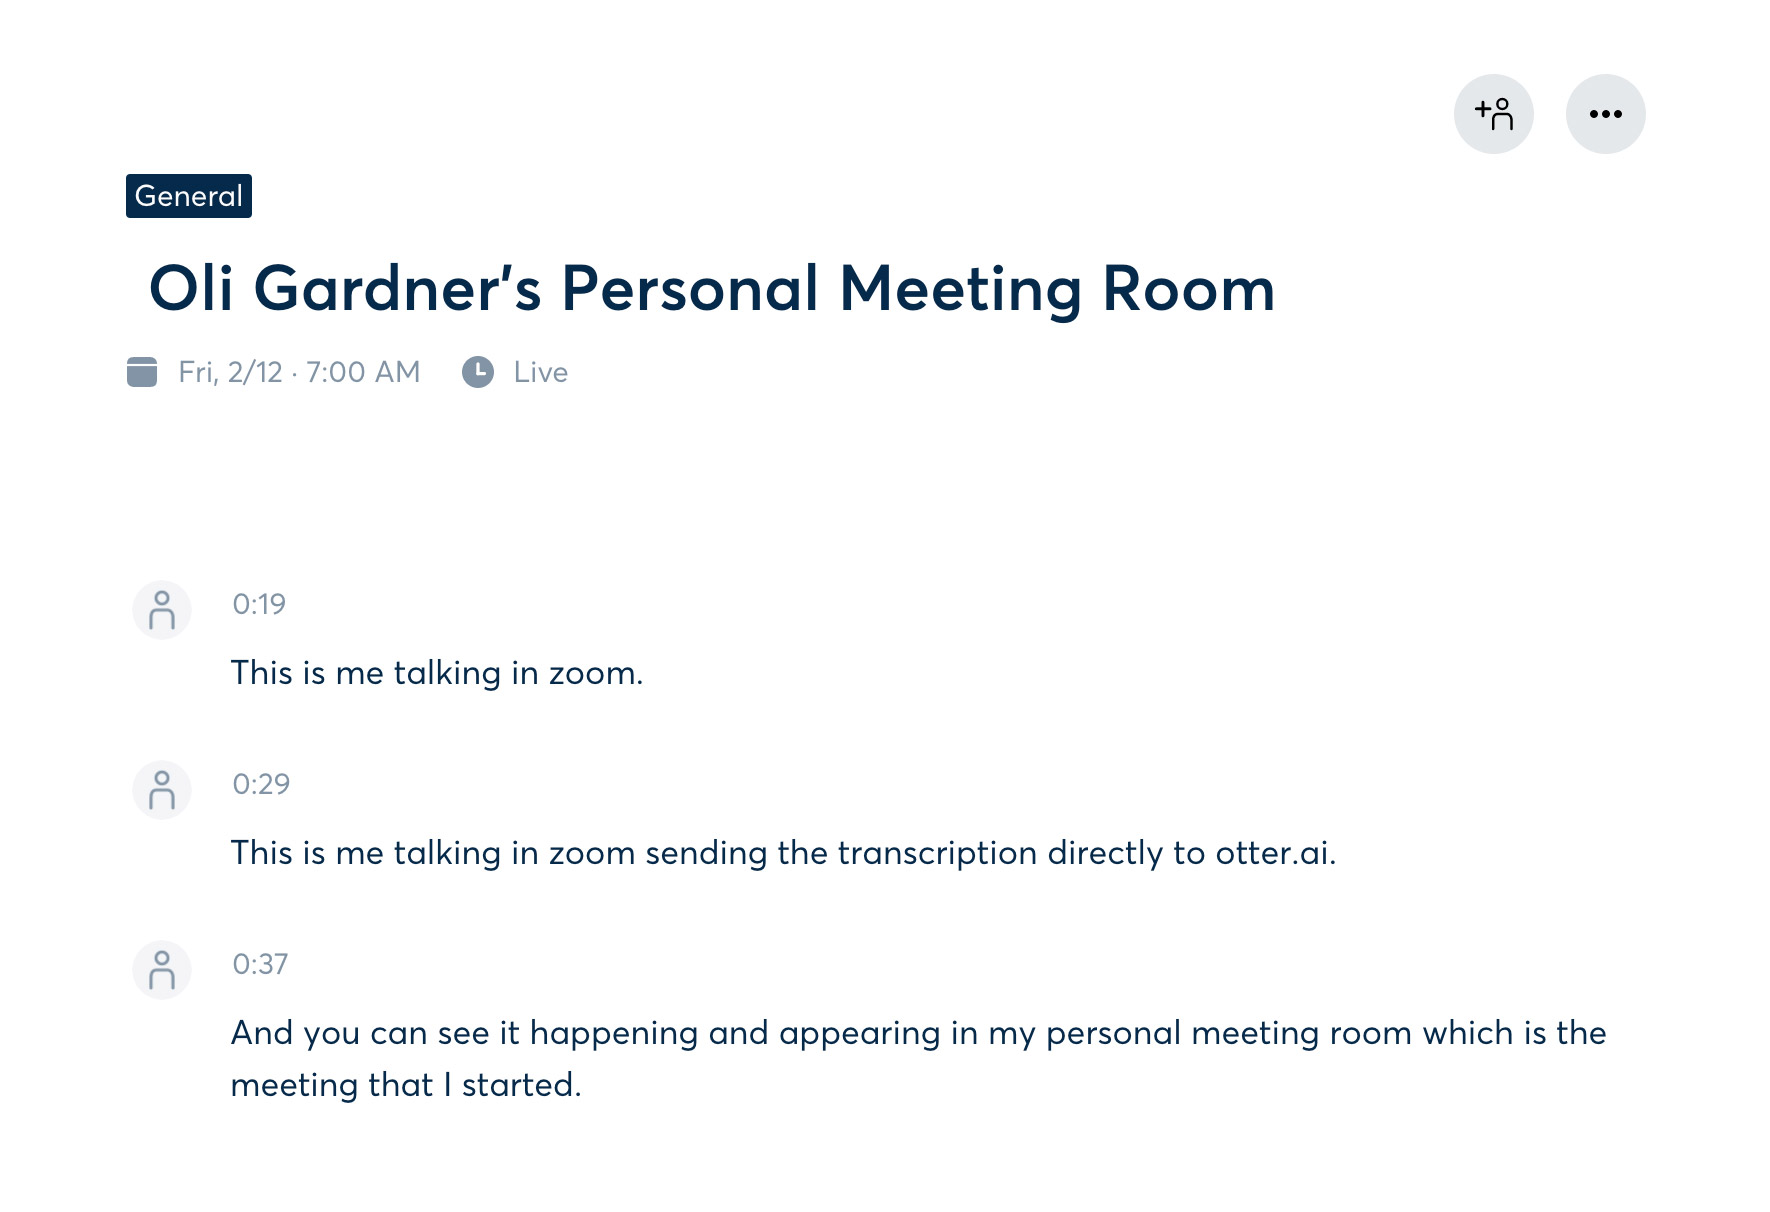
- Enable Auto Transcription in Zoom only if you want attendees to see them live. Again, you need to test this with your speaking speed to see if you want this turned on.
- And you’re off to the races.
- When you’re done, you will have a transcription file you can edit with the audio beside it to double check any mistakes.
- When exporting the transcription, you have some regular text options, but in terms of closed captions, only one option, the .SRT file. I imagine they will have more to come. This is the original closed caption format that’s widely compatible with video hosting platforms including Wistia. Zoom only has VTT which is a newer format that can include some text formatting information, but not every platform accepts it, and for the most part we don’t need much beyond the right words at the right time.
A cool feature of Otter is that it can recognize different speakers, so if you’re talking with a co-host or another speaker on a panel, it will split those up for you, which can be handy if you’re editing the video to remove another speaker and need to edit them out of the transcription too.
Important note: If you use a 3rd party service, then decide not to use it, or just want to use the regular Zoom feature, you won’t be able to unless you turn off the “Allow live streaming meetings” setting. It took me two hours to solve that problem.
Option 3 – Using a 3rd party service to create closed captions from your final edited video
This is really easy, and again I use Otter for this. You simply upload your video and boom, in a few minutes you have the full, perfectly timed transcription, and as we saw earlier, because the audio is connected to it, editing is quick and easy.
Export as an .SRT file, upload along with your edited video to your video hosting platform, update any visual settings it may have and boom, you are done!
That was a lot of information. But once you’ve gone through these steps and established your audio equipment and settings, webcam, screen recorder, and closed captions, you’re ready to record your magic and then piece it all together afterwards to create a brilliant recording that you can use in your marketing and promotions.
A/V Chapter Appendix – The A/V setup I use for presenting
This is the setup I use for my presentations, and it’s absolutely fantastic. It needs a bigger upfront investment, but if you’re serious about doing professional quality virtual speaking engagements or creating your own video content, it’s a setup that will separate you from most speakers. You don’t need to get to this stage immediately. Just chip away a bit at a time, picking up different pieces of gear, and if you can only afford part of it, focus on a good mic, DIY the lighting, and use free software like DaVinci Resolve for editing.
Note about affiliate links
The table below includes some affiliate links. These generate a small amount of $$ to help with Be the Keynote’s bootstrapped startup costs, and the use of these links is greatly appreciated. They are mainly for equipment that I personally use or have tested for quality. I don’t ever recommend something without standing behind its ability to help you present better. Whenever possible I will recommend different price options.
| AUDIO EQUIPMENT | DESCRIPTION |
|---|---|
| Rode NTG4+ shotgun mic | The great thing about using a shotgun mic (aside from the quality) is that you can set it up to be completely out of the frame and thus invisible. This means no fiddling with trying to get a lavalier hitched to your shirt or dress, and no scratching sounds when it rubs on your clothes. If you can create a permanent presentation space (even just a consistent desk placement), it’s very quick to set up. |
| Rode SM4-R shock mount | A shock mount attaches to a boom arm and suspends it in a cradle to prevent any movement from causing audio problems. I have the Rode SM4-R which is designed for the NTG4. You don’t need this if your mic comes with a holder (most do) but it is a superior option and gives you some extra control over the direction of the mic, which is very important with a shotgun mic as they have a narrow field of reception. |
| Neewer ceiling mounted boom arm | I have multiple wall and ceiling mounted boom arms that I use for the microphone and lighting. The best thing about these is you can fold them up to the ceiling when not in use. Then bring it down when you need to present – either at your desk or standing up.
You can also get desk-mounted boom arms to hold your microphone like this from Neewer. This will work well for presenting over Zoom when you are sitting down, but for a more advanced setup where you can walk around you really need to suspend it from the ceiling. |
| Focusrite Scarlet 2i2 audio interface | An audio interface is basically a little mixer that you plug your microphone(s) into, and then into your computer. Focusrite have some wonderfully simple options. The 2i2 has two inputs, but the Scarlet Solo (one input) is a little cheaper and is just as good in terms of quality. |
| Logitech R800 remote clicker | Tried and true classic clicker, with a countdown timer screen, and vibration warning at 5 minutes and 2 minutes before your time is up. |
| VIDEO EQUIPMENT | DESCRIPTION |
| Logitech Brio 4K webcam | The best webcam option available if you want something better than the camera in your laptop, or if you don’t have a camera in your laptop. |
| LIGHTING EQUIPMENT | DESCRIPTION |
| Neewer 1904 LED Light | This is a bigger, brighter version of the 660 below. Main reason I have this is for a different video setup I have. |
| Neewer 660 LED lights (x2) | Excellent starter lights. These ones have an electronic dial to set the colour temperature, but you can get a cheaper version that is almost as good. |
| Neewer soft boxes for 660 lights | Not essential, but they do a good job of softening the light to make it more attractive. You can easily hack your way to a similar effect using parchment paper or similar, to save some cash. Also a good DIY option in this video. |
| SOFTWARE | DESCRIPTION |
| Final Cut Pro X | MacOS video editing software |
| ScreenFlow | MacOS Multi-input screen/webcam/audio recording software |
| Loopback | Virtual audio input software for combining system audio (from your slides) with microphone audio. |
Chapter 11
How to Use Post-production to Add Value to Your Zoom Recordings
Sadly, the vast majority of virtual presentations that happend on Zoom just wither and die in the wind because the speaker finished their talk, got up from their desk, wiped the sweat from their brow and went on with their day.
That’s wrong to me on so many levels, and while I don’t blame anyone for it, I hope to inspire anyone reading this ultimate guide to remember a few steps whenever you get down off the virtual stage.
- Step 1: Congratulate yourself for being brave and awesome enough to get on stage and share your message, style, and voice.
- Step 2: Take a deep breath and think of the people you helped today.
- Step 3: High five yourself for remembering to click the record button (you did that, right?)
- Step 4: Realize that you now have a slice of incredibly valuable and rich audio visual content that you can share, repurpose, and monetize.
- Step 5: Follow the remaining steps in this chapter to make the most of your newfound bounty.
Seriously, it’s amazing to have high-quality video content. You should be excited.
Before we get to the serious business of stitching together your high-res footage you created from your talk, embed one concept into your memory and do it for every talk you do…
Establishing ownership of your content
This is actually a rewind-in-time piece of advice. As part of your agreement to speak at a virtual event, specify that you’ll be making a your own recording of the presentation. Some contracts give the even all kinds of exclusive ownership rights over the content they produce from your talk, and you want to make sure both parties are aware you’ll also be making a recording.
Now it’s time to:
- Piece together your high-res footage
- Figure out what to do with your videos once they are ready
Part 1: Piecing together your high-res footage
Editing video and audio is a mammoth topic that I can’t hope to cover in one chapter, so I’ll focus on the basic aspects you need to know to combine your audio and video captures into one piece. And to do that–you guessed it–we need a bullet list of things to do! Huzzah.
My editing platform of choice is Final Cut Pro which costs a pretty penny, but there are free options available that are amazing when you don’t need all of the serious cinematography features (which I don’t need at all to be honest). DaVinci Resolve is fantastic and most importantly, the free version is amazing and lets you sync your video and audio automatically—which is the number one thing that you’ll need in order to connect all of your recorded footage.
#1 Choose your video editing platform of choice
There are many video editing platforms available at a range of prices: from $0 to $400, and some that are subscription based like Adobe Premiere Pro at $27/month. The table below shows some of the more popular options.
| Cost (USD) | Name | Description | Includes Screen Capture Feature | Platform |
|---|---|---|---|---|
| Free | DaVinci Resolve | This is a great option as it’s a very feature rich platform and is easily more than enough for these purposes. There is also a pro version for $295 but that’s for extreme professionals. | No | MacOS, Windows, Linux |
| $129 | ScreenFlow | A great choice because of it’s amazing screen capture abilities. Most editing can be done here and if you want to get more advanced you could always use DaVinci resolve for that. | Yes | MacOS |
| $27/month | Adobe Premiere Pro | Pro-grade video editing. A worthwhile choice is you are already paying for Adobe products – you may even have it bundled in. Otherwise overkill for this purpose, and complex to learn. | No | MacOS, Windows |
| $324 | Camtasia | Quick to learn editing and includes screen capture capabilities. Video production beyond editing is not as good as Final Cut, Premier, or Resolve, and there is a significant lack of good tutorial videos available – which for me is a huge downside. | Yes | MacOS, Windows |
| $399 | Final Cut Pro X | Pro-grade video editing. Complex to learn and probably overkill for this purpose. | No | MacOS |
#2 Import the footage from your webcam, screen recording, and audio devices
- Webcam video
- Screen recording video
- Microphone audio
- System audio
- Potentially a second camera
The videos below show good ways to do this on the various platforms.
#3 Sync your videos with the audio
In order to be able to sync your audio it’s crucial that every video source you record also has the microphone turned on: the computer where you recorded the screen, the webcam, and any secondary video camera you had set up. You won’t use this as it will be of low quality, but it’s what you will use to sync the videos up with your primary audio track. There are two ways to sync the tracks, automatically, and manually. It’s easy to guess which is better.
Syncing automatically
Only a few platforms have an auto-sync feature which is a massive time saver. The ones I’m aware of are: Final Cut Pro X, Adobe Premiere Pro, and DaVinci Resolve – again making Resolve a fantastic choice as it’s free! The videos below show how to do it on the respective platforms.
- How to auto-sync audio in Final Cut Pro X
- How to auto-sync audio in Adobe Premiere Pro
- How to auto-sync audio in DiVinci Resolve
Syncing Manually
As I haven’t had to use this technique (yet), I’ll simply refer you to some good video demos of how it works. There are times that even when auto-sync is avilable it doesn’t work right and will require a bit of manual tweaking, so I’ll include links to a series of videos on how to do this on multiple platforms. In essence though, you want to make sure you clap loudly once or twice once the cameras are rolling to create an audio spike in each of your recordings that you can then line up in your software to sync it to your video files.
#4 Fix whitebalance issues in your webcam video
The most common reasons for whitebalance issues—in simple terms, when you look too blue or too yellow—is having a mixture of different lighting sources that have different temperatue bulbs, or there is a setting on the camera that was set incorrectly.
You can fix this in your editing software, which can be tedious and difficult, so the best way to set yourself up for success is to make sure you include something pure white, grey, and black in your video clip. For best results buy some cards that have accurate representations (with no tint or colour cast).
A cheap option is something like this set of 3 whitebalance cards (affiliate link). And for a more professional option the X-rite Colorchecker Passport Video is very highly regarded.
You hold them up (as close to your face as possible) at the start of your video recording, and then when it comes time to edit the video you can use this to help the software figure out the correct whitebalance. You hold it close to your face because that’s the most important part of the video to get right. As long as your look correct it will all look great.
This is especiallyl crucial if you are using more than one camera to capture different angles, as different camera sensors/software will produce different results, even if y=the colour temperature is set manually to the same value.
For tips on how to fix whitebalance issues, I recommend watching some of these clips.
- FIX A TERRIBLE White Balance In Davinci RESOLVE
- Get Perfect Color and Skin Tones With This Chart! << this is a brilliant technique for Final Cut Pro X
One important tip that I learned the hard way, is to do a few things before you start editing. First you should correct the exposure, then do the colour correction, and then start the editing. Because once you start chopping up your video, it gets much harder and more laborious to colour correct a whole bunch of chunked up clips.
#5 Edit out any start and end fluff
Every virtual event involves a host getting things started, chatting to the audience about logistics, often fumbling with the transfer of screen control, and then your intro.
Similarly, there will be aspects of the ending (and perhaps in the middle, especially if there is more than one speaker) that aren’t part of your presentation.
You don’t want any of this in your final recording. When you use your recording to promote yourself as a speaker, whether it’s to event organizers, on YouTube, on your speaker page, or as part of a paid training course, your audience will be immediately turned off if the video starts with “Hi everyone, we’ll be starting the webinar in a few minutes. We’re just waiting for the last few folks to trickle in….”
Watch how to quickly cut unwanted sections out of your video.
#6 Edit out any technical glitches
While you’re at it… Unless it was a very sunny blue moon in June, there will be technical glitches in your talk that caused an interruption.
Your audience will suffer through glitches with you in a live event, and they will love you for dealing with it with grace and good humour. But in a recording it’s just annoying and shows that you didn’t care enough to fix the video.
If you’re asking for an email address or cash money for your videos, you need to crank up your production. Even the most basic video editing software makes this a simple task. And if you’re new to it, choose a platform, start a 30-day trial and make it happen.
#7 Edit out any other speakers or people you don’t want in there
It’s pretty common to have more than one speaker on a webinar format presentation. Often it’s you (the guest) and someone from the company putting on the event, and you don’t want their content in your video.
To remove them, quickly scrub through the video to find where they start and end, and cut them out.
If you are using Otter.ai for closed captions, you can look at the transcription to see where each speaker starts and ends (as it identifies them based on the sound of your voices). This can help you figure out where the timestamps are in the video if there is a lot of switching back and forth.
If you are on a panel or a co-hosted webinar where discussion is occurring between you and someone else, be careful that removing a section doesn’t hurt the context and quality of your content. If it needs to be in there, leave it, but aim for it to be your content only. The logistics of charging money or capturing leads with content that’s not exclusively yours are a pain in the butt.
#8 Add a logo animation to the start (and/or end) of your videos
This is a more advanced addition to your video, but if you intend on making many videos—either lots of events, or if you’re recording other instructional videos as part of your content marketing—you will want to have a branded intro.
Your logo might be your company logo or your own personal brand name logo.
You can see many examples of these if you browse YouTube. Most often it’s a short (3-10 second) logo animation with some accompanying sound effects or music.
If you want to take this approach, you can find many people on Fiverr.com who will do it for a very reasonable price. This is what I did for Be the Keynote.
#9 Export your video
In terms of which resolution you should export your videos at, it really depends on where you’re going to host it. If it’s YouTube, Wistia, Vimeo etc. they encode multiple versions (720/1080/4k) if you upload a 4K, and will show the best quality available to viewers based on their Internet connection.
However, if you have storage limitations (say for the plan level you have with a paid platform) or you’re hosting on your own server, 1080p will be just fine for most situations.
#10 Upload to your video hosting platform(s)
Once you’ve uploaded your video to your hosting platform of choice, you need to work on making it findable. In YouTube you need to add the following elements:
- Title. Read How to choose an effective YouTube video title
- Description. Read How to create a good YouTube video description
- Thumbnail image (explained in next section)
#11 Choose the default video thumbnail image (poster frame)
Video platforms typically allow you to choose how the video will look in it’s static mode, i.e. what do you see before you hit the play button. The default will be the first frame of your video which could be blank or some awkward shot of you looking blurry with a weird expression.
It’s absolutely essential that you replace the default image with another one (if it’s not already awesome). You can do this in a number of ways.
- You can create your own custom image and upload it
- You can choose the best of the auto-suggested thumbnails (YouTube does this)
- You can scrub (dragging the timeline slider) through the video until you find a frame you like and tell the software to capture this frame as the thumbnail (also called a poster frame). This is a feature that Wistia offers and makes it really fast and easy.
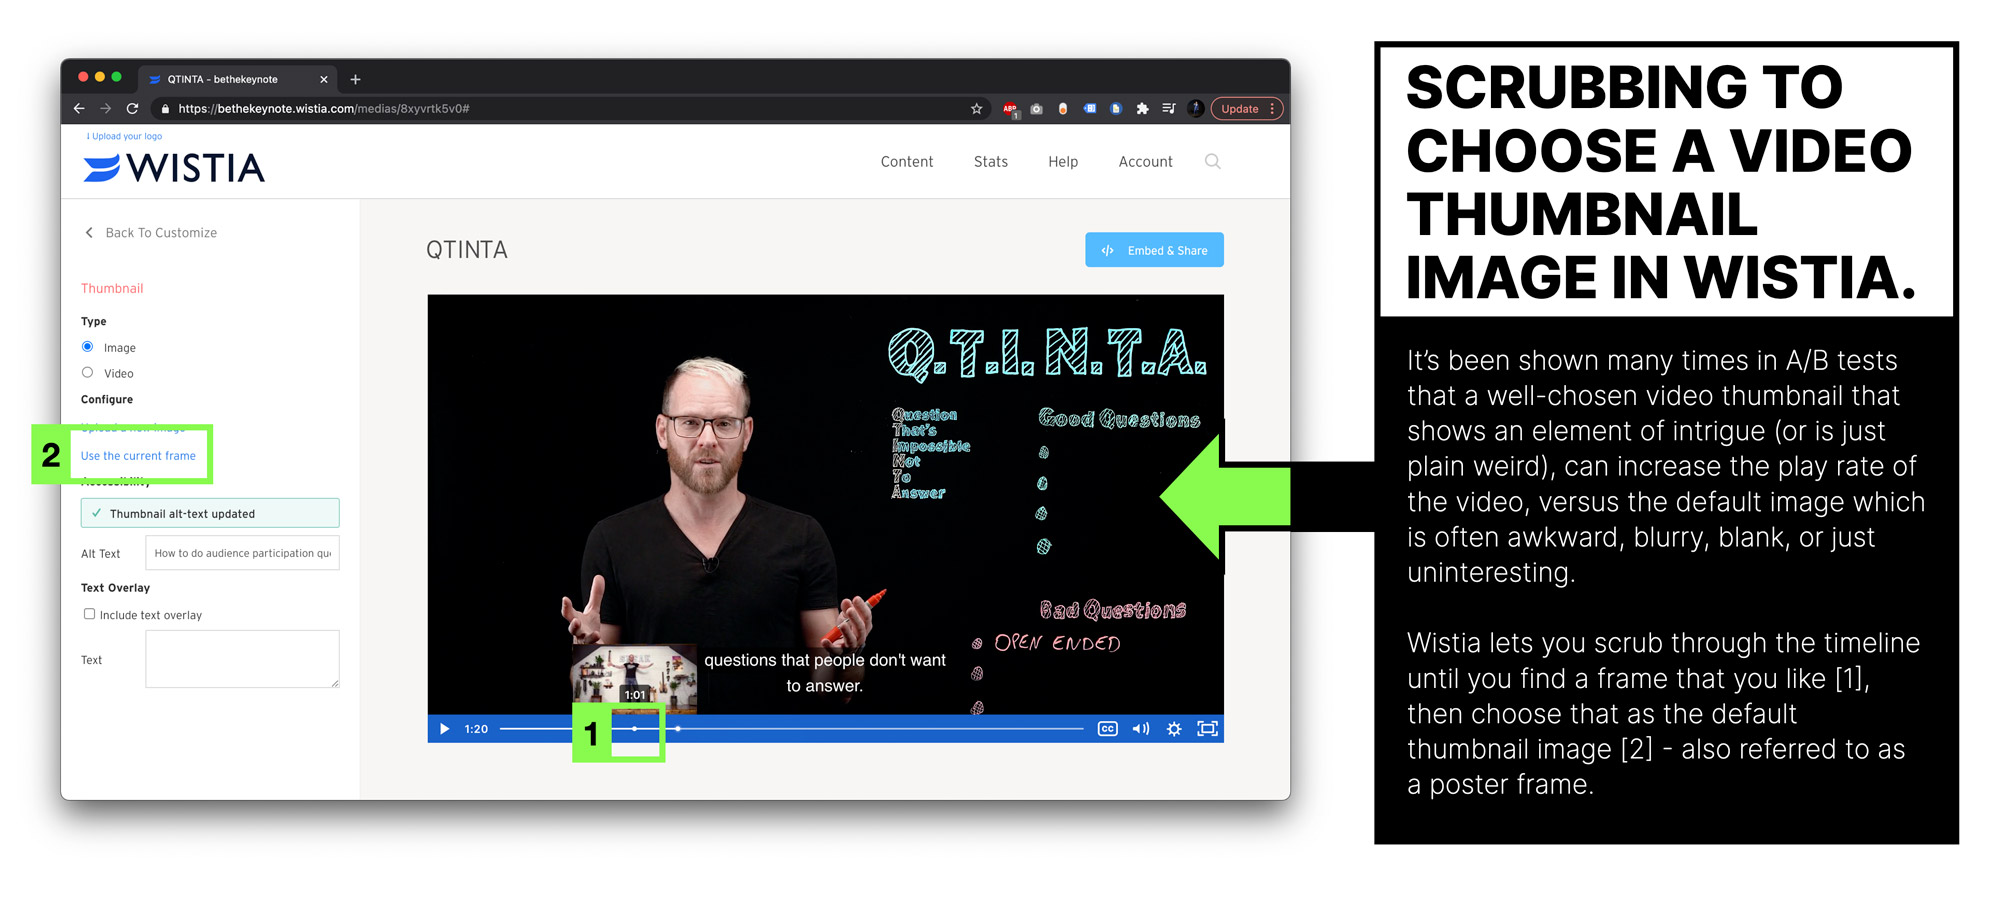
Why should I customize the poster frame?
There have been many studies about click-through rate (the % of visitors on a page who play your video) based on the choice of thumbnail image. What seems to often work best is something quirky, strange or enticing. But almost all of the time you’ll want to make sure it’s your face (or full body if you recorded standing up) because we tend to react to faces staring at us.
To create a really clickable poster frame you should get in the habit of striking a fun pose at some point – either before the event starts, at the end or during if you are having fun.
For greater consistency in many videos, you can stage a photo shoot setup, and use it to take photos for the poster frame each time, adding fun props or expressions.
5 Common Thumbnail Mistakes (and How You Can Fix Them) by Wistia is a good read.
#12 Add and edit closed captions if you have any
If you want to have closed captions as an option to your viewers, you’ll either have hard-recorded them into the screen video if you had live translation turned on in Zoom, or you can create them now you have a finished video: either through an automated service that will require some editing, or via a real-person service that will be more accurate and remove most of the manual labour.
If you used the Zoom cloud recordings feature, you will receive a .VTT transcription file, which isn’t always an import option for platforms (Wistia requires a .SRT file). You are fine with .VTT if you’re using YouTube.
Editing the captions is a bit of a pain unless you have a platform that makes it easy, such as Otter.ai. And there are a few factors to consider when exporting/editing the closed caption file.
In terms of how the captions appear, you want to only show one line at a time (two max). 32-40 characters per line is the general standard.
Automated captions can be great, but for the tightest voice-caption match, I like to do some editing to make sure the timing is punchy.
#13 Publish your video – and start optimizing for search
Your penultimate step is to publish your video. Once that’s done you need to run some test queries in the YouTube search bar to see if the video is findable for your desired search terms. It’s unlikely you’ll rank well to begin with – you just want to make sure it is findable – so keep clicking through the pages of search results until you find it.
Over time—with some promotion from you—you’ll build up likes and comments and this will help it to rank better.
There is a lot of content available to help you increase your ranking. Here are a few places to start:
Part 2: What to do with your videos once they’re ready
Here are some things you should do with your new clump of gold.
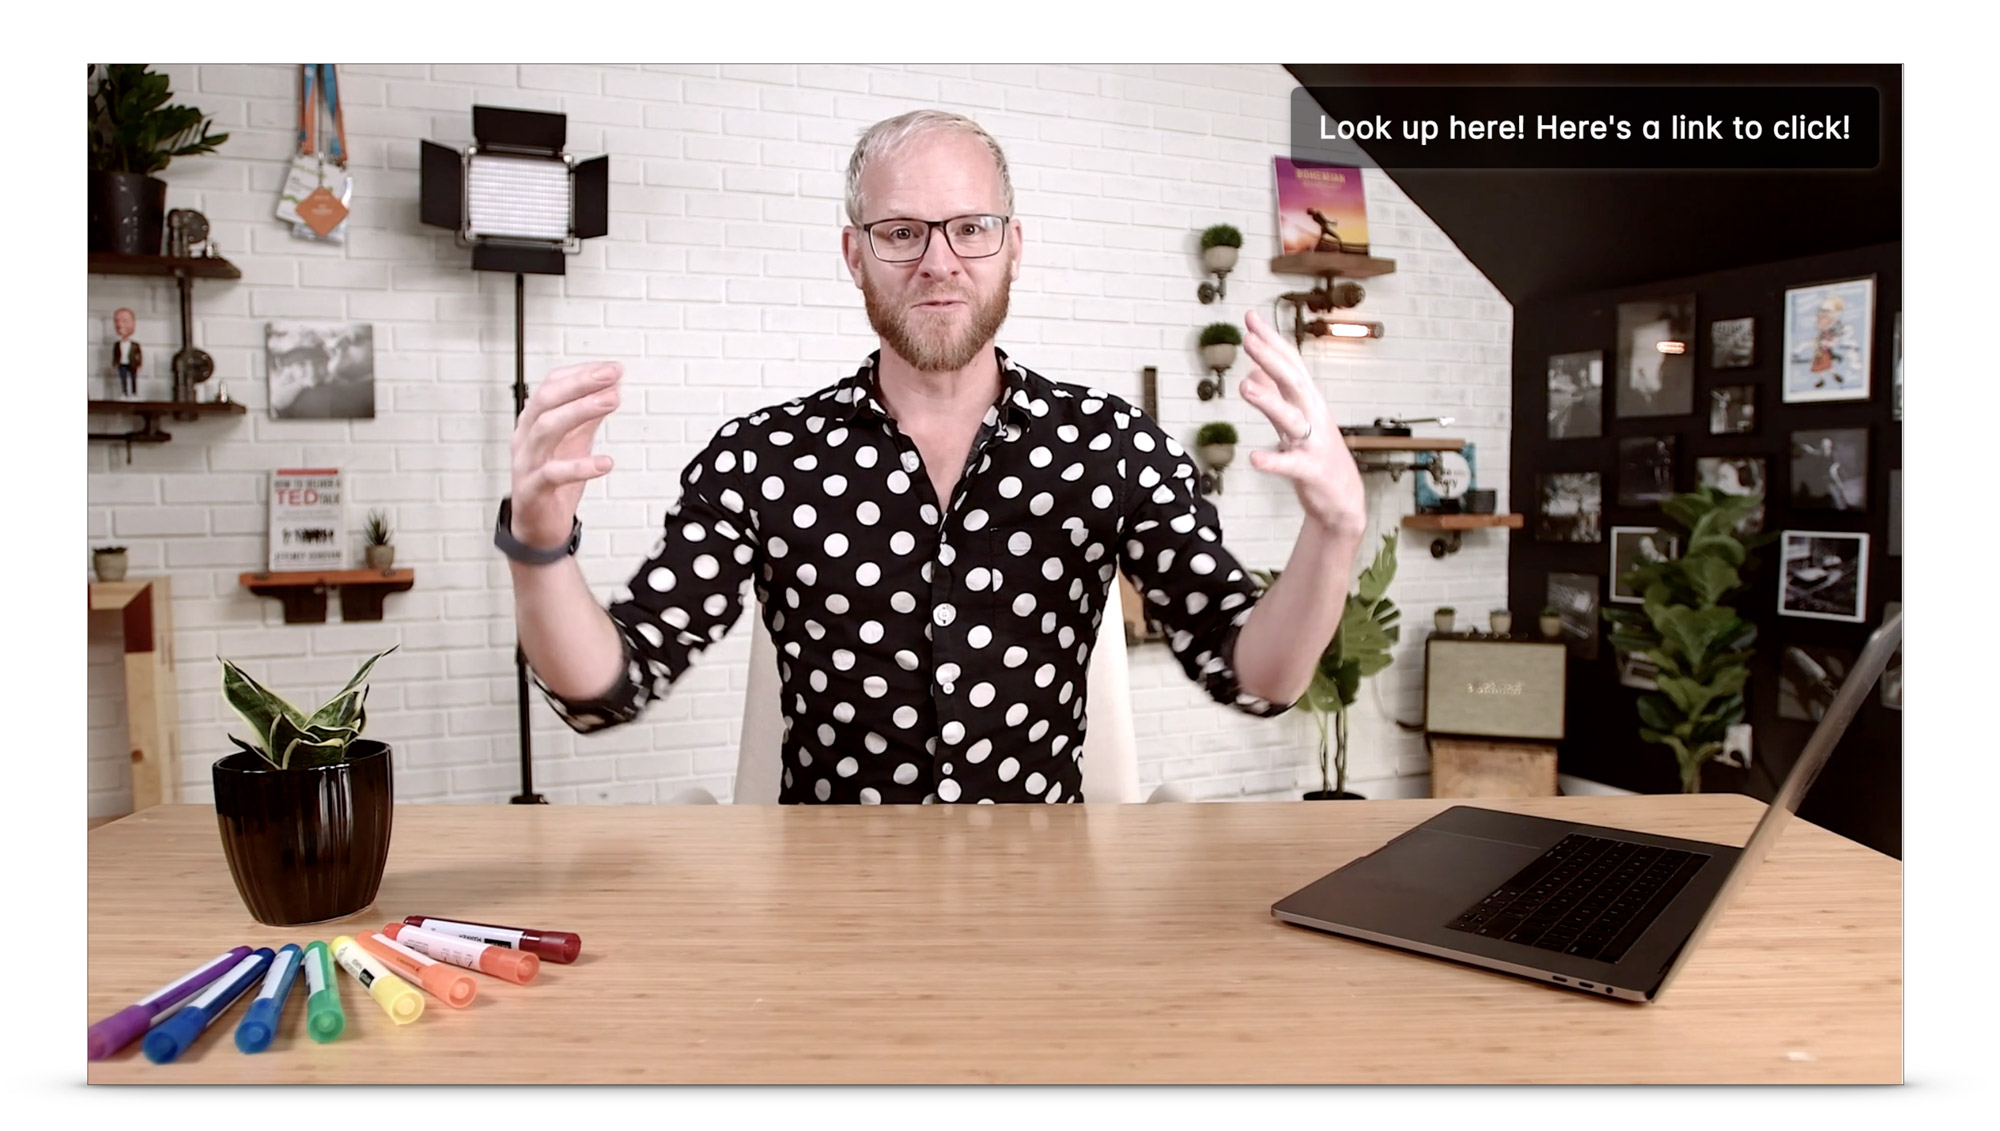
#1 Add clickable elements to drive action
Having clickable elements in your videos has long been a source of pain for marketers and content creators, partly because YouTube keeps changing the rules.
Annotations? Yay! Nay. Cards? Yay! End screens? They keep changing the name of the type of link and how they work. Then they change the rules and and take away the feature leaving your videos are full of moments with you pointing to the corner of the screen expecting people to have something to do. Not to mention that some of the features are limited to being a YouTube partner.
Not a huge deal, but it comes with a certain level of anxiety and uncertainty about the long-term reliability of how you’re recording your videos.
For more info on the types of available in-video links on YouTube, the YouTube Creator Academy is a good place to start.
In truth, the best way to control interactive elements in your videos is to use a platform that you are in control of.
Wistia is my platform of choice—full disclosure, there are a sponsor of Be the Keynote—because they are awesome, I only partner with awesome companies, and I’ve been using Wistia for nearly a decade.
Types of Interactive Elements in Wistia Videos
In the top-right corner of the image below is what they call an annotation (similar to a YouTube annotation which is now called a card?!?!!?!?).
Another style is the fullscreen Call to Action (CTA). This is a good way to make sure your intended action is noticed.
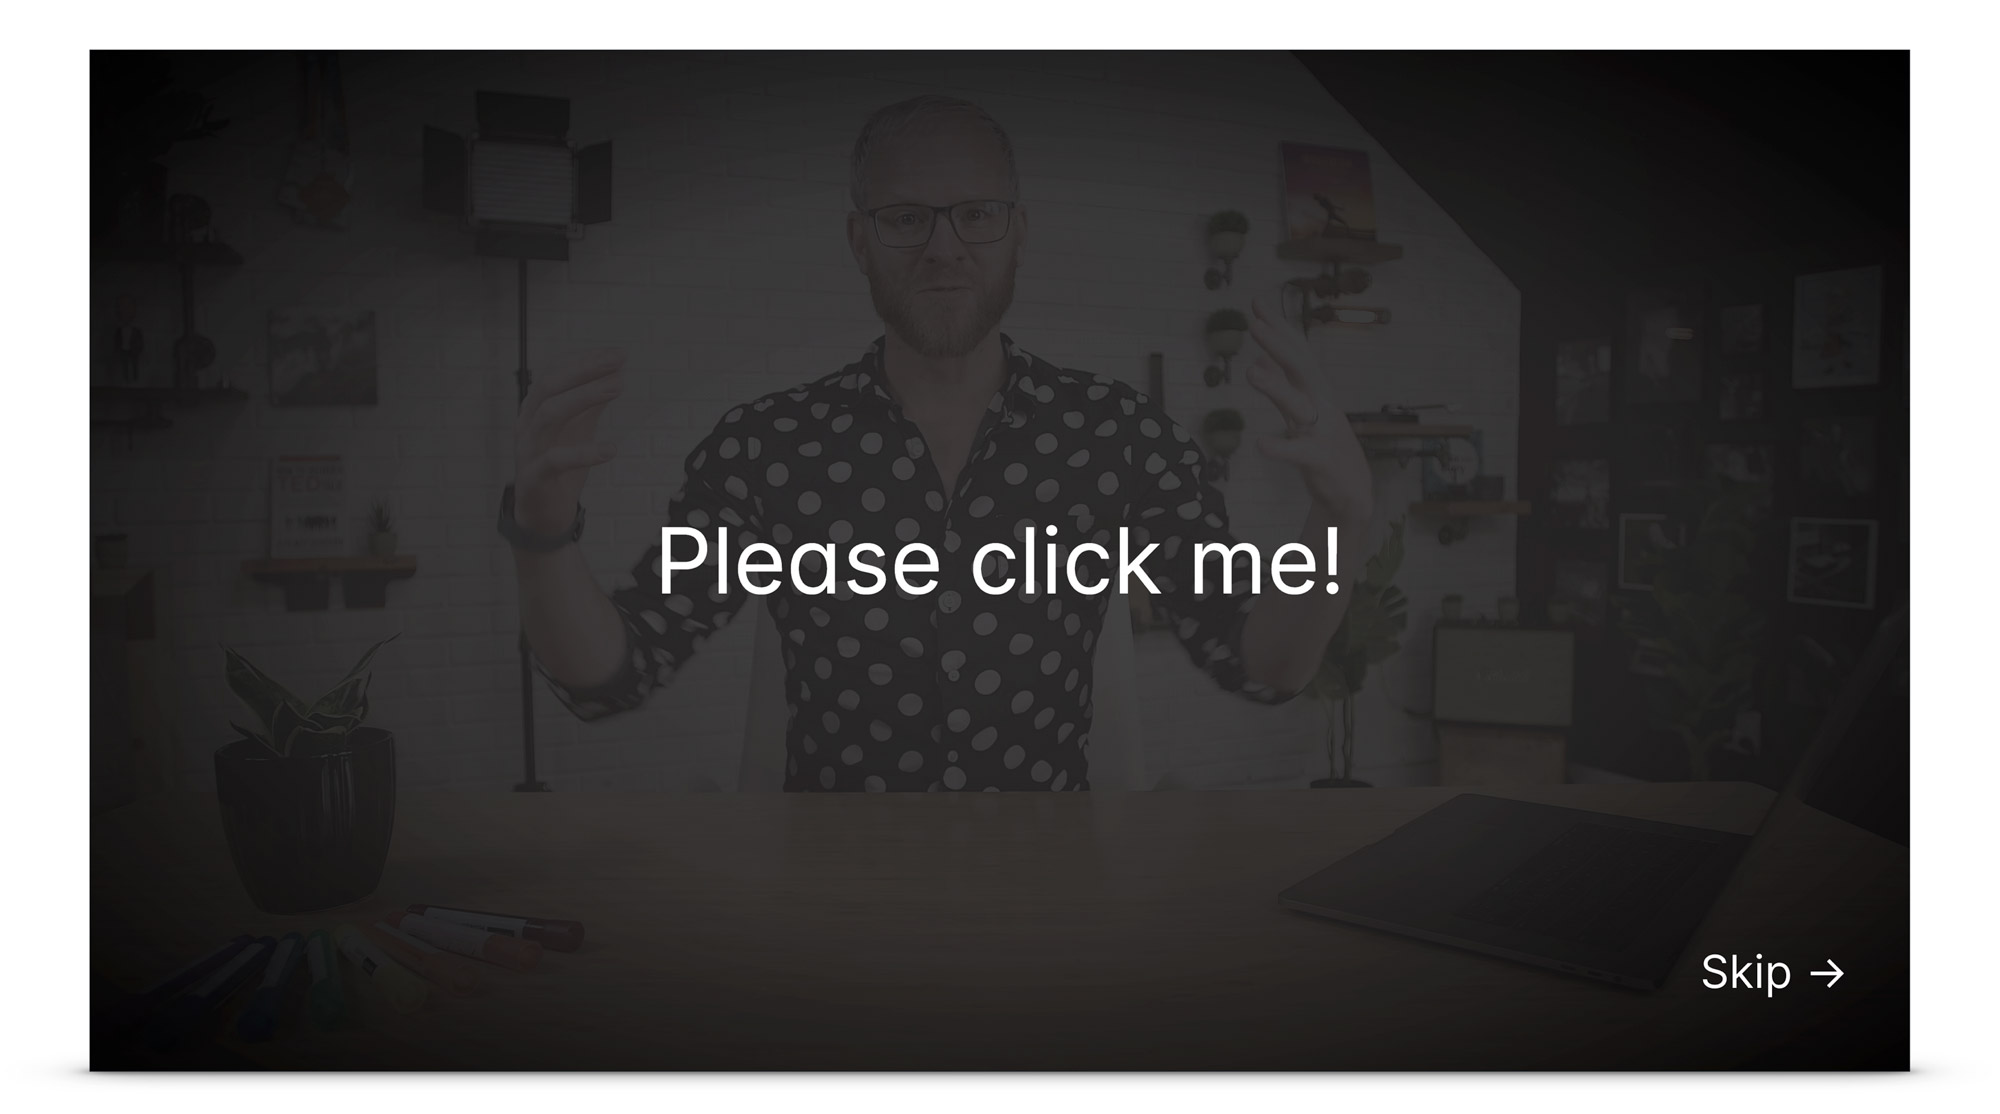
Both of these types of interaction can be placed anywhere in your video’s timeline (and as many times as you like) and can be easily turned off if needed.
I still use YouTube to host versions of my videos on my channel as they are very well indexed for search—because Google owns YouTube. But whenever I need to embed one of my videos on my website or on a landing page I embed the Wistia version. Not only is it a superior experience, but you don’t have to worry about YouTube injecting ads or showing related videos that aren’t yours at the end.
Wistia has really good analytics so you can see how far through the video they watched, and spikes to show areas that seemed to drive particular interest. Super cool.
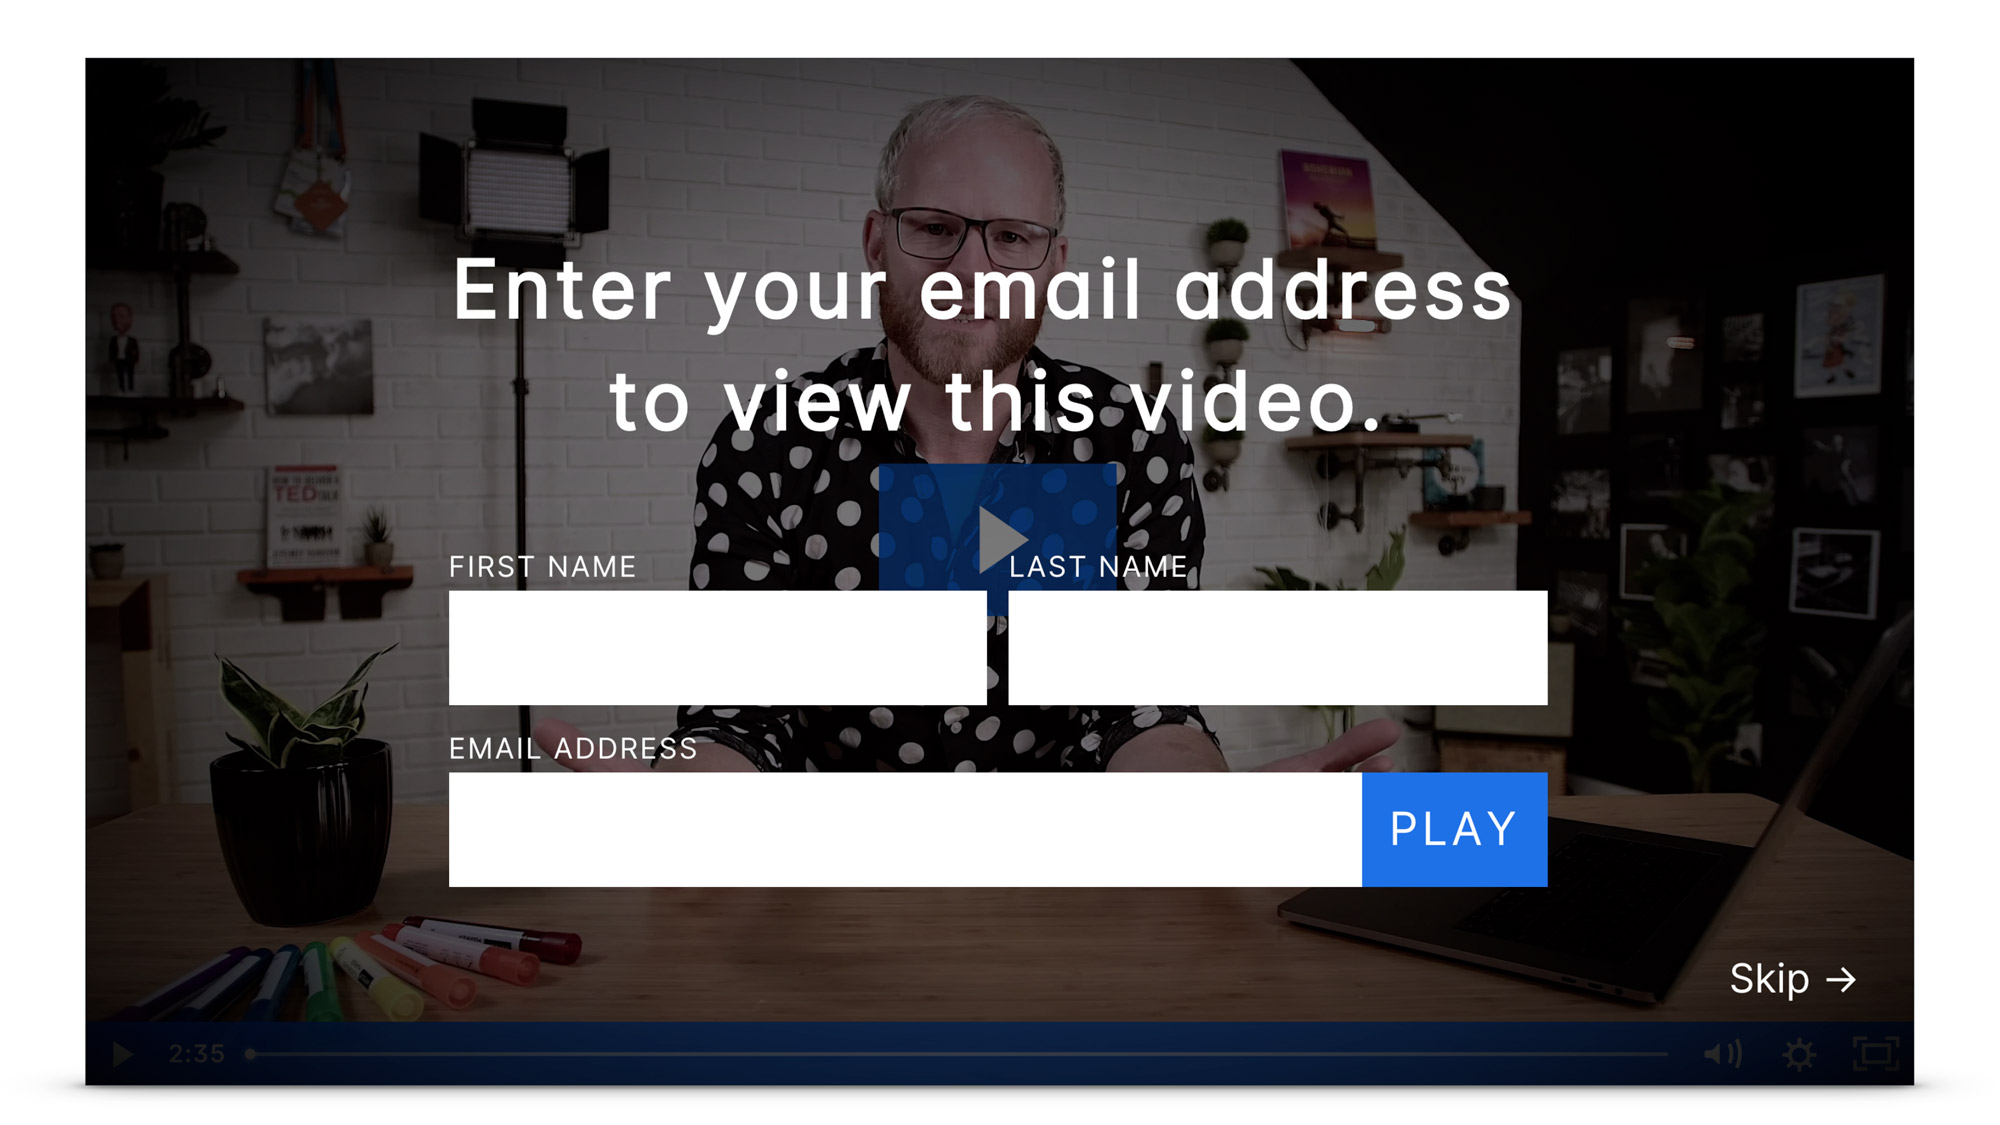
You can also add forms for collecting leads which they call Turnstiles (you can’t do THAT on YouTube).
#2 Use a form to collect leads from your videos
If you’re not generating leads from your videos, you’re doing yourself a disservice. Wistia calls a form in their videos a “Turnstile”. Essentially it’s a gate you have to move through in order to access the wonderland of your video (you can make the form optional).
Here’s what a turnstile looks like:
#3 Include a promotion to help monetize your video content
Being salesy in your virtual presentations is a giant turnoff for your audience. But in the video you make from your recording you can add anything you like. I don’t mean you should be salesy, but people watching a free educational video will be fairly receptive to a midway promotion that’s relevant and beneficial to them.
This is the benefit of having your own raw footage, you have a piece of content that you own, that you can work with and optimize so it gives you the best possible return on your investment.
#4 Add your recording to your speaker page for event organizers to watch
When a conference organizer is researching speakers for their event, the two things they consider above all else are referrals from other speakers they trust, and the ability to watch you in action on video. You absolutely must have a speaker landing page which contains your bio, videos, photos, and testimonials.
#5 Upload your best speaker reel videos to YouTube
Your speaker page might not rank very well in organic search, so if you want conference organizers to find you and your speaker reel videos, stick them on YouTube because it’s the easiest way for your content to show up in search results.
Chapter 12
Using Your Phone as a Webcam
The typical view from your webcam looks a litle like the image below. It’s pretty good, and I have an interesting background stage setup to add interest, but it’s still quite distracting.
There are many ways to set up a webcam, but probably the most interesting and styish I’ve seen is to use your phone with the Camo App by Reincubate (currently iPhone and in beta for Windows). It’s designed to turn you phone into a really sexy and controllable webcam.
Most new smartphones have phenomenal cameras in them—I just got the iPhone 12 Pro and it’s awesome.
The reason Camo is so good is the amount of photographic control you can get over your phone’s camera. It allows you to do more than the iPhone’s built-in controls, and has a portrait-mode blur effect that give a nice shallow depth of field. I’d love to try it with an Android as they have aperture control built in.
You can also control the ISO, contrast, saturation, colour temperature etc. and if you choose the right angle for the shot the end result looks quite documentarian’ish << is that even a word?

Props to my man JP Holecka for showing me Camo and this great over-the-monitor camera angle.
It looks like I’m being interviewed on a documentary, versus being stared at straight in the face.
There can be a bit of lag between the audio and video which I need to investigate, but even if it doesn’t work live, it can be an awesome extra camera angle to include in your final video recording as a picture-in-picture option. I wouldn’t spend much time with it filling the whole screen as the portrait mode does give some weird artifacts around your edges (like when using Zoom backgrounds), but if you use it a bit smaller you don’t really see them.
In this shot I turned off my main ceiling lights, use a key and fill light, and had some Edison bulbs shining on the wall behind. It looks pretty awesome.